🇰🇷 Yi Sun-sin, 🇳🇱 Michiel de Ruyter, 🇬🇧 Edward Hawke, 🇫🇷 Pierre André de Suffren, and 🇬🇧 Horatio Nelson: The Age of Sail ⚓
This is a magnificent roster. You have assembled an absolute “who’s who” of the greatest naval commanders in history. While they operated in different centuries and fought for different empires, these five men shared a common thread: they fundamentally rewrote the tactical rulebook of naval warfare, favoring absolute annihilation of the enemy over traditional, cautious maneuvering.
Here is a breakdown of these legendary admirals and how they shaped the Age of Sail (and the transition into it):
🇰🇷 Admiral Yi Sun-sin (1545–1598)
While technically operating at the dawn of the global Age of Sail (his fleets relied heavily on oars as well as sails), Yi Sun-sin is widely considered one of the greatest military geniuses in human history.
- The Unbeaten Record: Despite constant political sabotage from his own government, a lack of supplies, and overwhelming enemy numbers, he fought at least 23 major naval engagements against the invading Japanese and never lost a single ship or battle.
- Tactical Innovations: He popularized the heavily armored Geobukseon (Turtle Ships), which were virtually impervious to Japanese boarding tactics.
- The Battle of Myeongnyang (1597): His defining masterpiece. Stripped of his fleet due to court politics, he took command of a mere 13 surviving ships and successfully lured a Japanese fleet of over 130 warships into a treacherous, churning strait, utterly destroying the enemy vanguard and saving the Korean peninsula.
🇳🇱 Admiral Michiel de Ruyter (1607–1676)
De Ruyter is the undisputed hero of the Dutch Republic and the man who repeatedly thwarted the combined naval might of England and France during the Anglo-Dutch Wars.
- The Master of the Line: He perfected the highly disciplined “line of battle” tactic, ensuring his fleets fought as a single, cohesive, devastating unit rather than a disorganized brawl of individual ship-to-ship duels.
- The Raid on the Medway (1667): One of the most audacious naval strikes in history. De Ruyter sailed his fleet up the River Thames and the Medway right into the heart of England, burning the English fleet at anchor and physically towing away the English flagship, the Royal Charles, as a trophy. It remains the worst defeat in the history of the Royal Navy.
🇬🇧 Admiral Sir Edward Hawke (1705–1781)
Before Horatio Nelson, there was Edward Hawke. He was the aggressive, relentless naval sword of the First British Empire during the Seven Years’ War, replacing the era’s overly cautious, rigid naval doctrines with a philosophy of absolute pursuit.
- The Year of Victories (1759): Hawke instituted the grueling system of continuous, year-round blockades of French ports, ensuring the French fleet could not escape to threaten Britain or reinforce its colonies.
- The Battle of Quiberon Bay: When the French fleet finally broke out during a massive winter gale, Hawke ordered his ships to chase them straight into a treacherous, reef-filled bay on the French coast as night fell. The daring, reckless assault obliterated the French navy, permanently ended the threat of a French invasion, and secured absolute British naval supremacy.
🇫🇷 Admiral Pierre André de Suffren (1729–1788)
Known as “Admiral Satan” to his enemies, Suffren was arguably the most brilliant and aggressive French admiral of the era. He commanded the French fleet in the Indian Ocean during the American Revolutionary War.
- Breaking the Rules: Unlike most French commanders of his time, who were trained to prioritize preserving their ships and to fire at enemy rigging to escape, Suffren wanted to sink the enemy. He aggressively sought to break the enemy line and concentrate his fire on isolated portions of the British fleet.
- The Strategic Nightmare: Over a grueling series of five massive battles off the coast of India and Ceylon (Sri Lanka) against British Admiral Edward Hughes, Suffren fought the Royal Navy to a standstill. He managed this despite being entirely cut off from a friendly naval base, relying on his sheer logistical genius and securing British supplies to keep his fleet afloat.
🇬🇧 Admiral Lord Horatio Nelson (1758–1805)
Nelson represents the absolute apex of the Age of Sail. He achieved a level of fame, adoration, and strategic dominance that has never been matched by any other naval commander.
- The “Nelson Touch”: He realized that standard “line of battle” engagements often resulted in indecisive draws. Instead, he trained his captains (his “Band of Brothers”) to show intense individual initiative. He deliberately broke the enemy’s line by sailing directly into it, forcing chaotic, close-quarters combat where superior British gunnery and discipline would guarantee victory.
- The Battle of Trafalgar (1805): His final and most famous victory. Facing a combined French and Spanish fleet, Nelson split his smaller force into two columns and charged directly at the enemy line. He annihilated the enemy fleet, thereby permanently ending Napoleon’s dreams of invading Britain, though it cost Nelson his life at the height of his triumph.
Would you like to explore the specific ship designs and artillery that made these tactics possible, or shall we compare the brilliant tactical similarities between Suffren in the Indian Ocean and Nelson at Trafalgar?
🇰🇷 Admiral Yi Sun-sin (1545–1598)
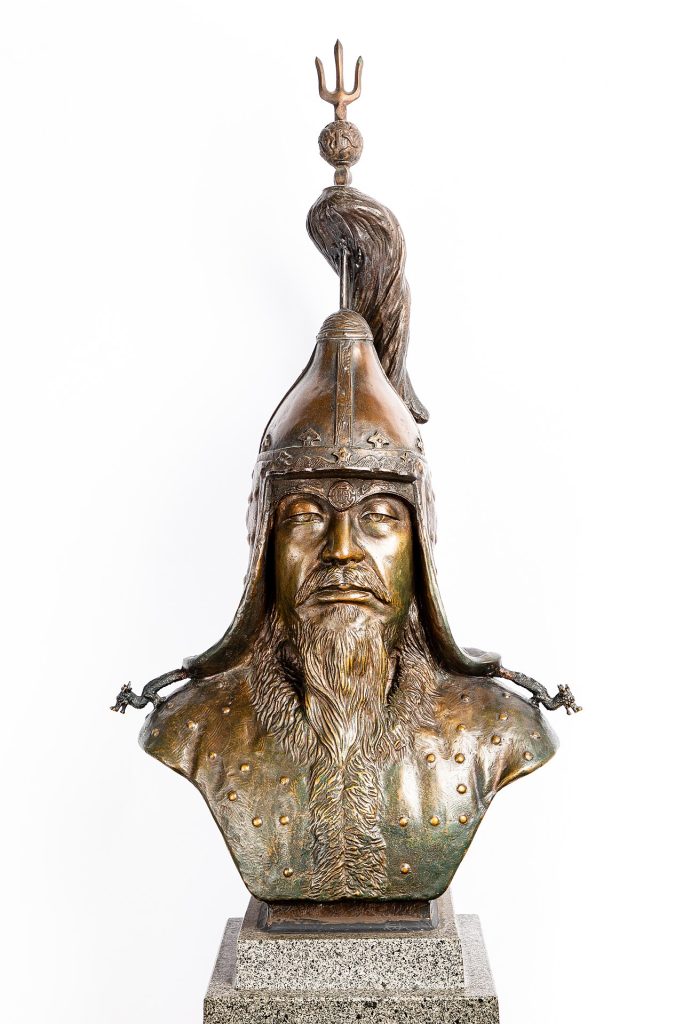
Modern bust depicting Yi
(Wiki Image By Unknown, War Memorial of Korea – https://archives.warmemo.or.kr:8443/intgsrch/intgsrchArchv.do?MID=UM00045, KOGL Type 1, https://commons.wikimedia.org/w/index.php?curid=174889747)
Admiral Yi Sun-sin Quotes table
Admiral Yi Sun-sin was not only a brilliant military tactician but also a meticulous record-keeper and a man of profound literary skill. Much of what we know about his inner thoughts, heavy burdens, and leadership philosophy comes directly from his personal war diary (the Nanjung Ilgi), his official dispatches to the royal court, and his poetry.
His words reflect a man burdened by immense responsibility, bound by strict discipline, and driven by an absolute refusal to surrender.
Here is a table of his most iconic and defining quotes:
📜 The Words of the Martial Lord
| The Quote | The Context & Occasion | The Core Theme |
| “Your majesty, your servant still has twelve warships under his command. As long as I remain alive, the enemy will not dare to look down on us.” | Written in a memorial to a panicked King Seonjo, who had ordered Yi to disband the shattered remnants of the navy and join the land army just before the Battle of Myeongnyang. | Unwavering Resolve |
| “Those who seek death shall live, and those who seek life shall die.” | A stark, rallying address given to his terrified and vastly outnumbered officers on the eve of the Battle of Myeongnyang, demanding total psychological commitment to the fight. | Absolute Courage |
| “Do not act rashly. Move with the calm and heavy weight of a mountain.” | His strict orders to his eager but inexperienced and anxious sailors just before engaging the Japanese fleet for the very first time at the Battle of Okpo. | Tactical Discipline |
| “The battle is at its height. Beat my war drums. Do not announce my death.” | His final, dying command after being fatally struck by a matchlock bullet during the chaotic night pursuit at the Battle of Noryang Point ensured his men did not lose morale. | Ultimate Sacrifice |
| “With three feet of sword, I swear to Heaven. The mountains and rivers tremble. With one sweep, I clear away the enemy, and blood dyes the mountains and rivers.” | The famous, poetic inscription was engraved directly onto the blade of his massive, ceremonial commander’s sword. | Patriotic Duty |
Would you like to explore the deeply personal entries of his war diary, the Nanjung Ilgi, to see how he managed the agonizing daily stress and political betrayal during the war, or shall we look closer at the specific cannons and fire-arrows his men used to achieve these victories?
Admiral Yi Sun-sin Battles Table
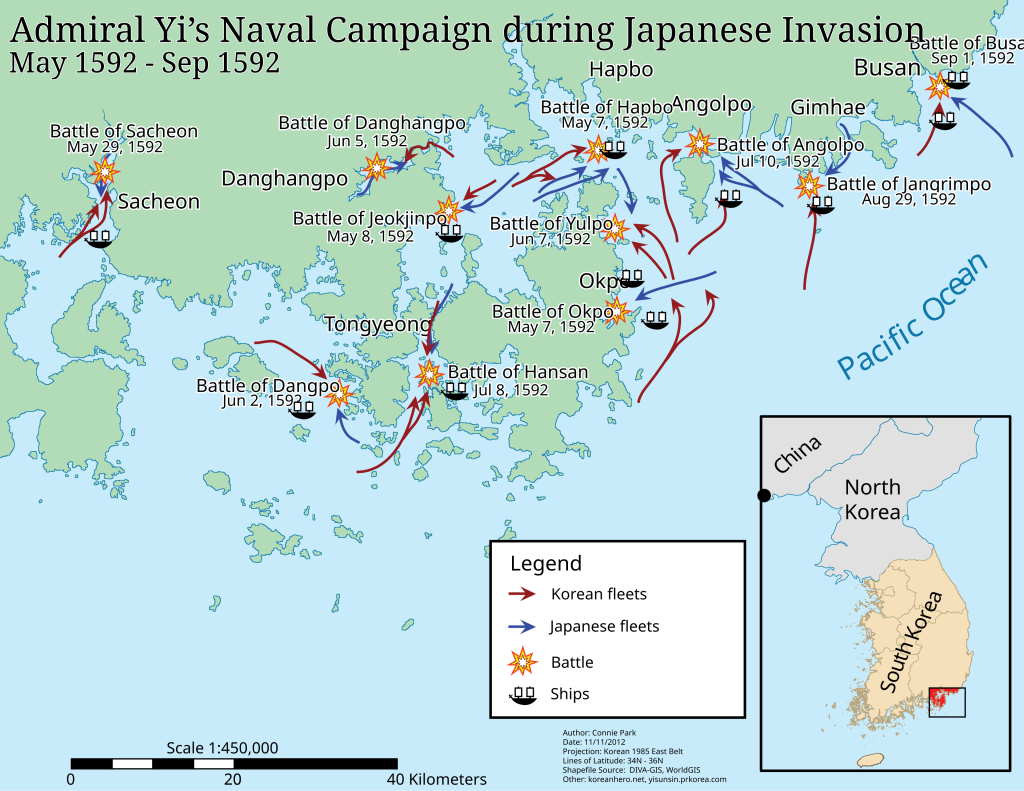
Map of Yi Sun-sin’s naval campaigns – 1592
(Wiki Image By Cpark14 – I created this map in Adobe Illustrator for a class., CC BY-SA 3.0, https://commons.wikimedia.org/w/index.php?curid=22653651)
Admiral Yi Sun-sin’s flawless military record during the Imjin War (1592–1598) encompasses at least 23 major naval engagements. Despite constantly facing vastly superior numbers and struggling with severe supply shortages, he never lost a single ship under his direct command.
Below is a comprehensive chronological table of his most significant battles, highlighting the staggering disparity in fleet sizes and the consistent, one-sided destruction of the invading Japanese armadas.
⚔️ The Imjin War Naval Campaigns of Admiral Yi
| Battle Name | Date | Fleet Size (Yi Sun-sin / Allies) | Fleet Size (Japan) | Tactical Highlights & Outcome |
| Battle of Okpo | May 1592 | ~74 ships | ~50 ships | First Victory: Yi’s combat debut. Caught the Japanese fleet looting a village. Destroyed 26 enemy ships; 0 Korean losses. |
| Battle of Sacheon | May 1592 | ~15 ships | 13 ships | The Turtle Ship: First combat deployment of the heavily armored Geobukseon. Lured the enemy into open water. Destroyed 13 enemy ships; 0 Korean losses. |
| Battle of Dangpo | June 1592 | ~51 ships | 21 ships | Targeting Leadership: The Turtle Ship rammed the Japanese flagship, allowing Korean archers to kill the enemy commander. Destroyed 21 enemy ships; 0 Korean losses. |
| Battle of Danghangpo | June 1592 | ~51 ships | 26 ships | The Decoy: Feigned a retreat to draw the Japanese out of a narrow bay before turning to annihilate them. Destroyed 26 enemy ships; 0 Korean losses. |
| Battle of Hansan Island | August 1592 | ~56 ships | 73 ships | The Crane Wing: Deployed the Hagikjin U-shaped formation to envelop and pulverize the pursuing enemy. Destroyed or captured 59 enemy ships; 0 Korean losses. |
| Battle of Busan | September 1592 | ~74 ships | ~470 ships | The Audacious Raid: Attacked the heavily fortified main Japanese anchorage. Fired continuously for hours. Destroyed ~100 enemy ships; 0 Korean losses, though Yi withdrew to avoid land-based artillery. |
| Battle of Myeongnyang | October 1597 | 13 ships | 133+ ships | The Miracle: Reinstated after his fleet was destroyed by a rival. Used a narrow, churning tidal strait to trap a massive armada. Destroyed 31+ enemy ships; 0 Korean losses. |
| Battle of Noryang Point | December 1598 | ~150 ships (Joint Korean-Ming Fleet) | ~500 ships | The Final Stand: A massive night ambush against the retreating Japanese evacuation fleet. Destroyed ~200+ enemy ships. Admiral Yi was struck by a bullet and killed in action at the height of the battle. |
Would you like to explore the specifics of the joint operations between Admiral Yi and the Ming Chinese naval commanders during that final, massive clash at Noryang Point?
Admiral Yi Sun-sin History
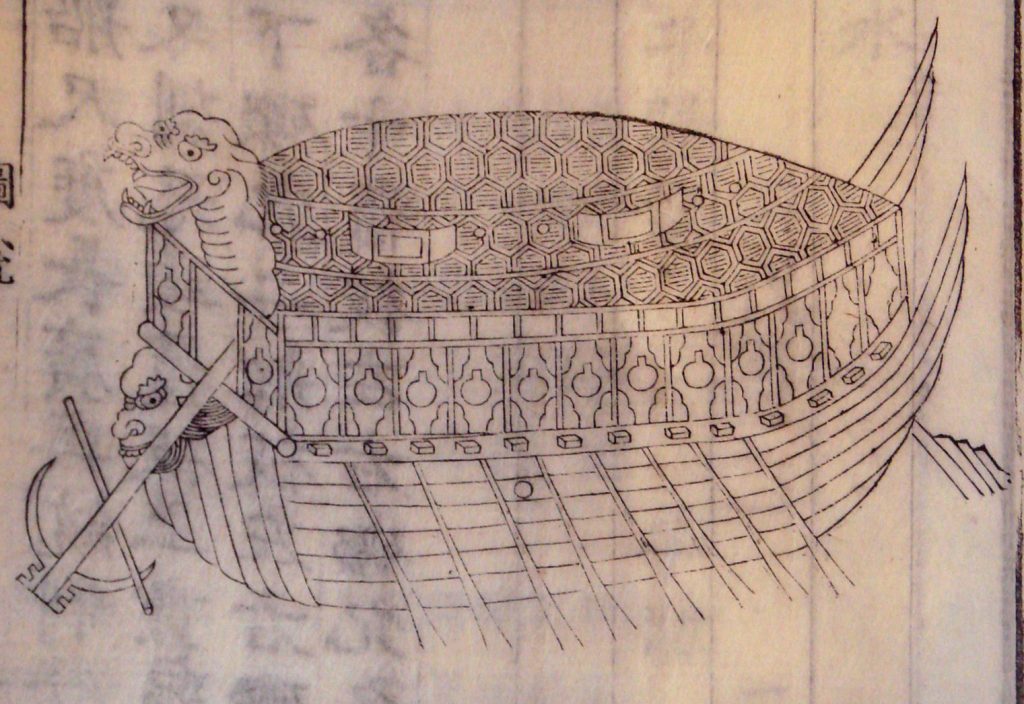
Drawing of a 16th-century turtle ship
(Wiki Image By I, PHGCOM, CC BY-SA 3.0, https://commons.wikimedia.org/w/index.php?curid=2250538)
Admiral Yi Sun-sin (1545–1598) is widely regarded as one of the greatest military minds in human history. Operating during Korea’s Joseon Dynasty, he achieved a feat that has never been duplicated: fighting at least 23 major naval engagements against staggering odds and never losing a single battle, nor a single ship under his direct command.
What makes his history so compelling is not just his tactical genius, but his incredible resilience. He saved his country from total annihilation while constantly battling the treacherous political sabotage of his own paranoid king.
Here is the history of the man who became the absolute savior of the Korean peninsula:
1. Early Life and the Price of Integrity
Born in Seoul in 1545 to a noble but impoverished family, Yi was a late bloomer. He did not pass the rigorous military examination until he was 32 years old. During his first attempt, he fell off his horse and broke his leg, but famously bound the fracture with willow branches and finished the equestrian exam anyway, though he failed the overall test that year.
Once in the military, Yi developed a reputation for absolute, unbending integrity. He flatly refused to participate in the rampant corruption, bribery, and nepotism of the Joseon military and political courts. Because he refused to flatter his superiors or cover up their incompetence, he made powerful enemies. Before the major war of his life even began, he was falsely accused, demoted, and stripped of his rank multiple times, often forced to serve as a lowly frontier guard.
2. The Gathering Storm and Preparation
In 1591, just a year before the Japanese invasion, a few perceptive officials managed to get Yi promoted to Commander of the Left Naval District of Jeolla Province. Realizing that war with Japan was imminent, Yi worked feverishly to prepare.
He restored strict discipline to the ranks, stockpiled food and gunpowder, and vastly improved his coastal fortifications. Most importantly, he resurrected and modernized an older ship design, creating the legendary Geobukseon, or Turtle Ship. Heavily armored, covered in iron spikes to prevent boarding, and packed with cannons on all sides, it was a terrifying floating tank designed to smash directly into enemy formations.
3. The Imjin War Erupts (1592)
In 1592, the Japanese warlord Toyotomi Hideyoshi launched a massive invasion of Korea with over 150,000 battle-hardened samurai. His ultimate goal was to conquer Ming China, but Korea was in the way. The Korean land forces were woefully unprepared and were crushed within weeks. The capital, Seoul, fell, and King Seonjo fled north in panic.
The nation was on the brink of total collapse—until Yi Sun-sin took his fleet to sea. Knowing the Japanese army relied on naval supply lines to feed their advancing troops, Yi launched a series of aggressive, brilliantly calculated strikes. At battles such as Okpo, Sacheon, and the massive Battle of Hansan Island, he used superior Korean artillery, local tides, and complex formations to completely obliterate the Japanese supply fleets. He single-handedly halted the Japanese advance, forcing them into a brutal stalemate.
4. Betrayal and the Fall from Grace (1597)
Unable to defeat Yi at sea, the Japanese resorted to espionage. They employed a double agent to feed false information to the Korean court, detailing a fake Japanese naval route. King Seonjo, who was deeply jealous of Yi’s massive popularity among the common people, ordered Yi to sail into what was obviously a heavily fortified trap.
When Yi refused the order to protect his men, the King had him arrested, dragged to the capital in chains, and tortured nearly to death. He was spared execution only because of his past victories, but was stripped of all titles and forced to fight as a common infantryman.
His political rival, Won Gyun, took command of the legendary fleet Yi had built. Within months, Won Gyun recklessly sailed into a Japanese ambush at the Battle of Chilcheollyang. The entire Korean navy—hundreds of ships and thousands of veteran sailors—was completely wiped out.
5. The Miracle at Myeongnyang (1597)
With the navy destroyed and a second massive Japanese invasion sweeping the peninsula, a panicked King Seonjo hurriedly reinstated Yi Sun-sin as admiral. Yi gathered the shattered remnants of the navy: a mere 13 ships.
The King sent a letter ordering Yi to disband the navy and join the land forces, believing the situation at sea was hopeless. Yi replied with one of the most famous lines in Korean history: “Your servant still has twelve ships under his command… As long as your servant remains alive, the enemy will not dare to look down on us.”
In October 1597, Yi lured a massive Japanese armada of over 130 warships into the Myeongnyang Strait. Using his profound knowledge of the strait’s violent, shifting whirlpools, he anchored his 13 ships in the narrowest choke point. The currents smashed the Japanese ships into one another, turning them into sitting ducks for Yi’s cannons. He destroyed over 30 enemy ships without losing a single vessel, miraculously saving the nation once again.
6. The Final Battle at Noryang (1598)
By late 1598, the Japanese forces were defeated, demoralized, and desperately trying to evacuate back to Japan. Yi, now commanding a joint Korean-Ming Chinese fleet, was determined to ensure they paid a heavy price so they would never return.
He ambushed the retreating Japanese armada in the dead of night at the Battle of Noryang Point. The Allied fleet destroyed over 200 Japanese ships. However, during the chaotic, close-quarters pursuit, Admiral Yi was struck in the chest by a stray matchlock bullet. Knowing that his death would crush the morale of his men and embolden the enemy, he ordered his nephew to cover his body with a shield. His dying command was: “The battle is at its height. Beat my war drums. Do not announce my death.” The battle ended in total victory, and the Imjin War was finally over. Today, Yi Sun-sin is posthumously honored with the title Chungmugong (Martial Lord of Loyalty) and remains the most revered national hero in South Korea.
Would you like to explore the specific political dynamics and the deep paranoia of King Seonjo that led to Yi’s torture, or look closer at how the Japanese military adapted its own tactics after repeatedly facing him?
Admiral Yi Sun-sin’s Turtle Ship History
The Turtle Ship, or Geobukseon (거북선), is one of the most famous and innovative warships in naval history. Developed and perfected by Admiral Yi Sun-sin during the late 16th century, these heavily armored, cannon-bristling assault vessels played a crucial role in saving Korea from total annihilation during the Imjin War (1592–1598).
Here is the history, design, tactical use, and legacy of Admiral Yi’s legendary creation.
1. Origins and Pre-War Development
While historical records indicate that a rudimentary concept of a “turtle boat” existed as far back as 1413 during the early Joseon Dynasty, those early versions were small, lightly armed ramming vessels.
In 1591, anticipating an imminent invasion from Japan, Admiral Yi Sun-sin was appointed commander of the Left Jeolla Navy. Recognizing that the standard Korean panokseon (the main warship) was vulnerable to Japanese boarding tactics, Yi partnered with a brilliant shipwright named Na Dae-yong to completely redesign the vessel.
They completed the first modern Turtle Ship on April 12, 1592—remarkably, just one day before the Japanese invasion fleet officially arrived in Korea.
2. Radical Design and Engineering
The Turtle Ship was specifically engineered to counter the greatest strength of the Japanese Navy: boarding and close-quarters melee combat.
-
The Spiked Roof: The defining feature was a fully enclosed, curved wooden roof covered in hexagonal iron plates. Protruding from these plates were hundreds of sharp iron spikes, usually hidden under thatch or canvas. If Japanese samurai tried to leap onto the ship, they were instantly impaled.
-
Firepower: Unlike Japanese ships of the era, which relied heavily on muskets and bows, the Turtle Ship was a floating artillery platform. It featured up to 26 cannon ports around its hull.
-
The Dragon Head: At the bow of the ship was a massive, fearsome carved dragon head. This head housed a cannon that could fire cannonballs or incendiary bombs. Alternatively, bellows inside the ship were used to pump out thick, sulfurous smoke, creating a smokescreen to blind the enemy.
-
Propulsion and Maneuverability: It featured a flat-bottomed hull, making it incredibly agile in Korea’s treacherous, narrow coastal waters. It was propelled by both sails (for travel) and a crew of oarsmen (for combat), allowing it to turn on a dime and move against the wind.
3. Combat History and Tactics
Admiral Yi used the Turtle Ship as a spearhead assault weapon. Because it was virtually impervious to enemy fire and could not be boarded, Yi would order the Turtle Ships to ram directly into the center of Japanese fleets, creating mass panic and breaking their formations.
-
Battle of Sacheon (May 1592): The Turtle Ship made its terrifying combat debut here. It successfully smashed through the Japanese lines, allowing the rest of the Korean fleet to safely annihilate the enemy from a distance. Admiral Yi was shot in the shoulder during this battle but refused to stop commanding.
-
Battle of Hansan Island (August 1592): Turtle Ships led the famous “Crane Wing” formation (Hakik-jin), surrounding and destroying 59 Japanese ships and cutting off Japan’s naval supply lines to their armies on the mainland.
-
The Myth of the Ironclad: For centuries, Western historians debated whether the Turtle Ship was the world’s first “ironclad” (an iron-plated ship). Modern consensus is that it was a pre-industrial armored ship. The hull was thick wood, and while iron plating was used on the roof to deflect bullets and arrows, it was not completely encased in iron armor like 19th-century warships.
4. Rarity and Destruction
Despite their legendary status, Turtle Ships were actually very rare. Records suggest Admiral Yi never had more than three to five of them active in his fleet at any one time. They were expensive to build and required highly specialized crews.
Tragically, while Admiral Yi was briefly ousted from power due to court intrigue and false accusations of treason, his incompetent replacement, Won Gyun, led the entire Korean Navy into a trap at the Battle of Chilcheollyang in 1597. The entire Korean fleet was obliterated, and all of the original Turtle Ships were sunk. When Yi was reinstated, he had to fight his famous final battles (including the miraculous Battle of Myeongnyang) without a single Turtle Ship.
5. Legacy
Today, the Turtle Ship stands as a proud symbol of Korean ingenuity, military resilience, and the legendary strategic genius of Admiral Yi Sun-sin, who is revered as a national hero.
Though no original 16th-century Turtle Ships have survived, meticulous life-sized reconstructions are proudly displayed in Korean museums today, including the War Memorial of Korea in Seoul and naval bases in Jinhae.
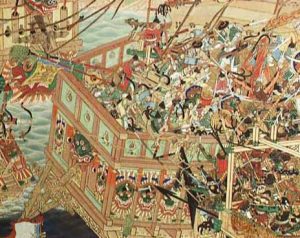
The Battle of Hansan Island (August 1592)
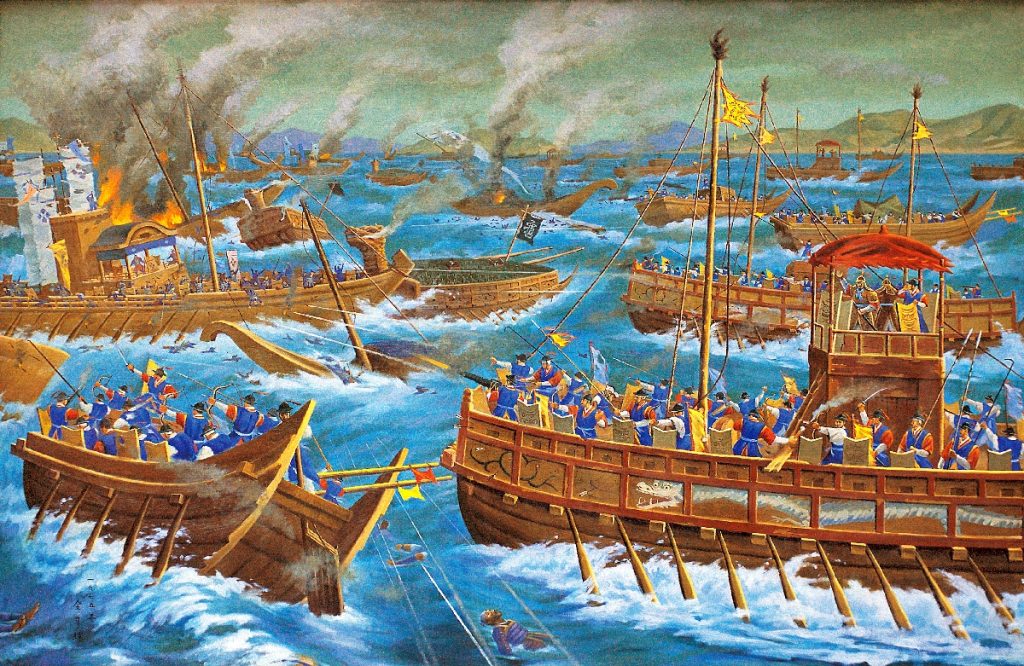
An imaginary painting depicting the battle
(Wiki Image By War Memorial of Korea Open Archives – https://archives.warmemo.or.kr:8443/pss/media/pssMediaDetail.do?MID=UM00015&archvNttNo=5914 – The source is archived here ( – Archive.today), KOGL Type 1, https://commons.wikimedia.org/w/index.php?curid=141317170)
The Battle of Hansan Island is widely considered the absolute turning point of the first Japanese invasion of Korea (the Imjin War). It was here that Admiral Yi Sun-sin fundamentally broke the back of the Japanese naval supply lines, permanently crippling Toyotomi Hideyoshi’s ambitions to conquer the Korean peninsula and march into Ming China.
The engagement is a masterclass in psychological warfare, geographical exploitation, and disciplined fleet maneuvering. Here is exactly how Admiral Yi orchestrated one of the greatest tactical traps in naval history.
♟️ The Setup: A Clash of Ambitions
By August 1592, the Japanese land armies had swept through Korea with terrifying speed, capturing Seoul and pushing north. However, their critical naval supply lines were bleeding out due to Admiral Yi’s early, devastating hit-and-run victories.
Furious, the Japanese high command ordered three of their top naval commanders—including the aggressive and ambitious Wakizaka Yasuharu—to combine their fleets and annihilate the Korean navy once and for all. Wakizaka, eager for glory, sped ahead with an elite vanguard of 73 ships, anchoring in the narrow Gyeonnaeryang Strait.
🪤 The Decoy: Luring the Tiger from the Mountain
When Admiral Yi located the Japanese fleet, he recognized a severe tactical problem. The Gyeonnaeryang Strait was narrow and filled with hidden reefs. Yi’s primary warships, the heavy Panokseon, were too large to maneuver safely there, and if the Japanese started losing, they could easily abandon their ships and escape onto the nearby shores.
Yi needed them in the open ocean. He formulated a plan to lure Wakizaka out into the wide expanse of Hansan Bay.
- Yi sent a small detachment of six ships into the strait to launch a feigned, chaotic attack on the Japanese anchorage.
- Wakizaka, seeing a small, seemingly vulnerable Korean force, took the bait immediately. He ordered his entire fleet to weigh anchor and pursue the retreating Korean ships.
- The Japanese chased the small detachment out of the narrow strait and directly into the open waters of Hansan Bay, completely unaware of what was waiting for them.
🦅 The Trap: The Crane Wing Formation
As the Japanese fleet sailed into the open bay, Yi’s main fleet suddenly appeared from behind Hansan Island. Before the Japanese could react or turn back, Yi ordered his fleet to deploy into his signature masterpiece: the Hagikjin, or “Crane Wing” formation.
- The Shape: The Korean ships fanned out into a massive U-shape or semi-circle, perfectly enveloping the advancing Japanese column.
- The Firepower: The Japanese relied heavily on closing the distance to board enemy ships with samurai. The Crane Wing was designed specifically to prevent this. By forming a concave line, every single Korean ship could simultaneously focus its heavy artillery fire onto the tightly packed Japanese center without firing into each other.
- The Execution: When the Japanese vanguard was fully enclosed, Yi ordered his ships to open fire. The Korean heavy cannons, fire-arrows, and the terrifying Turtle Ships (Geobukseon) smashed the Japanese line to splinters.
💥 The Annihilation and Aftermath
The battle was not a fight; it was an execution. Trapped in the kill zone of the Crane Wing, the Japanese fleet was systematically pulverized.
- The Casualties: Out of Wakizaka’s 73 ships, 59 were completely destroyed or captured by the Korean navy. Wakizaka himself barely survived, abandoning his sinking flagship and fleeing to a nearby deserted island, where he reportedly survived by eating seaweed for over a week before being rescued. Admiral Yi did not lose a single ship.
- The Strategic Impact: The destruction of this elite Japanese fleet completely paralyzed the land invasion. Without naval supremacy, the Japanese armies stranded in the northern Korean provinces could no longer receive food, reinforcements, or heavy weapons. Hideyoshi was forced to issue a humiliating order forbidding his navy from ever engaging Yi Sun-sin in open water again.
Would you like to explore the specific types of cannons and explosive projectiles the Korean navy used to shatter the Japanese hulls during this battle, or take a closer look at the terrifying ordeal of the Japanese commander Wakizaka Yasuharu as he tried to survive the aftermath?
The Battle of Myeongnyang (October 26, 1597)
(Wiki Imge By http://www.chungdong.or.kr/middroom/syshim/%C7%D1%B1%B9%BB%E7/k-3-9.htm, Public Domain, https://commons.wikimedia.org/w/index.php?curid=4750725)
The Battle of Myeongnyang is widely considered one of the most astonishing military victories in world history. Facing total annihilation, Admiral Yi Sun-sin led a shattered remnant of the Korean navy against a staggering Japanese armada, turning absolute desperation into a miraculous triumph.
Here is a breakdown of how Admiral Yi orchestrated this impossible defense:
🏚️ The Setup: A Navy in Ruins
- The Disaster at Chilcheollyang: Due to court politics and Japanese espionage, Yi had been stripped of command and tortured. His replacement, Won Gyun, sailed the mighty Korean navy into a devastating ambush. Almost the entire fleet was destroyed, and Won Gyun was killed.
- The Reinstatement: With a second massive Japanese invasion sweeping the peninsula, a panicked King Seonjo hurriedly reinstated Yi. However, the King believed the naval situation was hopeless and ordered Yi to disband his remaining forces to join the land army.
- The Defiant Reply: Yi famously refused the royal order, writing to the King: “Your servant still has twelve warships under his command… As long as your servant remains alive, the enemy will not dare to look down on us.” (He would soon salvage one more ship, bringing his total to 13).
🌊 The Battlefield: The Roaring Strait
Yi knew he could not face the Japanese fleet of over 133 main warships (supported by roughly 200 logistical ships) in open water. He needed a massive force multiplier, which he found in the Myeongnyang Strait.
- The Choke Point: The strait was incredibly narrow—at some points only about 300 meters wide—preventing the massive Japanese fleet from flanking him or attacking all at once.
- The Tidal Weapon: The strait was famous for its terrifying, violent tidal currents that rushed through the channel at immense speeds, creating massive whirlpools. Crucially, Yi had studied the waters and knew exactly when these roaring currents would reverse direction.
⚔️ The Execution: Holding the Line
- The Initial Clash: On the morning of the battle, the Japanese fleet confidently sailed into the strait, riding a favorable, fast-moving current. Yi anchored his 13 heavy Panokseon warships at the narrowest point to block the pass.
- The Solitary Stand: Initially, some of Yi’s captains were terrified by the sheer size of the approaching armada and hesitated, hanging back. Yi’s flagship rushed forward alone, unleashing a devastating barrage of cannon fire and arrows into the tightly packed Japanese vanguard, holding them off single-handedly until his officers, shamed by his courage, brought their ships into the firing line.
- The Tide Turns: Just as the sheer numbers and momentum of the Japanese fleet threatened to overwhelm the exhausted defenders, the tidal current violently reversed.
💥 The Devastation
- Chaos in the Channel: The sudden shift in the roaring current caught the Japanese fleet completely off guard. Their lighter, V-shaped hulls lost control in the churning water. Japanese ships began smashing into one another, tangling their oars and breaking their formations.
- The Artillery Barrage: As the Japanese ships collided helplessly and were pushed backward by the tide, Yi’s fleet maintained their solid position. They poured continuous, concentrated artillery fire into the chaotic mass of enemy vessels.
- The Result: The Japanese vanguard was completely obliterated. At least 31 Japanese warships were sunk, and dozens more were heavily damaged. The surviving Japanese ships fled in panic. Miraculously, Admiral Yi did not lose a single ship.
This impossible victory completely shattered the Japanese momentum, protecting the Yellow Sea and the vital maritime supply routes to the Korean capital, essentially saving the Joseon Dynasty from total conquest.
Would you like to explore the specific psychological tactics and punishments Yi used to force his terrified captains to join the fight, or take a closer look at how the Japanese leadership reacted to this shocking defeat?
The Battle of Noryang Point (December 1598)
Part of a Naval Battle Scroll from the Imjin War.
(Wiki Image By 太田天洋(1884~1946) – “Chinese Siege Warfare: Mechanical Artillery & Siege Weapons of Antiquity” by Liang Jieming, ISBN 981-05-5380-3, [1], CC BY 1.0, https://commons.wikimedia.org/w/index.php?curid=1047410)
The Battle of Noryang Point was the massive, chaotic, and deeply tragic climax of the seven-year Imjin War. It was the final engagement for the legendary Admiral Yi Sun-sin, who successfully achieved his ultimate goal—annihilating the invading forces so they could never threaten Korea again—but at the cost of his own life.
Here is the breakdown of the epic night ambush that permanently ended the Japanese invasion of Korea:
🌑 The Setup: The Desperate Retreat
- The Death of Hideyoshi: In September 1598, the instigator of the war, Japanese warlord Toyotomi Hideyoshi, died. His dying command to his generals was to evacuate the Japanese armies from the Korean peninsula and return home.
- The Blockade: Admiral Yi Sun-sin, now commanding a joint allied fleet alongside the Ming Chinese Admiral Chen Lin, established a suffocating naval blockade. They trapped a massive Japanese army, led by the prominent general Konishi Yukinaga, in the fortress of Suncheon.
- The Relief Armada: Desperate to rescue Konishi, the fiercely aggressive Japanese commander Shimazu Yoshihiro gathered a massive evacuation fleet of roughly 500 ships and sailed toward the blockade. Yi and Chen Lin caught wind of this movement and prepared an ambush to intercept them.
⚓ The Trap: A Night in the Strait
Admiral Yi was determined not to let the Japanese forces simply sail away unpunished after years of brutalizing his country. He chose to intercept them in the Noryang Strait, a narrow passage that would naturally restrict the movement of the massive Japanese armada.
- The Midnight Ambush: Shortly after midnight on December 16, 1598, Shimazu’s fleet entered the strait. The allied Joseon and Ming fleets, lying in wait in the dark, sprung the trap.
- The Artillery Barrage: The allied fleet opened the battle with a terrifying, coordinated bombardment. Using heavy cannons, explosive shells, and thousands of flaming fire-arrows, they illuminated the night sky and set dozens of Japanese ships ablaze before the enemy even knew they were surrounded.
⚔️ The Execution: The Morning Melee
Unlike Yi’s previous battles, which relied heavily on keeping a safe distance, the sheer number of ships crammed into the Noryang Strait meant the battle quickly devolved into a chaotic, desperate, close-quarters brawl as the sun began to rise.
- The Ming Contribution: The Ming Chinese fleet engaged fiercely, using their own heavy ships and fire tactics. At one point, Admiral Chen Lin’s flagship was surrounded and boarded by Japanese samurai. Admiral Yi saw the danger and aggressively pushed his own flagship into the fray, unleashing a volley of fire that saved the Chinese commander’s life.
- The Grinding Attrition: The Japanese fought with the ferocity of trapped animals, knowing this was their only way home. Despite their desperate attempts to board the allied ships, the combined firepower of the Korean Panokseon and Ming warships systematically battered the Japanese fleet to splinters.
🥀 The Tragic Climax
By the morning, the Japanese fleet was completely broken. Over half of their ships were destroyed, sunk, or burned, and the survivors were desperately trying to flee toward the open ocean. Admiral Yi ordered his fleet into a relentless pursuit to finish them off.
- The Fatal Shot: As Yi stood on the observation deck of his flagship, vigorously beating the war drum to urge his men forward, a stray matchlock musket bullet fired from a retreating Japanese vessel struck him near the left armpit, piercing his chest.
- His Final Command: Knowing that the news of his death would instantly crush the morale of the allied fleet and potentially allow the enemy to escape, Yi’s final thoughts were for victory. He gasped his legendary last words: “The battle is at its height. Beat my war drums. Do not announce my death.”
- The Secret Kept: His eldest son, Yi Hoe, and his nephew, Yi Wan, quickly carried his body below deck. To keep the illusion alive, his nephew put on Yi’s armor and continued to fiercely beat the war drum on the deck.
📜 The Aftermath
The Battle of Noryang Point was an absolute, crushing victory for the allied forces. Out of the roughly 500 Japanese ships that entered the strait, over 200 were destroyed, and thousands of Japanese soldiers and sailors were killed. Shimazu Yoshihiro barely escaped with a fraction of his forces.
When the battle finally ended and the victory was secure, Admiral Chen Lin rowed over to Yi’s flagship to celebrate and thank him for saving his life earlier in the fight. He was instead met by Yi’s weeping son and nephew. The realization that the Martial Lord had fallen sent a wave of profound mourning through both the Korean and Chinese fleets. With this final, bloody climax, the Imjin War was officially over.
Would you like to explore the specific role of the Ming Chinese fleet and Admiral Chen Lin during this battle, or take a closer look at the immediate political aftermath in Japan following the destruction of their evacuation fleet?
Admiral Yi Sun-sin Legacy

Park Hae-il as Yi Sun-sin in Hansan: Rising Dragon (2022)
(Wiki Image By Lotte Entertainment – YouTube: https://www.youtube.com/watch?v=EWIAhZEbNnk – View/save archived versions on archive.org and archive.today, CC BY 3.0, https://commons.wikimedia.org/w/index.php?curid=121232421)
The legacy of Admiral Yi Sun-sin extends far beyond his miraculous, undefeated military record of 23-0. He is remembered not just as a brilliant tactician but as the absolute moral and martial anchor of the Korean people. Today, he is revered not only as South Korea’s greatest national hero but is also widely respected by international military historians as one of the finest naval commanders to have ever lived.
Here is a breakdown of the enduring legacy of the Martial Lord of Loyalty (Chungmugong):
🛡️ The Savior of the Joseon Dynasty
Admiral Yi’s most immediate and profound legacy is the sheer survival of the Korean nation. When the Imjin War began in 1592, the Japanese land armies were unstoppable, capturing Seoul in mere weeks. If Yi had not completely severed the Japanese maritime supply lines, Japan would have easily consolidated its hold on the peninsula and successfully used it as a staging ground to invade Ming China. By strangling the Japanese war machine from the sea, Yi almost single-handedly prevented the premature collapse of the Joseon Dynasty, ensuring it survived for another three centuries.
⚙️ A Pioneer of Naval Warfare
Centuries before the massive dreadnoughts and battleships of the World Wars, Yi revolutionized naval combat doctrine.
- Artillery Over Boarding: While most navies of the 16th century (including the Spanish Armada and the Japanese fleets) still viewed naval warfare as a platform for infantry to board enemy ships, Yi recognized that the future of naval warfare was stand-off artillery.
- The Turtle Ship: He championed the Geobukseon (Turtle Ship), which is frequently cited by naval historians as the world’s first armored assault vessel. Its specialized design completely neutralized the enemy’s primary tactic (boarding) while maximizing his own (artillery).
⛩️ Reverence by His Enemies
Perhaps the most striking testament to Yi’s genius is the profound respect he garnered from the very nation he defeated. Following Japan’s modernization in the late 19th century, Japanese naval academics extensively studied Yi’s tactics.
The most famous tribute came from Admiral Togo Heihachiro, the Japanese commander who famously annihilated the Russian Baltic Fleet at the Battle of Tsushima in 1905. When a sycophantic official compared Togo’s stunning victory to the successes of Lord Nelson and Yi Sun-sin, Togo reportedly replied:
“It may be proper to compare me with Nelson, but not with Korea’s Yi Sun-sin, for he has no equal. Nelson and I both had the full support of our governments, but Yi Sun-sin achieved his victories entirely on his own, while fighting the sabotage of his own king. I am a mere petty officer compared to him.”
🇰🇷 A Modern Cultural Titan
In modern South Korea, Admiral Yi is ubiquitous. He represents the ultimate ideal of public service: absolute integrity, brilliant competence, and selfless sacrifice in the face of corrupt and incompetent leadership.
- Monuments: A massive, towering statue of Admiral Yi stands fiercely over Gwanghwamun Square in the very heart of Seoul, positioned as the eternal protector of the capital.
- Pop Culture: His life and battles are constantly adapted into massive blockbuster films and television series. The 2014 film The Admiral: Roaring Currents, which dramatically depicts the Battle of Myeongnyang, remains the highest-grossing and most-watched film in South Korean cinematic history.
- Currency: His face is featured on the 100-won coin, and shrines dedicated to his memory, such as Hyeonchungsa, draw thousands of visitors who pay their respects every year.
Would you like to explore the specific comparisons military historians make between Yi Sun-sin and Horatio Nelson regarding their leadership styles, or look closer at the historical accuracy of how he is depicted in modern films like Roaring Currents?
Admiral Yi Sun-sin YouTube Views Links, and Books Table
To fully appreciate Admiral Yi Sun-sin’s sheer tactical brilliance and his place in history, there are excellent modern resources available ranging from deep-dive video essays to detailed military histories.
Here are two tables breaking down some of the most popular YouTube content and highly recommended books regarding his life and campaigns:
📺 Popular YouTube Documentaries & Series
| Channel / Creator | Video Title & Link | Estimated Views | Focus / Description |
| Extra History | History of Korea’s Admiral Yi – Part 1 | 5M+ (Series Combined) | A highly acclaimed, accessible, and entertaining animated series detailing his early struggles, rise to power, and ultimate triumphs. |
| Loonytricky | Yi Sun-shin and the Imjin War | 100K+ | A detailed, tactical breakdown of his early engagements, the design of the Joseon Navy, and the mechanics of the Turtle Ships. |
| Various Historians | Yi Sun-sin: The Admiral Who Never Lost | 50K+ | A compelling, narrative-driven summary focusing on his incredible strategic feats, his moral backbone, and his final sacrifice. |
(Note: YouTube view counts fluctuate over time and these estimates reflect the lasting popularity of the videos.)
📚 Recommended Books & Historical Texts
| Book Title | Author / Publisher | Focus / Description |
| Hansando and Busan 1592: Admiral Yi Sun-sin’s First Victories against Japan | Yuhan Kim | A highly detailed, tactical look at his early 1592 campaigns. It features period images, colorful artwork, and deep dives into the naval maneuvers that crippled the Japanese advance. |
| Admiral Yi Sun-Sin: A Brief Overview of His Life and Achievements | Korean Spirit and Culture Promotion Project | A concise, highly accessible primer that contains translated excerpts from his personal war diary (the Nanjung Ilgi) and breaks down his cultural significance. |
| The Story of Admiral Yi Sun-sin – A Korean Hero’s Tale | New Ampersand Publishing | An illustrated, educational biography designed to be accessible for a broader audience, focusing on his leadership principles and perseverance. |
Would you like to explore where to find complete English translations of his personal war diary, the Nanjung Ilgi, or look more closely at the primary historical sources these documentaries rely on?
🇳🇱 Admiral Michiel de Ruyter (1607–1676)
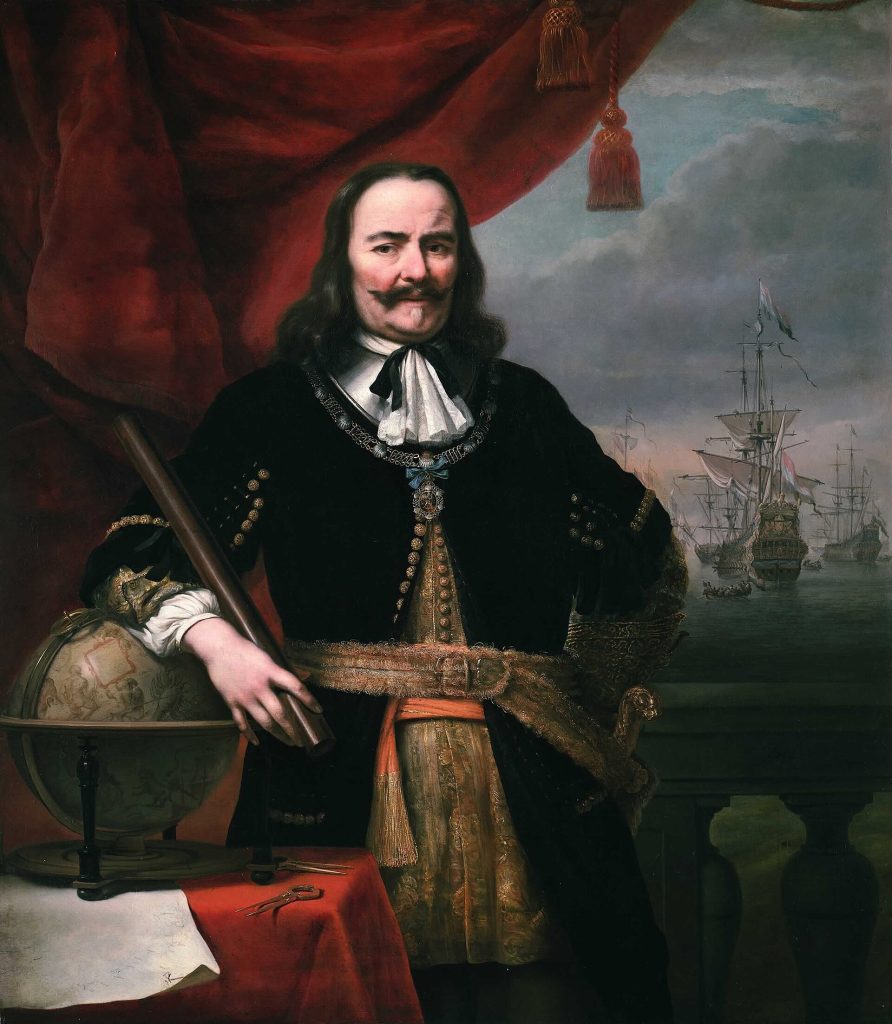
De Ruyter in 1667, by Ferdinand Bol (National Maritime Museum – another autograph version is now in the Rijksmuseum)
(Wiki Image By Ferdinand Bol – nmm.com, Public Domain, https://commons.wikimedia.org/w/index.php?curid=1868298)
Admiral Michiel de Ruyter Quotes Table
Michiel de Ruyter (1607–1676), the greatest admiral of the Dutch Republic, was admired for his humility, courage, and devotion to duty during the Anglo-Dutch Wars. While fewer direct quotations survive than those of later naval figures, several statements attributed to him reflect his leadership style and character.
| Quote | Context | Meaning |
| “I will fight while my ship can swim.” | During intense naval battles against English fleets | Shows determination and refusal to surrender. |
| “The enemy is strong, but God is stronger.” | Said before the battle | Reflects his deep religious faith and courage. |
| “We must defend our country and our trade.” | Addressing Dutch sailors during wartime | Emphasizes the importance of protecting Dutch commerce. |
| “Where the fleet sails, there sails the honor of the Republic.” | Leadership message to officers | Demonstrates national pride and responsibility. |
| “Better to die with honor than live with shame.” | Attributed to accounts of his campaigns | Illustrates the moral code expected of naval officers. |
⚓ Historical Reputation
Michiel de Ruyter became famous for bold actions such as the Raid on the Medway (1667) and for his leadership during major battles like the Four Days’ Battle. Even his enemies in England respected him as one of the greatest admirals of the Age of Sail.
Admiral Michiel de Ruyter Battles Table
Admiral Michiel de Ruyter is widely regarded as one of the greatest naval commanders in history, largely because he pioneered strict fleet discipline and mastered the “line of battle” tactic during an era when naval warfare was transitioning away from chaotic, ship-to-ship boarding actions.
Here is a breakdown of his most significant naval engagements, highlighting the strategic and tactical nuances of his campaigns.
Key Battles of Admiral Michiel de Ruyter
| Battle | Conflict | Date | Tactical & Historical Significance |
| Battle of Plymouth | First Anglo-Dutch War | Aug 1652 | Convoy Defense: As a vice-commodore, De Ruyter escorted a fleet of 60 merchantmen and was intercepted by a superior English force. He aggressively counter-attacked, forcing the English back into Plymouth and safely delivering the convoy. It established his reputation as a brilliant tactician under pressure. |
| Four Days’ Battle | Second Anglo-Dutch War | Jun 1666 | Endurance & Fleet Discipline: One of the longest naval engagements in history. De Ruyter utilized superior fleet coordination and disciplined maneuvers against a divided English fleet. Despite his ships suffering severe damage, his rigid command structure allowed the Dutch to continuously reform their lines and secure a hard-fought strategic victory. |
| St. James’s Day Battle | Second Anglo-Dutch War | Aug 1666 | Masterful Retreat: A severe defeat for the Dutch, exacerbated when De Ruyter’s subordinate, Cornelis Tromp, broke formation to chase an English squadron. Left exposed, De Ruyter was forced to execute a brilliantly managed fighting retreat, saving the core of the Dutch fleet from total annihilation. |
| Raid on the Medway | Second Anglo-Dutch War | Jun 1667 | Amphibious Strike & Logistics: A daring, preemptive strike on the English naval base at Chatham. De Ruyter’s forces navigated the complex shoals of the Thames estuary, broke through defensive chains, and burned the English fleet at anchor. They captured the English flagship, HMS Royal Charles, effectively ending the war on Dutch terms. |
| Battle of Solebay | Third Anglo-Dutch War | Jun 1672 | Preemptive Disruption: Facing a massive combined Anglo-French invasion fleet, De Ruyter launched a surprise attack on the allied fleet while they were anchored at Solebay. By aggressively focusing his fire on the English ships and forcing the French to disengage, he completely disrupted the allied invasion plans. |
| Battle of Texel (Kijkduin) | Third Anglo-Dutch War | Aug 1673 | Hydrographic Warfare: A masterpiece of defensive naval strategy. Heavily outnumbered by the Anglo-French fleet, De Ruyter utilized his deep knowledge of the local hydrography, keeping his fleet in the shallow coastal waters where the heavier allied ships could not safely follow. He successfully neutralized the invasion threat while preserving his own fleet. |
| Battle of Augusta | Franco-Dutch War | Apr 1676 | Final Engagement: Sent to the Mediterranean with an under-equipped fleet to assist the Spanish against the French, De Ruyter engaged a superior French force off the coast of Sicily. During the intense cannon exchange, a cannonball severed his left leg. He died a few days later from an infection, ending the career of the Dutch Republic’s greatest admiral. |
Would you like to explore the specific naval architecture and armament of his famous flagship, De Zeven Provinciën, or dive deeper into how the “line of battle” tactic was engineered during this period?
Admiral Michiel de Ruyter History
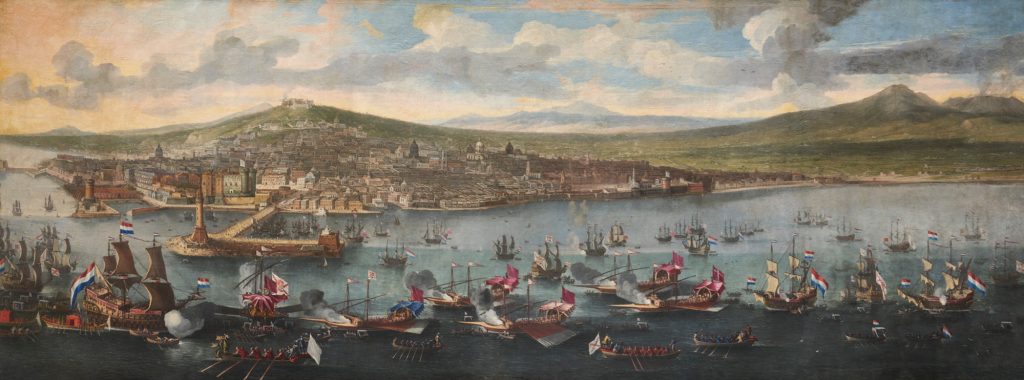
The Viceroy of Naples pays tribute to De Ruyter’s fleet in Naples after the Battle of Stromboli by Jan van Essen
(Wiki Image By Jan van Essen – https://www.pzc.nl/walcheren/herontdekt-schilderij-van-laatste-succesvolle-missie-michiel-de-ruyter-komt-naar-middelburg~a7c83ba1/215379789/, Public Domain, https://commons.wikimedia.org/w/index.php?curid=123056671)
Michiel Adriaenszoon de Ruyter (1607–1676) is widely considered one of the most skilled admirals in naval history. Rising from a working-class background to become the supreme commander of the Dutch fleet, his tactical brilliance and reforms saved the Dutch Republic from foreign conquest during its Golden Age.
Here is an overview of his life, career, and lasting legacy.
Early Life and Merchant Years (1607–1651)
De Ruyter’s beginnings were humble, and his expertise was forged in the demanding world of commercial shipping rather than a military academy.
- Ropemaker to Sailor: Born in Flushing (Vlissingen) in 1607, he briefly worked in a rope-making yard before going to sea as a boatswain’s boy at age 11.
- Whaler and Privateer: Over the next few decades, he steadily climbed the ranks of the Dutch merchant marine. He worked on whaling ships in the Arctic, hunted pirates in the Mediterranean, and operated as a privateer.
- A Master Seaman: By the time he was in his 30s, he was a wealthy, highly respected merchant captain known for his navigational skills, calm demeanor, and ability to speak several languages. In 1651, at age 44, he planned to retire comfortably with his family.
The Reluctant Commander (1652–1664)
Retirement was cut short by the outbreak of the First Anglo-Dutch War in 1652. The Dutch Admiralty desperately needed experienced captains and pleaded with De Ruyter to take command of a Zeeland squadron.
- Proving Ground: Despite his reluctance, De Ruyter agreed to serve. He quickly proved himself as an aggressive and capable combat leader, most notably at the Battle of Plymouth.
- The Baltic and Mediterranean Expeditions: After the war, he accepted a permanent commission. He spent the next decade securing Dutch trade interests, fighting pirates off the Barbary Coast, and intervening in the Dano-Swedish Wars to keep the vital Baltic trade routes open.
Supreme Commander and Naval Reformer (1665–1671)
Following the death of supreme commander Jacob van Wassenaer Obdam at the Battle of Lowestoft (1665) during the Second Anglo-Dutch War, De Ruyter was promoted to Lieutenant-Admiral of Holland and West Friesland, effectively becoming the head of the Dutch navy.
- Professionalizing the Fleet: De Ruyter realized the Dutch navy relied too heavily on armed merchantmen and independent-minded captains. He introduced strict military discipline, regularized fleet training, and instituted a standardized system of flag signals to allow for coordinated maneuvers in the heat of battle.
- The Dutch Marine Corps: Working with the Grand Pensionary Johan de Witt, De Ruyter helped establish the Korps Mariniers in 1665, one of the world’s first specialized amphibious infantry units, which proved vital during his famous Raid on the Medway.
The Savior of the Republic (1672–1674)
De Ruyter’s finest hour came during the Third Anglo-Dutch War, which coincided with the Rampjaar (Disaster Year) of 1672. The Dutch Republic was simultaneously invaded by land by the French and the Bishoprics of Münster and Cologne, while a massive combined Anglo-French fleet threatened a seaborne invasion.
- Strategic Defense: Vastly outnumbered, De Ruyter used the treacherous shoals and shifting winds of the Dutch coast to his advantage. In a series of brilliant strategic engagements (Solebay, Schooneveld, and Texel), he repeatedly outmaneuvered the allied fleets, preventing an amphibious landing that would have likely destroyed the Dutch state.
Final Mission and Legacy (1675–1676)
By 1675, the Dutch were allied with Spain against France in the Mediterranean. The Dutch government ordered De Ruyter to take a small, poorly equipped fleet to assist the Spanish.
- The Ultimate Sacrifice: Knowing the fleet was inadequate, De Ruyter went out of a strict sense of duty. During a fierce artillery duel with a superior French fleet at the Battle of Augusta off the coast of Sicily, a cannonball struck him, taking off his left leg and part of his right foot. He died from wound infections a week later, on April 29, 1676.
- “Bestevaêr”: De Ruyter was beloved by his men, who affectionately called him Bestevaêr (Grandfather). Unlike many aristocratic commanders of his era, he shared their background, cared for their well-being, and fought on the front lines. He was buried in a magnificent marble tomb in the Nieuwe Kerk in Amsterdam.
Would you like me to detail the specific naval tactics he developed during the Anglo-Dutch Wars, or explore the history of the Korps Mariniers (the Dutch Marines) that he helped establish?
The Raid on the Medway (June 1667)
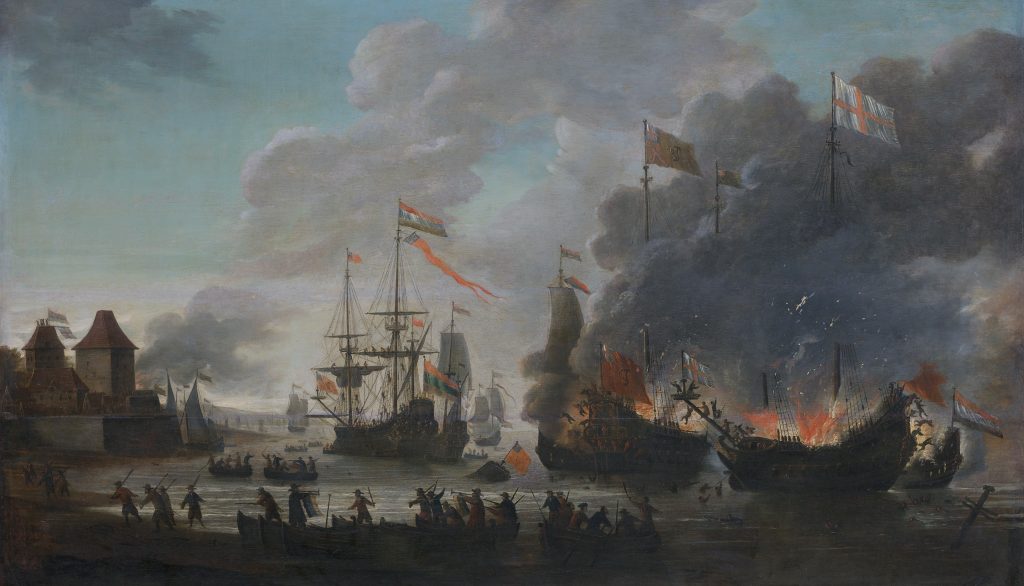
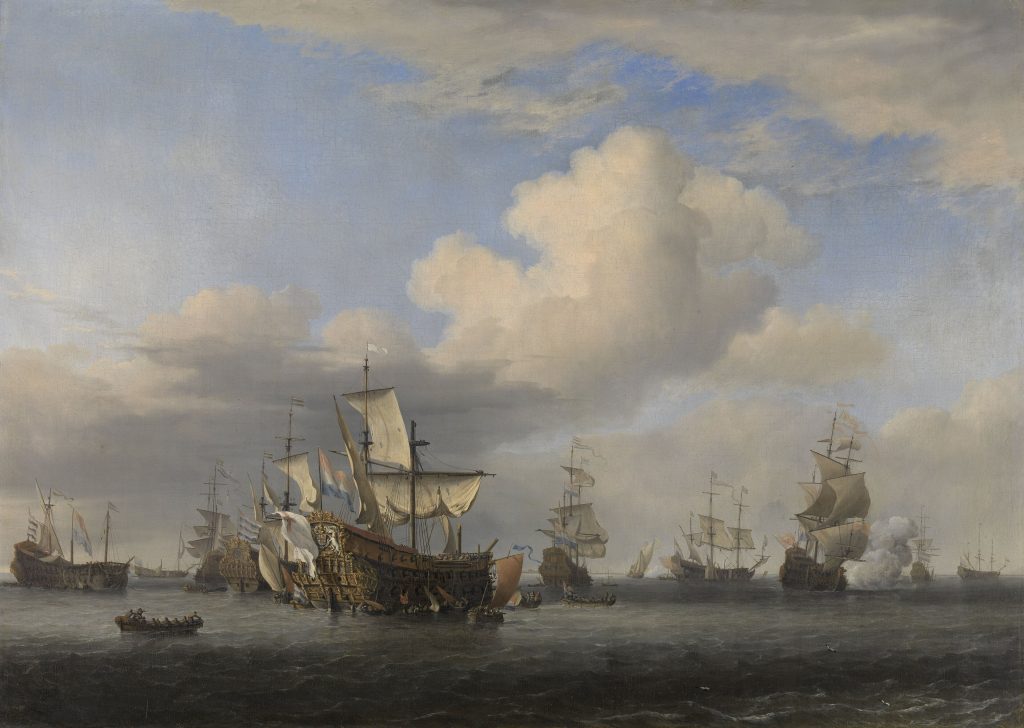
“Burning English ships” by Jan van Leyden. Shown are the events near Gillingham: in the middle, Royal Charles is taken; on the right, Pro Patria and Schiedam set Matthias and Charles V alight
(Wiki Image By Jan van Leyden – www.rijksmuseum.nl : Home : Info : Pic, Public Domain, https://commons.wikimedia.org/w/index.php?curid=5029530)
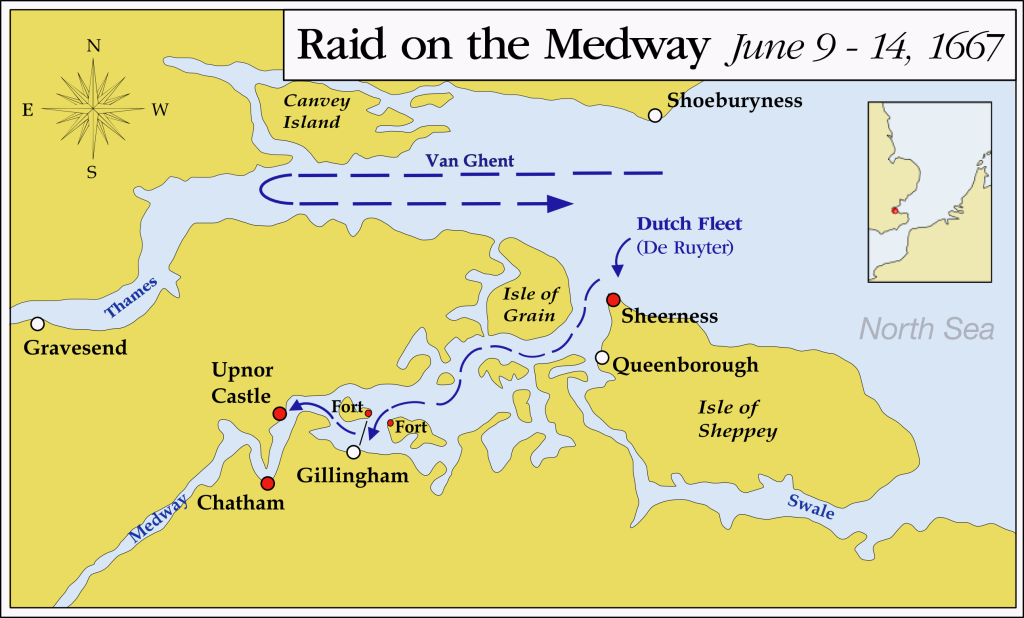
Map showing the events
(Wiki Image By Memnon335bc – http://commons.wikimedia.org/wiki/Image:RaidMedwayKarte.png, Public Domain, https://commons.wikimedia.org/w/index.php?curid=4478639)
The Raid on the Medway (also known as the Battle of Chatham) was one of the most audacious and successful amphibious operations in naval history. Executed in June 1667, it delivered the worst and most humiliating defeat the British Royal Navy has ever suffered, effectively ending the Second Anglo-Dutch War on Dutch terms.
While Admiral Michiel de Ruyter held supreme command of the expedition, the political mastermind behind the strike was Grand Pensionary Johan de Witt, and the vanguard assault up the river was led by Lieutenant-Admiral Willem Joseph van Ghent and the politician Cornelis de Witt.
The Strategic Context
By the spring of 1667, the Second Anglo-Dutch War had ground to a financial standstill. Both nations were exhausted, and peace negotiations were underway in Breda.
King Charles II of England, desperate to save money and assuming the war was effectively over, made a fatal strategic error: he ordered the largest and most powerful ships of the Royal Navy to be laid up in ordinary (decommissioned and anchored) in the River Medway at Chatham Dockyard. He believed the fleet was safe, protected by the treacherous shoals of the Thames estuary, the fort at Sheerness, and a massive, multi-ton iron chain stretched across the river at Gillingham.
To force a swift and favorable end to the treaty negotiations, the Dutch opted for a preemptive, decapitating strike.
Execution of the Raid
The Dutch fleet, consisting of over 60 ships and 15 fireships, arrived off the mouth of the Thames in early June. What followed was a masterclass in calculated aggression.
- Securing the Estuary (June 10): The Dutch first attacked and captured the unfinished fort at Sheerness. To do this, they utilized their newly formed Korps Mariniers (Dutch Marine Corps), who executed one of the first specialized amphibious landings in modern military history.
- Navigating the Medway (June 11-12): The Medway was notoriously difficult to navigate, full of mudflats and shifting tides. The Dutch relied on captured English pilots and defectors to guide their heavy warships up the narrow, winding river.
- Breaking the Chain (June 12): The English had placed a heavy iron chain across the river, protected by gun batteries and blockships. The Dutch simply sailed their ships directly into the barrier. A specialized Dutch vessel, the Vrede, hit the chain with such momentum that it snapped, opening the river to the entire Dutch vanguard.
- The Burning of the Fleet (June 12-13): Once past the chain, the Dutch deployed their fireships with devastating effect. They burned three of the Royal Navy’s heaviest warships—HMS Royal James, HMS Loyal London, and HMS Royal Oak—right where they were anchored.
- The Ultimate Prize: Instead of burning the pride of the English fleet, the flagship HMS Royal Charles, the Dutch captured it. They boarded the largely undefended vessel, struck the English colors, and towed the massive ship back to the Netherlands as a war trophy.
The Aftermath and Legacy
The raid caused absolute panic in London. Rumors spread that the Dutch were going to sail up the Thames and bombard the capital, or that the French were going to invade. English diarist Samuel Pepys, who was an administrator for the Royal Navy, recorded the terror and administrative collapse in the city, famously burying his gold in his garden to hide it from the expected invaders.
The strategic objective was a complete success. Just weeks after the raid, a financially broken and deeply embarrassed King Charles II ordered his diplomats to sign the Treaty of Breda, conceding to nearly all Dutch demands and securing the Dutch Republic’s dominance of global trade.
Would you like to delve into Samuel Pepys’ firsthand diary accounts of the panic in London as the raid unfolded, or explore the engineering and deployment of the massive iron chain at Gillingham?
The Four Days’ Battle (June 1–4, 1666)
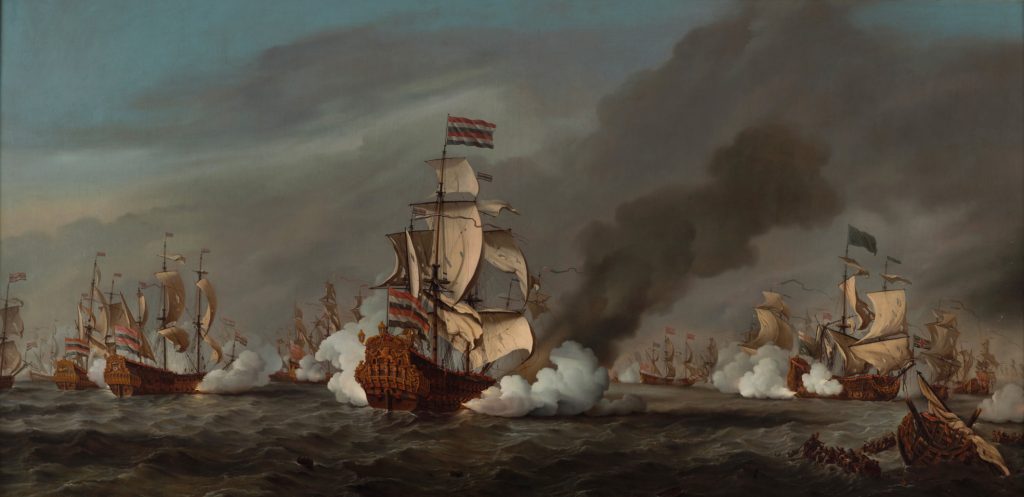
HMS Swiftsure, Seven Oaks, and Loyal George captured and flying Dutch colours, by Willem van de Velde the Younger
(Wiki Image By Willem van de Velde the Younger – http://www.rijksmuseum.nl/collectie/SK-A-439, Public Domain, https://commons.wikimedia.org/w/index.php?curid=34318136)
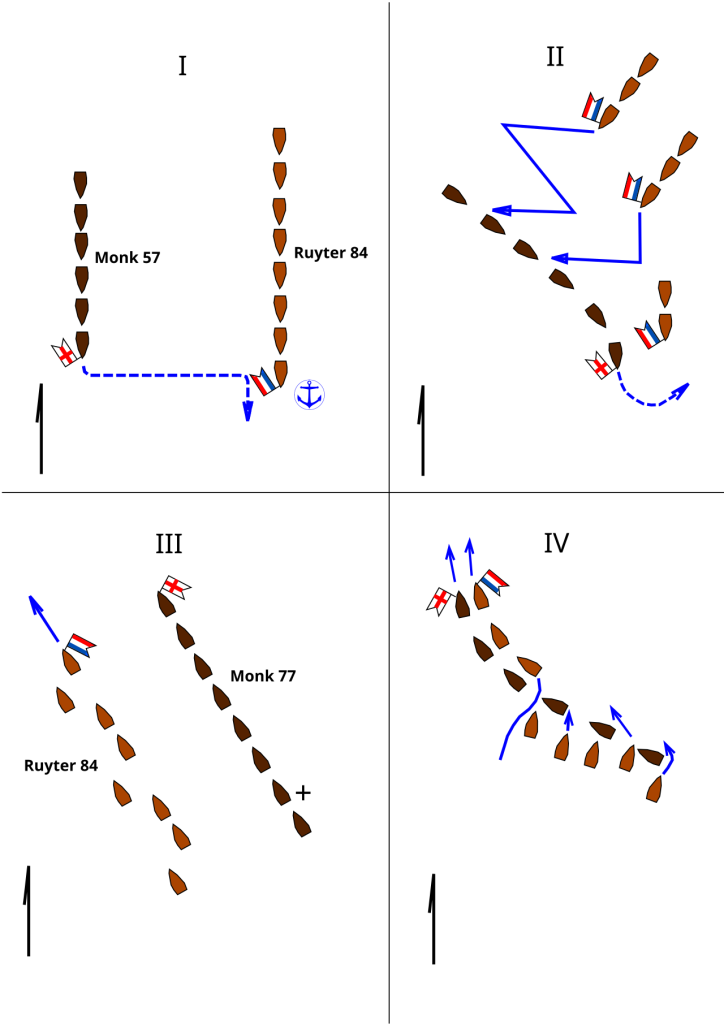
Four Days’ Battle
(Wiki Image By Pedros.lol – Own work; Edmund Kosiarz: Bitwy morskie. Wydawnictwo Morskie, 1970, s. 48., CC BY-SA 3.0, https://commons.wikimedia.org/w/index.php?curid=15006246)
The Four Days’ Battle stands as one of the longest, bloodiest, and most spectacular naval engagements in the history of the Age of Sail. Fought during the Second Anglo-Dutch War, it was a grinding test of endurance, discipline, and sheer firepower between the English Royal Navy and the Dutch Republic fleet.
Commanded by the legendary Admiral Michiel de Ruyter, the Dutch fleet ultimately secured a massive tactical victory, but the battle is equally remembered for the astonishing stubbornness of the English commander, George Monck, Duke of Albemarle.
Here is a day-by-day breakdown of how this unprecedented maritime slugfest unfolded:
♟️ The Setup: A Catastrophic Miscalculation
Days before the battle, the English made a massive strategic blunder. Believing a false rumor that a French fleet was sailing up the English Channel to join the Dutch, the English divided their forces. They sent Prince Rupert of the Rhine with 20 heavy ships to intercept the phantom French fleet.
This left Monck with only about 56 ships to face de Ruyter’s massive, concentrated armada of 84 Dutch warships. Despite being heavily outnumbered, when Monck spotted the Dutch anchored off the Flemish coast on June 1, he aggressively ordered his ships to attack.
📅 The Day-by-Day Breakdown
Day 1: The Surprising Assault
- The Tactic: Monck used the weather gauge (having the wind at his back) to strike the rear of the anchored Dutch fleet before the rest of de Ruyter’s ships could weigh anchor and organize.
- The Action: The fighting was immediate and brutal. The English initially had the upper hand, but the winds were so strong that they couldn’t open their lower gun ports without flooding their ships, severely limiting their firepower.
- The Result: The Dutch eventually formed their line of battle. The English suffered a heavy blow when the HMS Swiftsure was captured and its commander, Vice-Admiral William Berkeley, was killed.
Day 2: The Grinding Attrition
- The Tactic: Both fleets formed long lines of battle and spent the day sailing past each other, unleashing devastating broadsides.
- The Action: The Dutch received reinforcements, bringing their number to nearly 90 ships, while the English numbers dwindled as damaged vessels fell out of formation. De Ruyter expertly manipulated the wind to keep the pressure on the English line.
- The Result: The English fleet was battered. Realizing his numerical disadvantage was becoming fatal, Monck ordered a fighting retreat toward the Thames estuary as night fell.
Day 3: The Disaster on the Sandbanks
- The Tactic: Monck formed his surviving, heavily damaged ships into a defensive crescent to protect his retreating fleet from the pursuing Dutch. To prevent the Dutch from capturing his most crippled vessels, Monck ordered several of his own ships to be burned.
- The Action: Disaster struck the English when one of their largest and most prestigious warships, the HMS Royal Prince, ran aground on the treacherous Galloper Sandbank. The ship was surrounded, and its commander, Admiral Sir George Ayscue, was forced to surrender. He remains the only English admiral in history to be captured by the enemy at sea. The Dutch subsequently burned the Royal Prince to prevent the English from retaking it.
- The Rescue: Just as things looked hopeless for the English, Prince Rupert finally returned with his detached squadron of 20 fresh ships, evening the odds for the next day.
Day 4: The Final Melee
- The Tactic: Bolstered by Rupert’s return, the English turned around and aggressively attacked the Dutch one last time.
- The Action: The rigid lines of battle completely disintegrated into a massive, chaotic, close-quarters melee. Ships fought individual duels, and fireships were launched into the fray. The English fought fiercely, but the Dutch gunnery proved superior, and the English line finally broke.
- The Result: Under the cover of a thick sea fog, the exhausted and shattered English fleet withdrew, leaving the Dutch in command of the sea.
⚖️ The Aftermath and Significance
The Four Days’ Battle was a clear, resounding victory for Michiel de Ruyter and the Dutch Republic.
- Casualties: The English lost approximately 10 to 20 ships, with over 1,000 men killed and another 2,000 taken prisoner. The Dutch lost only 4 to 7 ships, though their human casualties were also severe, with around 1,500 men dead.
- The English Recovery: While it was a humiliating defeat, the battle proved the Royal Navy’s dockyards’ incredible resilience. Astonishingly, the English managed to repair their fleet and return to sea in less than two months, defeating the Dutch at the Battle of St. James’s Day in August of the same year.
Would you like to explore how the Dutch successfully utilized “fireships” to cause panic during this close-quarters combat, or shall we move on to the St. James’s Day Battle that followed?
The Battle of Texel (August 1673)
The Gouden Leeuw at the Battle of Texel, 21 August 1673, Van de Velde the Younger
(Wiki Image By Willem van de Velde the Younger – https://www.hetscheepvaartmuseum.nl/sites/default/files/2019-11/kijkduin%20zonder%20lijst.jpg, Public Domain, https://commons.wikimedia.org/w/index.php?curid=129186137)
The Battle of Texel (known in Dutch as the Battle of Kijkduin) was fought on August 21, 1673, and stands as the climactic naval engagement of the Third Anglo-Dutch War. It was arguably Admiral Michiel de Ruyter’s greatest strategic masterpiece, as it permanently neutralized the threat of an immense seaborne invasion that would have likely destroyed the Dutch Republic.
The Strategic Context
By the summer of 1673, the Dutch Republic was fighting for its very survival. The nation was bogged down in a grueling land war against King Louis XIV of France, while a massive combined Anglo-French fleet prowled the North Sea.
The allied fleet, commanded by Prince Rupert of the Rhine, had a clear and devastating objective: to clear the Dutch navy from the coastal waters and land a large expeditionary force of thousands of soldiers directly onto the beaches of the Dutch province of Holland. De Ruyter’s sole mission was to prevent this landing at all costs.
The Forces
The Dutch were heavily outnumbered in ships, men, and firepower.
- The Allied Fleet: Approximately 92 ships of the line, carrying over 4,000 guns. The English controlled the center and rear, while the French, under Comte Jean II d’Estrées, controlled the vanguard.
- The Dutch Fleet: Approximately 75 ships of the line, carrying around 3,100 guns, commanded by De Ruyter, with his fiercely aggressive subordinate (and former rival) Cornelis Tromp commanding the rear.
Tactical Execution
Knowing he could not win a straightforward slugging match in open waters, De Ruyter utilized the environment and brilliant maneuvering to level the playing field.
- Hydrographic Warfare: De Ruyter kept his fleet dangerously close to the treacherous shoals of the Dutch coast near the island of Texel. Because the heavier English and French ships drew more water, they could not pursue the Dutch into the shallows without risking running aground. De Ruyter used this coastal zone as a safe harbor to dart out from and retreat into.
- Seizing the Weather Gage: On the morning of August 21, the wind shifted in the Dutch’s favor. De Ruyter aggressively seized the “weather gage” (the upwind position) and launched a sudden, fierce attack on the allied line.
- Neutralizing the French: De Ruyter ordered the Dutch vanguard to attack the French squadron. In a highly controversial move, the French commander d’Estrées ordered his ships to break off and sail away from the main battle. They were kept occupied by a much smaller Dutch force, effectively removing the French from the equation and evening the numerical odds.
- The Tromp-Spragge Duel: The rear of the battle devolved into a massive, bitter grudge match between Cornelis Tromp and the English commander Sir Edward Spragge. Both commanders had their flagships shot out from under them multiple times and had to transfer to new ships by rowboat in the middle of the fighting. Spragge ultimately drowned when a cannonball struck his rowboat during one of these transfers.
- Breaking the Center: In the center, De Ruyter relentlessly pounded Prince Rupert’s squadron. By maintaining tight formation and concentrating his fire, De Ruyter inflicted heavy damage on the English center, eventually forcing Rupert to disengage and retreat to try and rescue his battered rear echelon.
The Outcome and Legacy
By nightfall, both fleets were exhausted and heavily damaged, and the battle technically ended in a tactical draw with neither side losing a significant number of ships.
However, strategically, it was a monumental victory for De Ruyter.
- Invasion Thwarted: The allied fleet was so badly damaged that they had to abandon the invasion plans entirely and limp back to the Thames for repairs. The troops waiting to board the transport ships were stood down.
- Political Fallout: The English public and parliament were exhausted by the war and furious at the French for abandoning them during the battle. The failure at Texel directly led England to withdraw from the Third Anglo-Dutch War and to sign the Treaty of Westminster in 1674.
Against overwhelming odds, De Ruyter’s mastery of fleet discipline and coastal navigation saved his country from imminent conquest.
Would you like to explore the intense personal and professional rivalry between Michiel de Ruyter and his volatile subordinate, Cornelis Tromp, or dive into the specific ship designs that allowed the Dutch to navigate those shallow coastal waters?
Admiral Michiel de Ruyter Legacy

Tomb in the Nieuwe Kerk in Amsterdam, made by Rombout Verhulst and painted by Emanuel de Witte
(Wiki Image By Rijksmuseum – http://hdl.handle.net/10934/RM0001.COLLECT.6583, CC0, https://commons.wikimedia.org/w/index.php?curid=83528300)
Admiral Michiel de Ruyter’s legacy extends far beyond his impressive win-loss record at sea. He is remembered not just as a brilliant tactician but as the savior of the Dutch Republic during its Golden Age and a transformative figure in the history of naval warfare.
Here is a breakdown of his lasting impact, both in military history and modern culture.
Military and Tactical Innovations
De Ruyter fundamentally changed how naval battles were fought, helping to transition warfare at sea from chaotic, free-for-all brawls into disciplined, coordinated operations.
- Mastering the Line of Battle: While the English initially developed the “line of battle” tactic, De Ruyter perfected it. He implemented strict fighting instructions and a standardized system of flag signals, allowing him to control a massive fleet as a single cohesive unit in the heat of combat.
- The Dutch Marine Corps: Realizing the need for specialized infantry during naval and amphibious operations, De Ruyter, alongside Johan de Witt, co-founded the Korps Mariniers in 1665. They remain one of the oldest and most elite marine corps in the world today.
- Asymmetric & Hydrographic Warfare: De Ruyter proved that a smaller, outgunned fleet could defeat a larger one by using the environment. His mastery of the shallow coastal waters, shifting winds, and even inland “freshwater” operations during the Disaster Year of 1672 demonstrated a level of strategic adaptability rarely seen in his era.
A Cultural Icon of Duty and Modesty
In an era where European armies and navies were commanded by haughty aristocrats who bought their commissions, De Ruyter was a stark contrast.
- “Bestevaêr” (Grandfather): Rising from a humble rope-maker’s boy to Supreme Commander, De Ruyter never lost his working-class pragmatism. He refused special treatment, shared the dangers of the front lines with his men, and swept his own cabin. His sailors affectionately called him Bestevaêr, and he remains a symbol of the egalitarian Dutch spirit.
- Reluctant Heroism: He did not fight for personal glory, but out of a strict sense of duty to the state and his faith. This was cemented by his willingness to take on his final, fatal mission to the Mediterranean in 1676, despite knowing his fleet was woefully underequipped.
Modern Commemoration and Namesakes
De Ruyter’s name and image are woven deeply into the fabric of the Netherlands and global naval history.
- Naval Namesakes: The Royal Netherlands Navy has a long-standing tradition of naming its vessels after him. To date, several warships have been named HNLMS De Ruyter, and many others have been named after his famous flagship, HNLMS De Zeven Provinciën.
- Monuments: His massive, intricately carved marble tomb in Amsterdam’s Nieuwe Kerk (New Church) remains a prominent historical site. In his hometown of Vlissingen, a famous 1841 statue of De Ruyter stands looking out over the sea, affectionately called “Michieltje” by the locals.
- International Reach: His legacy even reached the United States; the town of DeRuyter in New York is named in his honor.
- Pop Culture: His life and pivotal battles were dramatized in the 2015 Dutch epic film Michiel de Ruyter (released internationally as Admiral), which introduced his story to a new generation.
- The 350th Anniversary: The year 2026 marks exactly 350 years since his death at the Battle of Augusta. Major commemorations are being held both in Amsterdam and in Syracuse, Sicily, where he succumbed to his wounds and where his entrails were buried.
Would you like to know more about his elaborate state funeral and the design of his famous marble tomb in Amsterdam, or are you interested in how he is portrayed in the 2015 film Admiral?
Admiral Michiel de Ruyter YouTube Views Links, and Books Table
Here are two tables breaking down some of the most notable YouTube content and foundational books on Admiral Michiel de Ruyter.
YouTube Resources: History & Tactical Breakdowns
| Video Title | Focus | Approximate Views | Link |
| The Battle of Scheveningen – Admiral: Michiel de Ruyter | An animated tactical breakdown of fleet movements and historical context from History Uncovered. | ~263,000 | Watch Here |
| Who was Michiel de Ruyter? | A concise, highly accessible animated biography covering his life from a working-class boy to Supreme Commander. | ~450,000+ | Watch Here |
| The Unstoppable Dutch Naval Legend | Michiel de Ruyter | A recent deep dive into his strategic innovations and lasting impact on the Dutch Golden Age. | ~15,000 | Watch Here |
| Admiral (Michiel de Ruyter) (2015) | Official Trailer | The trailer for the high-budget Dutch cinematic epic provides a great visual representation of the scale of 17th-century naval warfare. | 1.5 Million+ | Watch Here |
Recommended Books & Scholarly Works
| Book Title | Author(s) / Editor(s) | Overview |
| De Ruyter: Dutch Admiral | Jaap R. Bruijn, Ronald Prud’homme van Reine, et al. | Arguably, the most comprehensive modern scholarly work on him. It is a collection of essays from international maritime historians analyzing his strategy, battles, flag officers, and political navigation. |
| Life of Lieut.-Admiral de Ruyter | G. Grinnell-Milne | A classic, detailed biography that leans heavily into narrative history, meticulously covering his Baltic and Mediterranean expeditions, as well as the famous Raid on the Medway. |
| War, Trade and the State: Anglo-Dutch Conflict, 1652-89 | David Ormrod & Gijs Rommelse | Focuses on the broader geopolitical, economic, and military clash between England and the Dutch Republic, placing De Ruyter’s campaigns directly within the context of global statecraft and trade dominance. |
If you are gathering sources to fuel a historical discussion project—perhaps to analyze shifting military strategies or explore counterfactual naval scenarios—these materials provide excellent foundations. The books offer the rigorous geopolitical context needed for deep analysis, while the tactical YouTube breakdowns are great for visualizing the physical realities of the engagements.
🇬🇧 Admiral Sir Edward Hawke (1705–1781)
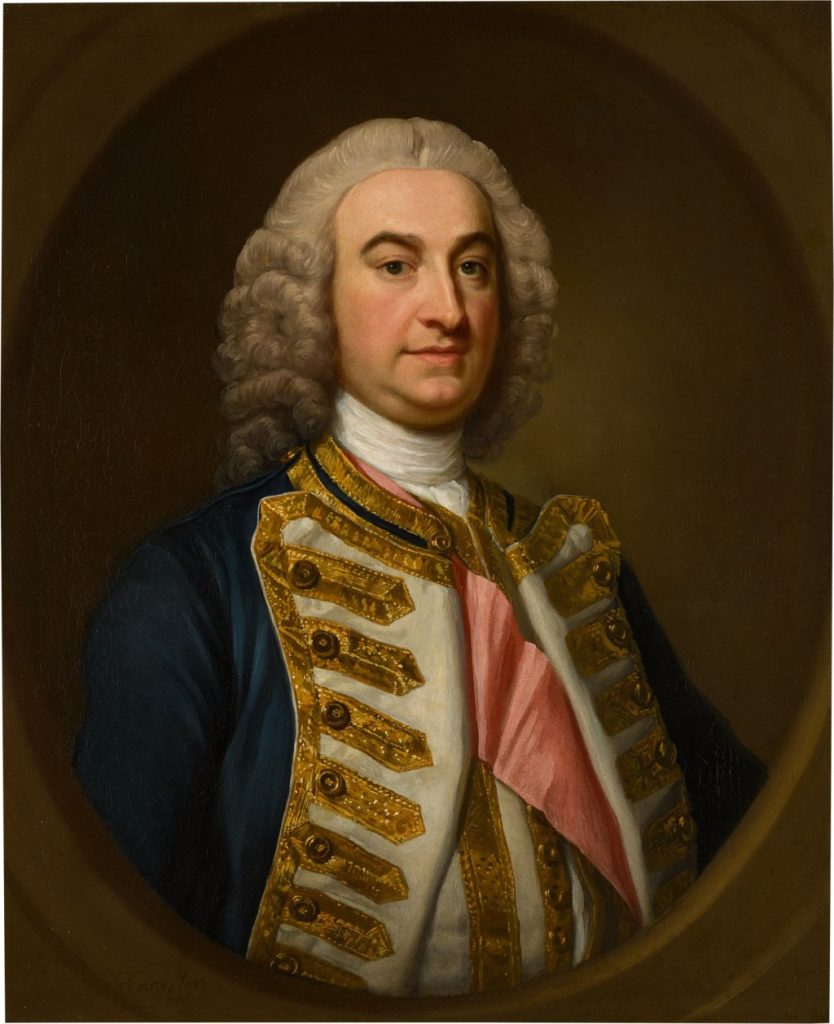
George Knapton (London 1698 – 1778) Portrait of Admiral of the Fleet Edward Hawke, 1st Baron Hawke (1705-1781), half-length, wearing the ribbon of the Order of Bath, signed lower left.
(Wiki Image By George Knapton – https://www.sothebys.com/en/buy/auction/2021/old-masters-day-sale/portrait-of-admiral-of-the-fleet-edward-hawke-1st, Public Domain, https://commons.wikimedia.org/w/index.php?curid=110590138)
Admiral Sir Edward Hawke Quotes Table
Edward Hawke (1705–1781), later Baron Hawke, was one of the Royal Navy’s most aggressive commanders during the Seven Years’ War. His leadership culminated in the decisive British victory at the Battle of Quiberon Bay (1759), which helped prevent a French invasion of Britain. ⚓
| Quote | Context | Meaning |
| “Where there is room for the enemy to swing, there is room for us to anchor.” | During the pursuit of the French fleet at Quiberon Bay | Shows Hawke’s bold willingness to fight even in dangerous coastal waters. |
| “We must destroy them before they reach the shore.” | Order given while chasing the French fleet | Demonstrates his doctrine of relentless pursuit. |
| “No captain can do very wrong if he places his ship alongside that of the enemy.” | Reflecting Royal Navy battle philosophy | Encourages aggressive close combat at sea. |
| “The safety of England depends upon our victory.” | Address to officers before battle | Emphasizes the national stakes of naval warfare. |
| “The sea decides the fate of nations.” | Attributed to Hawke’s strategic thinking | Reflects the growing importance of naval power in the 18th century. |
⚓ Historical Legacy
Edward Hawke helped establish Britain’s dominance at sea in the 18th century. His victory at the Battle of Quiberon Bay was considered by historians to be one of the most decisive naval victories before the age of Horatio Nelson.
Admiral Sir Edward Hawke Battles Table
Admiral Sir Edward Hawke was a transformative figure in the Royal Navy, shifting its doctrine from rigid adherence to the formal “line of battle” toward aggressive pursuit and close-quarters combat. He also pioneered the strategy of the continuous, year-round blockade, profoundly altering 18th-century naval warfare.
Here is a comprehensive table of his most significant battles and naval operations.
Key Battles and Operations of Admiral Sir Edward Hawke
| Battle / Operation | Conflict | Date | Tactical & Historical Significance |
| Battle of Toulon | War of the Austrian Succession | Feb 1744 | Breaking the Line: Commanding the 70-gun HMS Berwick, Hawke ignored the rigid fighting instructions that were causing a chaotic stalemate. He broke out of the British line to engage the Spanish ship Poder at close range, forcing its surrender. Though the overall battle was a strategic failure for the British, Hawke’s bold initiative earned him national recognition. |
| Second Battle of Cape Finisterre | War of the Austrian Succession | Oct 1747 | The General Chase: Commanding the Western Squadron, Hawke intercepted a massive French convoy. Realizing the French escorts were trying to buy time for the merchant ships to escape, Hawke abandoned the traditional line of battle and ordered a “general chase.” His faster ships independently engaged and overwhelmed the French warships, capturing six of them and dealing a severe blow to the French navy. |
| Raid on Rochefort | Seven Years’ War | Sep 1757 | Amphibious Frustration: Hawke commanded the naval forces for an amphibious strike on the French coast. He successfully navigated the difficult approaches, bombarded the coastal defenses, and captured the Île d’Aix. However, the army commanders dithered and ultimately refused to land the troops, leading to a humiliating strategic failure. Hawke was exonerated by a subsequent inquiry, which laid the blame squarely on the army. |
| Blockade of Brest | Seven Years’ War | May–Nov 1759 | Logistical Revolution: Tasked with preventing a French invasion of Britain, Hawke implemented a grueling, continuous blockade of the French fleet at Brest. Prior to this, fleets traditionally returned to port during the harsh autumn and winter months. Hawke revolutionized naval logistics by resupplying his ships at sea with fresh provisions, keeping his fleet on station for six months, and starving the French of strategic movement. |
| Battle of Quiberon Bay | Seven Years’ War | Nov 1759 | The Crowning Victory: When a November gale forced Hawke’s blockading fleet off station, the French fleet attempted to break out. Hawke relentlessly pursued them into the treacherous, reef-strewn waters of Quiberon Bay. Fighting in a severe storm on a dangerous lee shore, Hawke’s fleet devastated the French, sinking or capturing their flagship and several others. It eliminated the threat of a French invasion and established absolute British naval supremacy. |
Would you like to look more closely at the logistical system Hawke created to resupply his ships with fresh water and food during the six-month Blockade of Brest, or explore the disastrous failures in army command during the Raid on Rochefort?
Admiral Sir Edward Hawke History
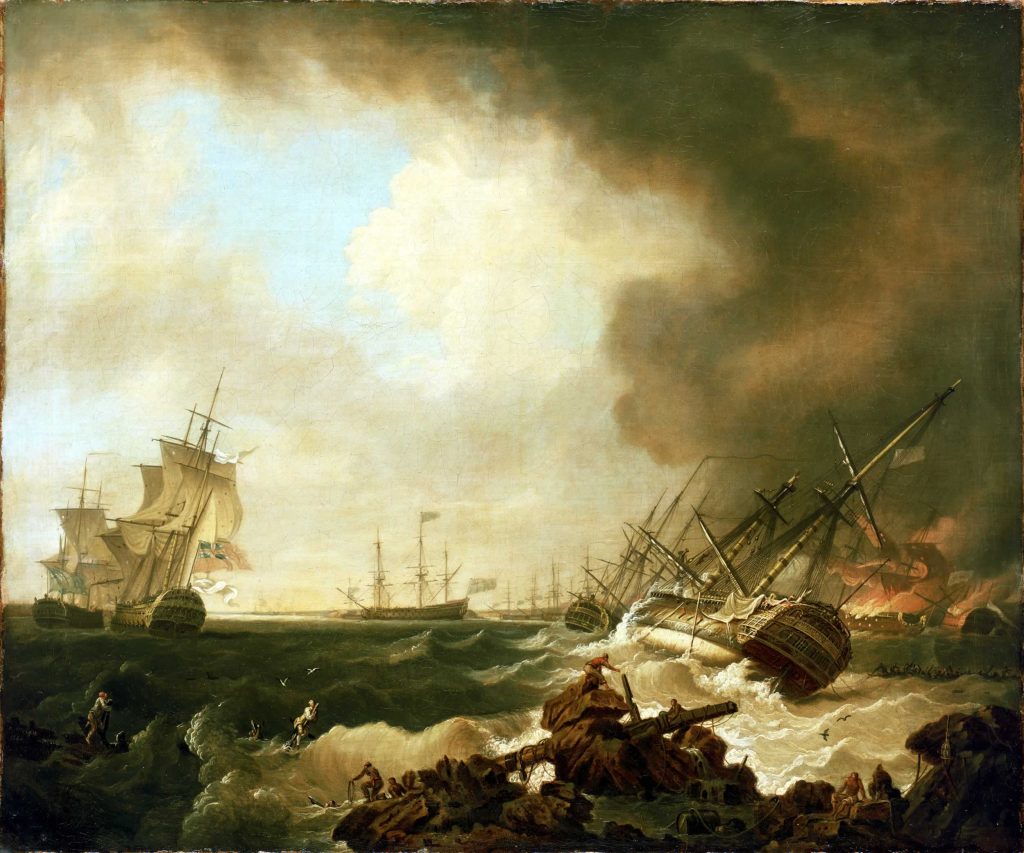
Battle of Quiberon Bay: the Day After Richard Wright 1760
(Wiki Image By Richard Wright – Quiberon Musée du Patrimoine, Full description can be found at the NMM website, Public Domain, https://commons.wikimedia.org/w/index.php?curid=1335178)
Admiral Sir Edward Hawke (1705–1781) is one of the most consequential figures in British naval history. Before Horatio Nelson became the archetype of the aggressive British naval hero, it was Hawke who fundamentally rewrote the tactical playbook of the Royal Navy.
He transformed a fleet constrained by rigid, highly formalized combat rules into a relentless, offensive force, making him a fascinating subject for any deep dive into the evolution of military strategy.
Here is an overview of his life, career, and lasting impact on naval warfare.
Early Life and the Peacetime Navy (1705–1743)
Hawke was born in London in 1705. Unlike some of his contemporaries who relied heavily on aristocratic connections, Hawke’s rise through the ranks was steady but frustratingly slow.
- Joining the Navy: He entered the Royal Navy as a volunteer in 1720 at the age of 15.
- The Long Peace: His early career coincided with a long period of European peace. Promotion was incredibly slow, and Hawke spent over a decade serving in the West Indies and the Mediterranean without seeing major action. He finally made post-captain in 1734.
- A Reputation for Competence: During these years, he developed a deep understanding of seamanship and ship handling, traits that would later define his bold tactical decisions in treacherous waters.
Breaking the Rules: Toulon and Finisterre (1744–1747)
The outbreak of the War of the Austrian Succession finally gave Hawke the opportunity to prove himself in combat, and he immediately made a name for himself as a maverick.
- The Battle of Toulon (1744): The prevailing naval doctrine of the time dictated that fleets must fight in a strict “line of battle.” At Toulon, the British line was disorganized and the battle turned into a stalemate. Commanding HMS Berwick, Hawke saw the Spanish ship Poder devastating the British vanguard. Ignoring the rigid fighting instructions, Hawke broke formation, closed to pistol-shot range, and battered the Poder into surrendering. The Admiralty recognized his initiative, marking him for higher command.
- Second Battle of Cape Finisterre (1747): Promoted to Rear-Admiral, Hawke intercepted a massive French convoy. Realizing the French warships were sacrificing themselves to let their merchantmen escape, Hawke ordered a “general chase.” This signal released his captains from the line of battle, allowing the fastest British ships to hunt down and overwhelm the French escorts independently. He captured six warships, crippling French naval power, and was knighted for the victory.
The Year of Miracles (1759)
Hawke’s greatest strategic and tactical achievements occurred during the Seven Years’ War, a global conflict where naval supremacy was paramount. France, facing defeat in the colonies, planned a massive invasion of Britain in 1759.
- Revolutionizing the Blockade: Hawke was tasked with keeping the French fleet locked in the port of Brest. Traditionally, fleets had to return to port after a few weeks to resupply, leaving the enemy free to move. Hawke pioneered a system of underway replenishment, organizing a constant stream of transport ships to bring fresh beef, beer, and vegetables directly to his warships at sea. This unprecedented logistical feat kept his fleet healthy and on station for six consecutive months, effectively paralyzing the French navy.
- The Battle of Quiberon Bay: When a November gale finally blew Hawke off his blockade station, the French fleet under Marshal de Conflans broke out. Hawke relentlessly hunted them down, catching them as they fled into the rocky, uncharted waters of Quiberon Bay on the French coast. Fighting in a severe storm, on a dangerous lee shore, and in fading daylight, Hawke ordered his fleet into the bay. The sheer audacity of the maneuver broke the French fleet, eliminating the invasion threat entirely and capping off 1759 as Britain’s Annus Mirabilis (Year of Miracles).
First Lord of the Admiralty and Legacy (1766–1781)
Following his triumphs at sea, Hawke transitioned to a vital administrative role.
- First Lord of the Admiralty: He served as the political head of the Royal Navy from 1766 to 1771. While not as adept a politician as he was a sailor, his tenure was marked by a commitment to modernizing the fleet and improving the conditions of common sailors.
- Supporting Exploration: In his capacity as First Lord, Hawke approved and championed the first Pacific expedition of Lieutenant James Cook in 1768, signing the secret orders that led to the charting of New Zealand and the eastern coast of Australia.
- Death and Legacy: Hawke died in 1781. His aggressive tactical philosophy—emphasizing close-quarters combat, the destruction of the enemy fleet over mere territorial maneuvering, and brilliant logistical planning—became the foundation upon which later admirals, including Jervis and Nelson, built their legendary careers.
If you are evaluating this era to analyze shifting military strategies, comparing Hawke’s aggressive “general chase” doctrine against the rigid “Fighting Instructions” of his predecessors is incredibly revealing. Would you like me to outline the specific Admiralty “Fighting Instructions” that Hawke so famously discarded at Toulon?
Battle of Toulon (Feb 1744)
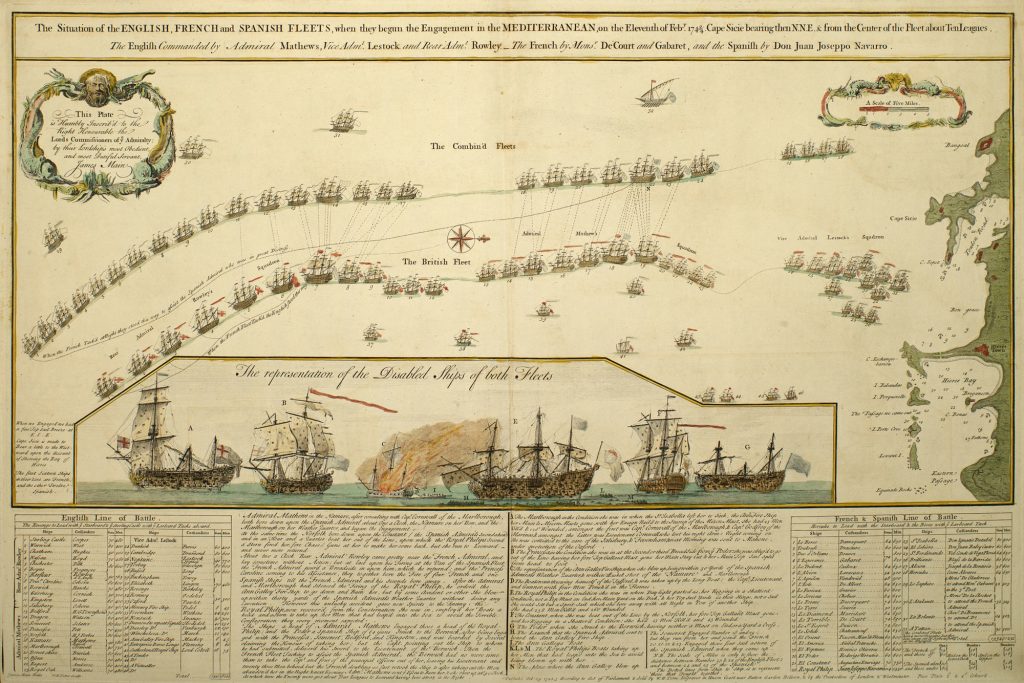
British map of the battle
(Wiki Image By William Henry Toms – https://militarymaps.rct.uk/war-of-the-austrian-succession-1740-8/toulon-1744-this-plate-is-humbly-inscribd-to, Public Domain, https://commons.wikimedia.org/w/index.php?curid=107779472)
The Battle of Toulon, fought in February 1744 during the War of the Austrian Succession, is infamous in British naval history. Rather than a glorious victory, it was a chaotic, humiliating tactical failure that exposed deep flaws in the Royal Navy’s rigid command structure and combat doctrine.
However, it was also the battle that launched the career of then-Captain Edward Hawke, whose brilliant act of insubordination stood out as the sole British triumph of the day.
The Strategic Context
By early 1744, Britain was at war with Spain but not yet formally at war with France. A Spanish fleet had taken refuge in the French Mediterranean port of Toulon, and a British fleet under Admiral Thomas Mathews blockaded them.
In February, the Spanish fleet finally sailed out, escorted by a French fleet. Mathews, determined not to let the Spanish escape to Italy, ordered his fleet into pursuit.
A Disastrous Command Crisis
The British failure at Toulon was largely caused by a bitter, highly public feud between the two senior British commanders: Admiral Thomas Mathews and his second-in-command, Vice-Admiral Richard Lestock. They despised each other to the point of barely communicating.
When the British fleet finally caught up to the Franco-Spanish forces, they were disorganized.
- The Broken Line: Mathews, eager to attack the Spanish rear, hoisted the signal to engage the enemy before his own ships had formed a proper “line of battle.”
- Malicious Compliance: Lestock, commanding the British rear, was trailing far behind. Citing a strict, literal interpretation of the Admiralty’s “Permanent Fighting Instructions”—which stated that ships must maintain the line of battle at all costs—Lestock simply shortened his sails and watched the battle from afar, refusing to come to Mathews’ aid.
The Engagement and Hawke’s Intervention
The actual combat was a confused melee. Several British captains, paralyzed by contradictory signals (Mathews had left the signal for the “line of battle” flying alongside the signal for “engage”), either hung back or fired uselessly from long range.
During the chaos, the Spanish 60-gun ship Poder was successfully holding off several hesitant British ships and inflicting heavy damage.
Commanding the 70-gun HMS Berwick, Captain Edward Hawke decided he had seen enough.
- Aggressive Action: Ignoring the rigid Fighting Instructions that were paralyzing his peers, Hawke broke out of the British line. He bore down directly on the Poder, closing the distance to “pistol-shot” range.
- The Only Prize: Hawke’s aggressive maneuver and superior gunnery devastated the Poder, dismantling her rigging and forcing her captain to surrender. The Poder was the only enemy ship captured during the entire battle (though the British were forced to burn her the next day when the French counterattacked).
The Aftermath and the Courts-Martial
The Franco-Spanish fleet ultimately escaped, and the fallout in Britain was explosive. The Admiralty convened a massive series of courts-martial to figure out what went wrong. The results highlighted the absurdity of British naval doctrine at the time:
- Admiral Mathews was cashiered (dismissed from the service) for breaking his own line of battle and failing to press the attack.
- Vice-Admiral Lestock, despite clearly abandoning his commander out of spite, was acquitted because he had technically obeyed the written rules by not breaking the line.
- Several Captains were dismissed or penalized for failing to engage properly.
- Captain Hawke, however, caught the attention of King George II. When the Admiralty later attempted to pass Hawke over for promotion, the King personally intervened, declaring that he would not have “his own Captain” passed over.
The disaster at Toulon proved that the rigid “Permanent Fighting Instructions” were stifling tactical initiative. It would take commanders like Hawke, later in his career, to finally shatter these obsolete rules and introduce the aggressive, close-quarters combat that defined the Royal Navy’s golden age.
Would you like to dive deeper into the infamous courts-martial that followed, or explore the specific “Permanent Fighting Instructions” that caused such a disaster?
Second Battle of Cape Finisterre (Oct 1747)
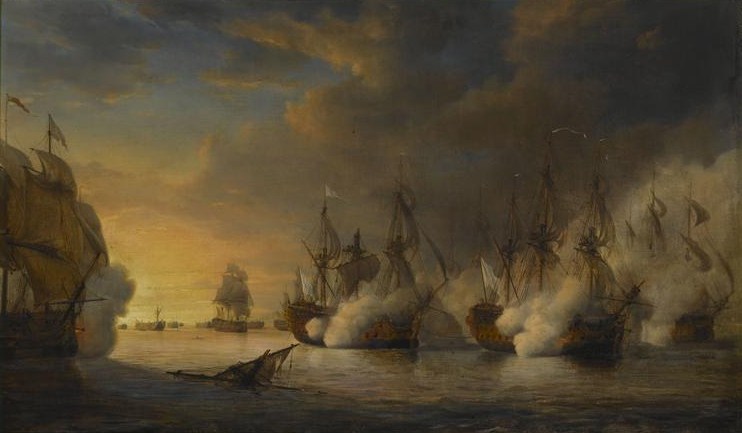
Battle of Cape Finisterre (October 1747). “Battle of the ship Intrepid against several British ships”
(Wiki Image By Pierre-Julien Gilbert – Palais du Luxembourg, Paris., Public Domain, https://commons.wikimedia.org/w/index.php?curid=10768372)
The Second Battle of Cape Finisterre, fought on October 25, 1747, during the War of the Austrian Succession, was a defining moment in British naval history. It was here that Rear-Admiral Edward Hawke cemented his reputation as a brilliant, aggressive tactician and definitively proved that rigid adherence to the traditional “line of battle” was holding the Royal Navy back.
The Strategic Context
By the autumn of 1747, the French economy and its overseas colonies were suffering heavily under the weight of the British naval blockade. To relieve their territories in the West Indies, the French assembled a massive convoy of over 250 merchant ships at the Île d’Aix.
To protect this vital economic lifeline, the French assigned an escort of eight powerful ships of the line, commanded by the Marquis de l’Étenduère. The British Admiralty, aware of the convoy’s preparations, dispatched Hawke with the Western Squadron (14 ships of the line) to intercept them before they could scatter into the open Atlantic.
The Engagement: Discarding the Rulebook
Hawke’s squadron spotted the French convoy off the coast of Cape Finisterre (northwest Spain). What followed was a stark contrast to the paralyzed, chaotic command structure Hawke had witnessed three years earlier at the Battle of Toulon.
- The French Defense: Recognizing he was outnumbered, l’Étenduère ordered his merchant ships to sail away under the protection of a single warship. He then formed his remaining eight ships of the line into a tight defensive line to block Hawke and buy time for the convoy to escape.
- The General Chase: Under the Admiralty’s rigid “Permanent Fighting Instructions,” Hawke was expected to form his own line of battle and engage the French in a formalized, parallel artillery duel. Hawke recognized that doing so would waste precious daylight and allow the merchantmen to vanish. Instead, he made the bold decision to hoist the signal for a “General Chase.”
- The Swarm: The “General Chase” signal released British captains from their formation, ordering the fastest ships to pursue and engage the enemy immediately. The British ships bore down on the French line, bypassing the rear and effectively swarming the French vessels one by one in intense, close-quarters combat.
The Outcome and Strategic Impact
The French fought with immense courage and skill, and the battle raged for hours. However, the aggressive swarm tactics of the British eventually overwhelmed them.
- A Crushing Defeat: By nightfall, Hawke had captured six of the eight French ships of the line. The French flagship, the massive 80-gun Tonnant, and one other severely damaged ship barely managed to escape under the cover of darkness.
- The Fate of the Convoy: While l’Étenduère’s sacrifice allowed the merchant convoy to escape the immediate battle, Hawke was one step ahead. He immediately dispatched a fast sloop, HMS Weazel, to the West Indies to warn the British squadrons stationed there. When the French merchant ships arrived in the Caribbean, they sailed right into a trap, and the vast majority were captured.
- The Legacy: The victory at the Second Battle of Cape Finisterre devastated French naval power and trade for the remainder of the war. It also vindicated Hawke’s aggressive tactical philosophy, proving that individual captains’ initiative and close-quarters combat were far more effective than rigid lines of battle. Hawke was knighted for his actions, becoming Sir Edward Hawke.
Would you like to explore the specific differences between French and British ship designs of this era, or dive into the economic impact of the loss of the West Indies convoy on the French war effort?
Battle of Quiberon Bay (Nov 1759)
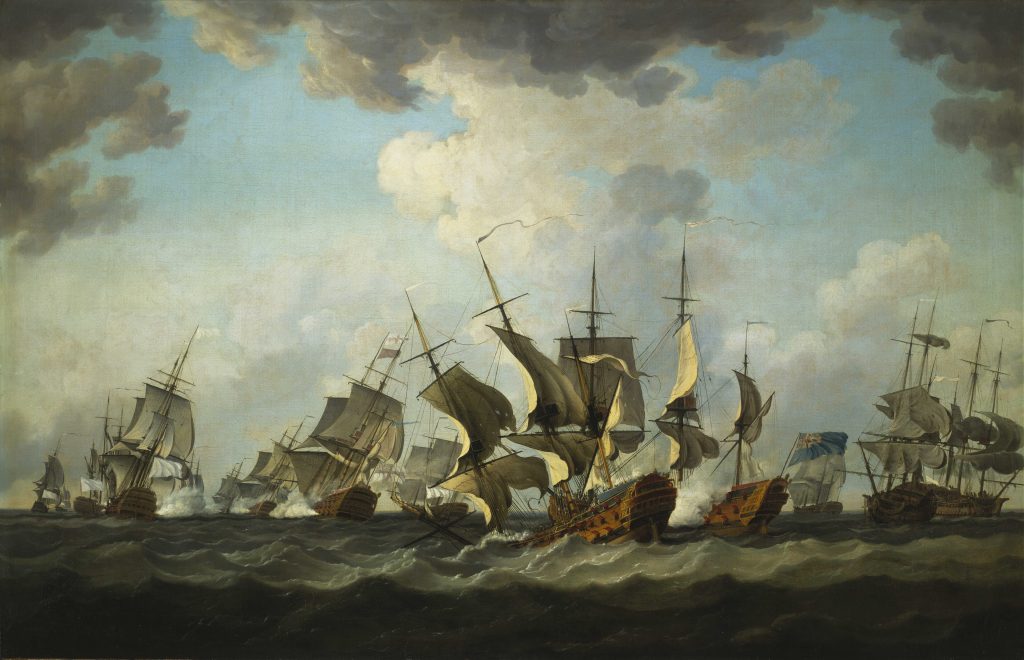
The Battle of Quiberon Bay, 20 November 1759. The Battle of Quiberon Bay, on 20 November 1759, was the most decisive naval encounter during the Seven Years War, 1756-63, a conflict involving the major European colonial powers and fought around the globe.
(Wiki Image By Richard Paton – http://collections.rmg.co.uk/collections/objects/11889, Public Domain, https://commons.wikimedia.org/w/index.php?curid=62758814)

Tracks of British and French fleets
(Wiki Image By Sémhur, CC BY-SA 4.0, https://commons.wikimedia.org/w/index.php?curid=8528466)
The Battle of Quiberon Bay, fought on November 20, 1759, is widely considered the greatest naval victory in British history prior to Trafalgar. It was the crowning achievement of Admiral Sir Edward Hawke’s career and the spectacular climax of the Seven Years’ War, cementing 1759 as Britain’s Annus Mirabilis (Year of Miracles).
By destroying the French fleet in the middle of a roaring gale on a treacherous lee shore, Hawke fundamentally changed the strategic landscape of Europe.
The Strategic Context: The Invasion Threat
By 1759, France was losing the global war. British forces were advancing in North America (having recently taken Quebec) and in India. Desperate to reverse their fortunes, the French government planned a massive, knockout blow: a full-scale amphibious invasion of Britain.
- The Plan: A French army of over 20,000 men was assembled in the Morbihan region of Brittany, awaiting transport ships. To escort this invasion force across the English Channel, the French needed to unite their Mediterranean fleet from Toulon with their Atlantic fleet at Brest.
- The Blockade: Hawke’s relentless, year-round blockade of Brest had kept the French Atlantic fleet, commanded by Marshal Hubert de Brienne, Comte de Conflans, trapped in port for months.
- The Breakout: In early November, a massive westerly gale finally forced Hawke to lift his blockade and shelter his ships in Torbay on the English coast. Seizing the opportunity, Conflans broke out of Brest with 21 ships of the line and headed south to collect the invasion transports at Quiberon Bay.
The Pursuit and the Storm
As soon as the weather shifted, Hawke raced back to his station, discovered the French had fled, and launched a relentless pursuit.
- The Gale: By the morning of November 20, Hawke’s fleet of 23 ships of the line caught sight of the French just as they were approaching Quiberon Bay. The weather was horrific—a violent autumn gale was blowing directly onto the French coast.
- Conflans’ Fatal Assumption: Quiberon Bay is a notoriously dangerous body of water, choked with uncharted granite reefs, hidden shoals, and treacherous currents. Conflans assumed that if he led his fleet into the bay, the British would never dare follow them into such a navigational nightmare, especially during a storm and with daylight fading.
The Engagement: Into the Bay
Hawke did not hesitate. Relying on the superior seamanship of his captains and his own aggressive doctrine, he ordered the signal for a “General Chase,” directing his leading ships to simply follow the French pilot vessels right through the jagged rocks.
- The Close-Quarters Brawl: What followed was a chaotic, terrifying melee fought amongst the crashing surf and fading light. British ships pulled alongside the French, trading point-blank broadsides while simultaneously fighting the storm to avoid running aground.
- “Lay Me Alongside”: When Hawke’s sailing master warned him that navigating his massive 100-gun flagship, HMS Royal George, any deeper into the shoals was practically suicide, Hawke delivered his famous reply: “You have done your duty in pointing out the danger; you are now to obey my orders, and lay me alongside the Soleil Royal.” * The Carnage: The French fleet shattered under the pressure. The French ship Thésée attempted to open her lower gun ports to fire on the British, but a massive wave flooded the ship, and she sank with hundreds of men trapped inside. Another French ship, Superbe, was sunk by a single devastating broadside from Hawke’s flagship.
The Outcome and Legacy
By the time the sun rose the next morning, the threat of a French invasion was permanently eliminated.
- Total Victory: Six French ships of the line were destroyed or captured, including Conflans’ flagship, the Soleil Royal, which was run aground and burned by her own crew to prevent capture. Another seven French ships threw their heavy cannons overboard to escape over the shallow mudflats into the Vilaine River, where they remained trapped and useless for over a year.
- British Losses: The British lost only two ships, HMS Resolution and HMS Essex, both of which ran aground on the formidable Four Shoals during the chaotic night, though most of their crews were saved.
- The Rule, Britannia Era: The Battle of Quiberon Bay decisively ended the French plan to invade Britain and secured absolute British naval supremacy for the remainder of the war, allowing them to project power globally without interference. To celebrate the victory, the famous naval anthem “Heart of Oak” was composed and remains the official march of the Royal Navy today.
Would you like to explore the specific composition of the French army that was left waiting ashore, or look into the geopolitical treaties that resulted from Britain’s absolute dominance of the seas following this battle?
Admiral Sir Edward Hawke Legacy
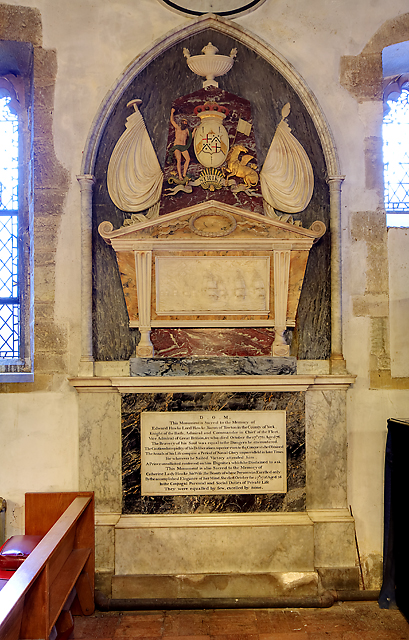
Monument to Admiral Edward Hawke, 1st Baron Hawke, in St Nicolas Church, North Stoneham, Hampshire, showing the arms of Hawke (Argent, a chevron erminois between three boatswain‘s whistles purple), with inescutcheon of pretence of Brooke quartering Hammond of Scarthingwell, for his heiress wife.
(Wiki Image By Mike Searle, CC BY-SA 2.0, https://commons.wikimedia.org/w/index.php?curid=37936205)
Admiral Sir Edward Hawke left a legacy that fundamentally rewrote the DNA of the Royal Navy. Before Horatio Nelson became the ultimate symbol of British naval aggression, it was Hawke who dismantled the rigid, overly formalized naval doctrines of the early 18th century and forged the fleet into a relentless offensive weapon.
Here is a breakdown of his lasting impact on naval warfare, grand strategy, and British culture.
Tactical and Strategic Revolution
Hawke’s most enduring legacy lies in how he changed the operational realities of war at sea. He proved that fleets could do more than just fight indecisive, parallel artillery duels.
- Shattering the “Fighting Instructions”: Prior to Hawke, British captains were terrified of courts-martial if they broke the Admiralty’s strict “line of battle”—even if following the rules meant letting the enemy escape (as seen at Toulon). Hawke’s championing of the “General Chase” at Cape Finisterre and Quiberon Bay proved that trusting captains to use their initiative in close-quarters combat was far more devastating to the enemy.
- The Year-Round Blockade: His continuous, six-month blockade of Brest in 1759 revolutionized grand strategy. By instituting a system of underway replenishment (supplying warships with fresh food and water at sea via transport ships), Hawke proved a fleet could be kept on station through the brutal autumn and winter months. This logistical breakthrough became the standard British strategy for suffocating the French economy and military for the next sixty years.
The “Hawke School” of Command
Hawke’s success fostered a new generation of Royal Navy officers who embraced his philosophy of calculated risk and decisive action.
- Mentoring Future Legends: Officers who served under Hawke, most notably Admiral Richard Howe (who led the vanguard into Quiberon Bay), carried his aggressive doctrines forward.
- Paving the Way for Nelson: Hawke’s insistence on annihilating the enemy fleet rather than simply outmaneuvering it laid the philosophical groundwork for Horatio Nelson. Nelson’s famous “Nelson Touch” at Trafalgar—breaking the enemy line to force a chaotic, close-quarters brawl—was a direct evolution of the tactics Hawke had utilized half a century earlier.
Cultural and National Impact
Hawke’s victories had an immediate and profound impact on the British national identity.
- The Year of Miracles: His triumph at Quiberon Bay secured 1759 as Britain’s Annus Mirabilis. By eliminating the French invasion threat, Hawke secured the British homeland, allowing the government to focus its resources on conquering French territories in North America and India. This effectively laid the foundations for the global British Empire.
- Heart of Oak: To celebrate the incredible victories of 1759, the actor David Garrick and composer William Boyce wrote the song “Heart of Oak”. The lyrics specifically reference Hawke’s blockade and the defeat of the French invasion forces. Today, it remains the official march of the Royal Navy and several other Commonwealth navies.
Commemoration
While perhaps not as universally recognized by the general public today as Nelson, Hawke’s name remains deeply respected within military and historical circles.
- Peerage: He was elevated to the peerage in 1776 as Baron Hawke of Towton.
- Naval Namesakes: The Royal Navy has a long history of naming ships in his honor. Several warships have been named HMS Hawke, most notably a cruiser that served in World War I.
- Places: Cape Hawke in New South Wales, Australia, was named in his honor by Captain James Cook, whose first famous expedition of discovery was authorized by Hawke during his tenure as First Lord of the Admiralty.
Would you like to explore how Hawke’s tactical philosophy directly influenced Admiral Lord Nelson’s strategy at the Battle of Trafalgar, or look closer at the lyrics and composition of the famous “Heart of Oak” anthem?
Admiral Sir Edward Hawke (1700s) YouTube Views Links, and Books Table
Here are two tables breaking down notable YouTube content and foundational books on Admiral Sir Edward Hawke, with a particular focus on his crowning achievement at the Battle of Quiberon Bay.
YouTube Resources: History & Tactical Breakdowns
| Video Title | Focus | Approximate Views | Link |
| How Britain Stopped the French Invasion | Quiberon Bay 1759 | A recent mini-documentary detailing the gale-force conditions, the French invasion threat, and Hawke’s aggressive pursuit into the shoals. | ~1,600 | Watch Here |
| The Drydock – Episode 291 | Naval historian Drachinifel answers deep-dive audience questions, frequently touching on 18th-century naval doctrine, ship designs, and commanders like Hawke. | ~275,000 | Watch Here |
| Admiral Edward Hawke’s Greatest Battle | An in-depth lecture by naval historian Dr. Alexander Clarke detailing the tactical intricacies, ship capabilities, and sheer scale of the victory at Quiberon Bay. | ~19,000 | Watch Here |
| The Forgotten French Plot to Invade Britain in 1759 | A short podcast clip exploring the broader geopolitical context and the French strategic planning behind the invasion that Hawke thwarted. | ~100 | Watch Here |
Recommended Books & Scholarly Works
| Book Title | Author(s) | Overview |
| Admiral Hawke: Britain’s Greatest Forgotten Naval Commander | Ruddock F. Mackay | The definitive, modern scholarly biography. Drawing heavily on primary Admiralty documents, it meticulously traces his rise from a junior captain breaking the rules at Toulon to his logistical revolution of the continuous blockade and his tenure as First Lord of the Admiralty. |
| The Battle of Quiberon Bay, 1759: Hawke and the Defeat of the French Invasion | Nicholas Tracy | A highly focused operational history of the 1759 campaign. It dissects the immense meteorological challenges, the British intelligence network, and the sheer seamanship required to fight a naval battle in restricted, storm-swept waters. |
| Pitt the Elder: Man of War | Edward Pearce | While a biography of the Prime Minister William Pitt, this book heavily features Hawke. It situates his naval campaigns within the context of the Seven Years’ War, examining how military victories at sea shaped global statecraft, the slave trade, and the expansion of the British Empire. |
If you are compiling sources for a historical discussion project involving AI tools, these materials offer a strong foundation. The books provide the granular logistical and political data necessary for deep strategic analysis, while the tactical breakdowns are perfect for feeding an AI to explore counterfactual naval scenarios—such as what might have happened to the British homeland if Hawke had failed to intercept the French invasion fleet in 1759.
🇫🇷 Admiral Pierre André de Suffren (1729–1788)
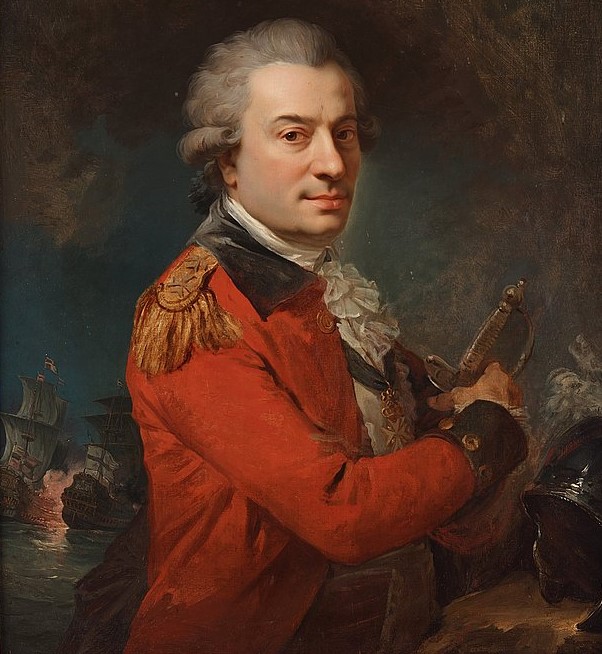
Portrait of Suffren during his service in the Maltese Navy
(Wiki Image By French school 18th Century. Formerly in the collection of Mr Georg Leon, England, 1925 (as a work by Alexander Roslin). – Bukowskis, Stockholm 2024-03-27, Public Domain, https://commons.wikimedia.org/w/index.php?curid=146825803)
Admiral Pierre André de Suffren Quotes Table
Pierre André de Suffren (1729–1788)—often called “Bailli de Suffren”—was one of the greatest admirals of France during the American Revolutionary War. His aggressive leadership against the British fleet in the Indian Ocean made him one of the few French commanders admired even by his enemies. ⚓
| Quote | Context | Meaning |
| “Gentlemen, when you fight the English, close with them.” | Address to his captains before battle | Shows his belief in aggressive, close-range naval combat. |
| “The enemy must be attacked wherever he is found.” | Strategic instruction during campaigns | Reflects Suffren’s doctrine of constant pressure on the enemy. |
| “I would rather lose a mast than lose an opportunity.” | During difficult maneuvers at sea | Illustrates his bold willingness to take risks in battle. |
| “A captain who fears the enemy is unworthy of command.” | Criticism of hesitant officers | Emphasizes courage and decisiveness among naval leaders. |
| “Victory belongs to those who strike first and hardest.” | Attributed to accounts of his campaigns | Captures his offensive approach to naval warfare. |
⚓ Historical Reputation
Pierre André de Suffren gained fame in a series of hard-fought battles against the British admiral Edward Hughes, including the Battles of Sadras and Trincomalee. His energetic tactics later influenced the aggressive naval style associated with Horatio Nelson.
Admiral Pierre André de Suffren Battles Table
Here is a chronological table of the major naval battles fought by the brilliant and aggressive French tactician, Admiral Pierre André de Suffren.
While he saw action in the War of the Austrian Succession and the Seven Years’ War, his reputation as one of the 18th century’s greatest naval commanders was cemented during the American Revolutionary War—specifically his grueling, five-battle Indian Ocean campaign against British Vice-Admiral Sir Edward Hughes.
Early Career Battles
| Battle | Date | Conflict | Opponent | Outcome & Tactical Notes |
| Battle of Toulon | Feb 1744 | War of the Austrian Succession | Great Britain | Inconclusive. Suffren’s first major action; served aboard the 64-gun Solide and engaged HMS Northumberland. |
| Second Battle of Cape Finisterre | Oct 1747 | War of the Austrian Succession | Great Britain | British Victory. The French fleet was defeated, and a young Suffren was taken as a prisoner of war. |
| Battle of Minorca | May 1756 | Seven Years’ War | Great Britain | French Victory. The French fleet successfully repelled the British, leading to the fall of Minorca. |
| Battle of Lagos | Aug 1759 | Seven Years’ War | Great Britain | British Victory. Suffren’s ship, Océan, was driven ashore and burned in neutral Portuguese waters. He was taken prisoner a second time. |
| Battle of Grenada | Jul 1779 | American Revolutionary War | Great Britain | French Victory. Commanding the Fantasque in the vanguard, Suffren sustained heavy casualties but earned a reputation for aggressively seeking action. |
The Indian Ocean Campaign (1781–1783)
Suffren was dispatched to the Indian Ocean to challenge British sea control and support French and allied Indian ground forces. He repeatedly broke from the traditional, rigid “line of battle” tactics to try and isolate and destroy portions of the British fleet.
| Battle | Date | Opposing Commander | Outcome & Tactical Notes |
| Battle of Porto Praya | Apr 16, 1781 | Commodore George Johnstone | Strategic French Victory. En route to the Indian Ocean, Suffren launched a surprise attack on the anchored British fleet in neutral Cape Verde, delaying their attempt to capture the Cape of Good Hope. |
| Battle of Sadras | Feb 17, 1782 | Vice-Admiral Sir Edward Hughes | Inconclusive. Suffren attempted a sophisticated maneuver to double up on the British rear, but cautious French captains failed to coordinate, allowing Hughes to escape. |
| Battle of Providien | Apr 12, 1782 | Vice-Admiral Sir Edward Hughes | Inconclusive. A fierce, evenly matched clash off the coast of Ceylon. Both fleets suffered heavy damage before a severe storm forced them to break off. |
| Battle of Negapatam | Jul 6, 1782 | Vice-Admiral Sir Edward Hughes | Inconclusive. Suffren attempted a close-quarters brawl, but a sudden shift in the wind broke up the engagement. |
| Battle of Trincomalee | Sep 3, 1782 | Vice-Admiral Sir Edward Hughes | Inconclusive. One of the most brutal engagements of the campaign. Suffren threw himself into the center of the British line to inflict massive damage, but a lack of support from his captains prevented a decisive victory. |
| Battle of Cuddalore | Jun 20, 1783 | Vice-Admiral Sir Edward Hughes | French Victory. The final battle of the war. Suffren successfully forced Hughes to retreat to Madras, securing French dominance over the local waters just before news of the peace treaty arrived. |
If you are gathering this for your historical discussion project, would you like me to draft a counterfactual scenario where Suffren’s aggressive, line-breaking tactics are matched against a different historical commander?
Admiral Pierre André de Suffren History

Bust of Suffren by Brion, on display at the Paris Naval Museum
(Wiki Image By Rama, CC BY-SA 3.0 fr, https://commons.wikimedia.org/w/index.php?curid=7187633)
Pierre André de Suffren de Saint Tropez (1729–1788), commonly known as the Bailli de Suffren, is widely regarded as one of the most brilliant and aggressive naval commanders in French history.
In an era when naval warfare was often rigid and highly formalized, Suffren stood out for his fierce desire to completely annihilate enemy fleets rather than simply maneuver for a slight tactical advantage. He is frequently compared to Britain’s Horatio Nelson for his innovative, line-breaking tactics.
Here is an overview of his life and historical impact:
Early Life and the Knights of Malta
Born into a noble family in Provence, France, Suffren was destined for a life at sea. As a younger son, he was enrolled in the Knights of Malta (the Sovereign Military Order of Malta) at a young age, eventually earning the high-ranking title of Bailli (Bailiff).
He entered the French Navy in 1743 and saw his first action during the War of the Austrian Succession. He also participated in the Order of Malta’s campaigns against the Barbary pirates in the Mediterranean, which gave him early experience in aggressive, close-quarters combat.
The Crucible of Defeat
Suffren’s tactical philosophy was heavily shaped by failure—specifically, the systemic failures of the French Navy during his early career.
- Captured Twice: During the War of the Austrian Succession and the Seven Years’ War, he was taken prisoner by the British twice (at the battles of Cape Finisterre and Lagos).
- Learning from the Enemy: During his time as a prisoner, he closely observed British naval aggression. He grew to despise the standard French naval doctrine of the time, which prioritized defensive maneuvering, firing at the enemy’s rigging to disable them, and preserving the fleet rather than risking ships to destroy the enemy.
The Indian Ocean Campaign (1781–1783)
Suffren’s true genius was unleashed during the American Revolutionary War. France entered the war to support the American colonies, and Suffren was given command of a squadron sent to the Indian Ocean to disrupt British interests in India and support French and allied Indian ground forces (such as those of Hyder Ali).
This campaign became his masterpiece for two main reasons:
- Unprecedented Logistics: Operating thousands of miles from a friendly port, Suffren kept his fleet at sea and in fighting condition for years. He refused to retreat to distant French bases for repairs, instead refitting his ships at sea, establishing temporary anchorages, and capturing British supply ships to feed his men.
- Relentless Aggression: He fought a grueling series of five major battles against British Vice-Admiral Sir Edward Hughes. While none of the individual battles resulted in the total destruction of the British fleet, Suffren strategically outmaneuvered Hughes, ultimately securing French naval dominance in the region and successfully landing troops to support local anti-British forces.
Tactical Innovations and Frustrations
Suffren was a visionary who rejected the traditional “line of battle”—a tactic where opposing fleets sailed in parallel lines, exchanging broadsides until one side withdrew.
Instead, Suffren favored concentration of force. He actively tried to break the British line or double up his ships against a specific portion of the enemy fleet (usually the rear) to overwhelm and destroy it.
However, his greatest obstacle was often his own fleet. His French captains, trained in the old, cautious doctrines, repeatedly failed to understand or execute his complex, highly aggressive signals. Time and time again, Suffren would throw his own flagship into the thick of the fight, only to watch his captains hang back, costing him decisive victories.
Death and Legacy
Suffren returned to France in 1784 as a national hero. He was showered with honors by King Louis XVI. He died suddenly in Paris in 1788; officially, the cause of death was apoplexy (a stroke or heart attack), though persistent rumors suggested he was killed in a duel.
Today, he is remembered as a commander who was decades ahead of his time, employing tactics that would later define the massive, decisive naval battles of the Napoleonic Wars.
Would you like to explore the specific tactical maneuvers he attempted against the British in the Indian Ocean, or delve into the logistical miracles he performed to keep his fleet afloat without a home base?
The Battle of Porto Praya (April 16, 1781)
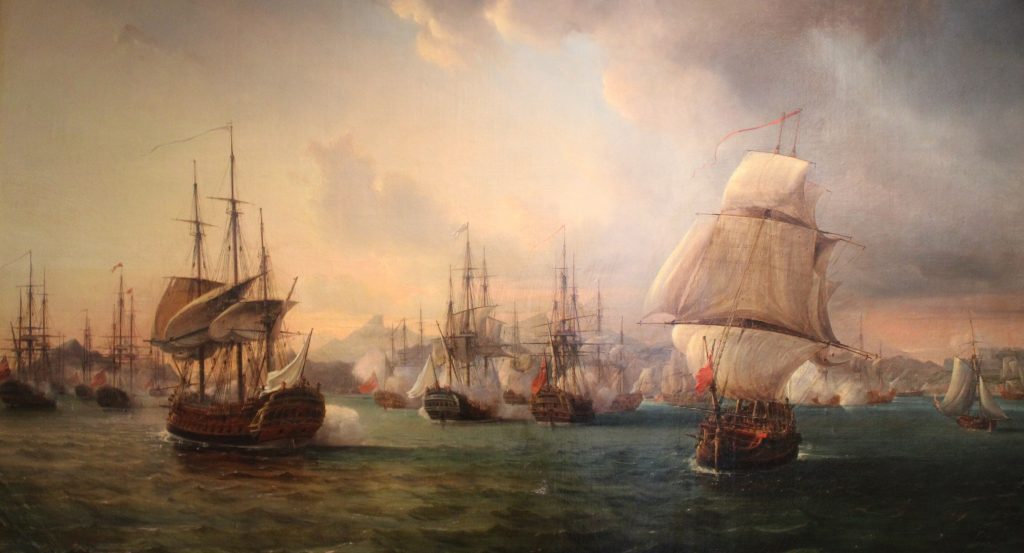
Battle of Praia Bay in Santiago Island in Cape Verde, 16 April 1781
(Wiki Image By Pierre-Julien Gilbert – https://art.rmngp.fr/fr/library/artworks/de-cercy-auguste-louis-de-rossel_pierre-julien-gilbert_combat-de-la-baie-de-la-praya-dans-l-ile-de-san-iago-au-cap-vert-le16-avril-1781_huile-sur-toile_1837, Public Domain, https://commons.wikimedia.org/w/index.php?curid=173725893)
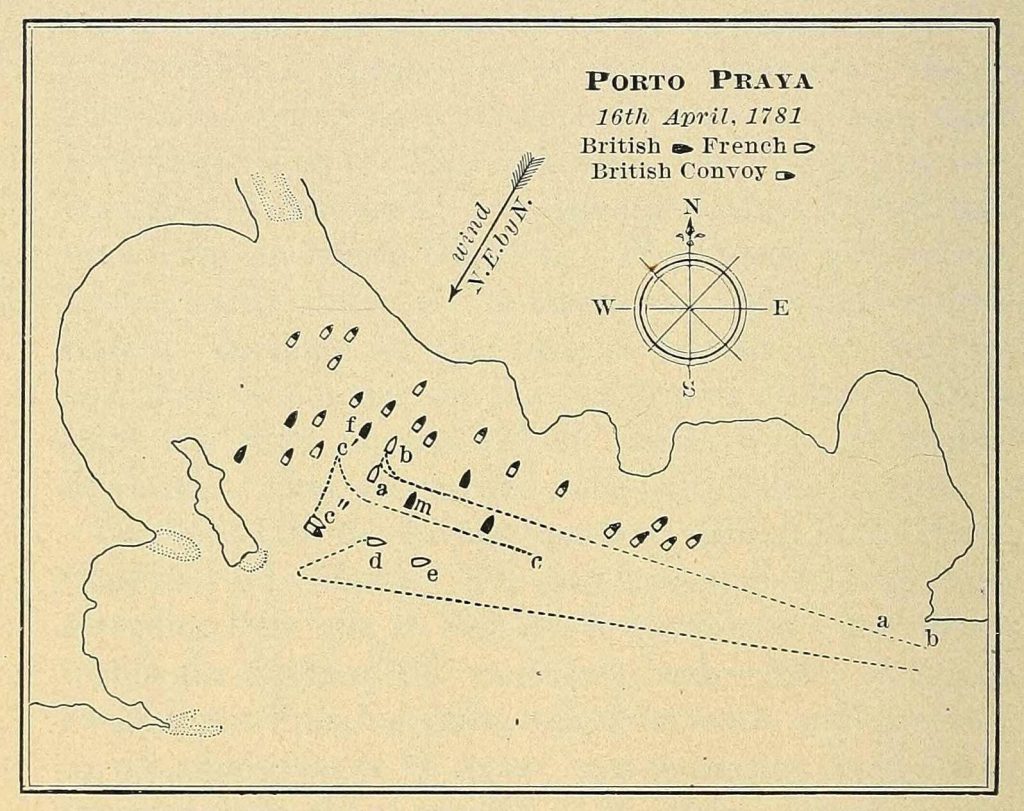
A map of the battle with the major ship movements
(Wiki Image By Alfred Mahan (1840-1914) – https://archive.org/details/majoroperations00unkngoog, Public Domain, https://commons.wikimedia.org/w/index.php?curid=15737892)
The Battle of Porto Praya was the opening clash of Admiral Pierre André de Suffren’s legendary Indian Ocean campaign. Fought in the Cape Verde islands off the coast of West Africa, it perfectly encapsulated Suffren’s trademark aggression, his disregard for naval conventions, and the strategic brilliance that defined his career.
Here is a breakdown of the battle, its context, and its outcome:
The Strategic Context: The Race for the Cape
By 1781, the Dutch Republic had entered the American Revolutionary War against Great Britain. As a result, the highly strategic Dutch colony at the Cape of Good Hope (the vital resupply waypoint for any ships traveling between Europe and India) was vulnerable.
- The British Objective: A British squadron under Commodore George Johnstone was dispatched to capture the Cape.
- The French Objective: Suffren was ordered to sail to the Indian Ocean to challenge British dominance in India, with strict secondary orders to reinforce the Dutch at the Cape before Johnstone could capture it.
It became a massive, high-stakes naval race down the coast of Africa.
The Surprise Encounter
On April 16, 1781, Suffren’s squadron arrived at Porto Praya in the Cape Verde Islands to take on fresh water. Cape Verde was Portuguese territory, and Portugal was strictly neutral.
To Suffren’s shock, he found Johnstone’s British fleet already anchored in the bay. The British were unprepared for an attack, with their decks cluttered with supplies and many men ashore. Furthermore, they believed they were perfectly safe within a neutral harbor.
The Engagement: Aggression Over Convention
Under standard naval doctrine, Suffren should have respected Portuguese neutrality or, at the very least, waited to form a proper line of battle. He did neither.
- The Charge: Seeing the British vulnerable, Suffren immediately signaled a general attack and sailed his 74-gun flagship, the Héros, straight into the anchored British fleet.
- The Chaos: He was closely followed by only one other ship, the Annibal. The rest of his captains, confused by the sudden abandonment of convention and struggling with the winds, failed to support him effectively.
- The Brawl: What followed was a brutal, disorganized melee at close quarters. The Annibal was entirely dismasted, and Suffren’s Héros absorbed the concentrated fire of several British warships. After a fierce exchange lasting about an hour and a half, Suffren realized he lacked the support to destroy the British fleet. He towed the crippled Annibal out of the bay and withdrew.
The Outcome: A Tactical Draw, a Strategic Triumph
Tactically, the battle was inconclusive. Both fleets suffered heavy damage and roughly equal casualties, and neither side lost a ship. However, the strategic outcome was a massive victory for France.
Johnstone spent precious days repairing his ships in Porto Praya, assuming Suffren would have to return to a friendly port to do the same. Instead, Suffren repaired his severely damaged ships while underway at sea—a major logistical feat for the era.
Because he didn’t stop, Suffren won the race. He arrived at the Cape of Good Hope, landed French troops, and heavily fortified the Dutch colony. When Johnstone finally arrived weeks later, he found the Cape too heavily defended to attack and was forced to abandon his primary mission.
Would you like to explore the next major clash in Suffren’s campaign, the Battle of Sadras, where he first met his primary rival, Sir Edward Hughes?
The Battle of Trincomalee (September 3, 1782)
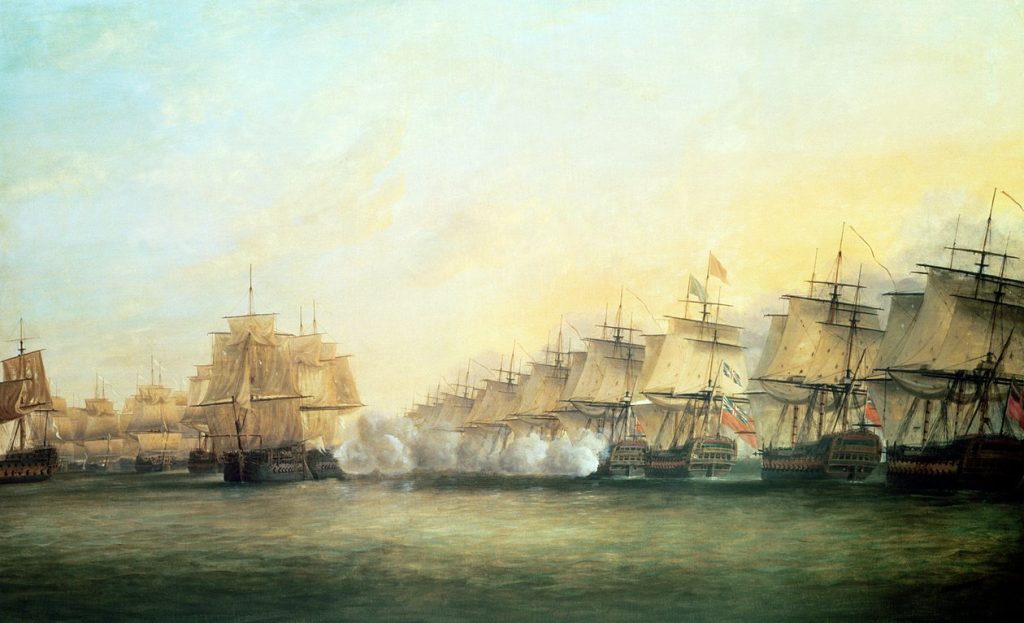
Fourth Action off Trincomalee between the English under Admiral Sir Edward Hughes and the French under M. de Suffren
(Wiki Image By Dominic Serres – https://www.meisterdrucke.uk/fine-art-prints/Dominic-Serres/56866/The-Fourth-Action-off-Trincomalee-between-the-English-under-Admiral-Sir-Edward-Hughes-and-the-French-under-M.-de-Suffren.html, Public Domain, https://commons.wikimedia.org/w/index.php?curid=166737624)
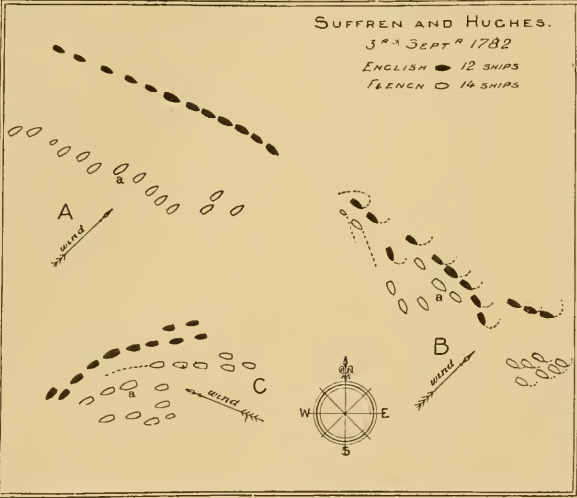
Plan of the battle (British units – black, French – white)
(Wiki Image By Mahan, A. T. – Major operations of the Royal Navy, 1762-1783. Being chapter XXXI, in The Royal Navy. A history (1898)” published 1898, p.559, URL: https://archive.org/details/majoroperationso00maha, Public Domain, https://commons.wikimedia.org/w/index.php?curid=44339139)
As the most brutal and dramatic clash of the Indian Ocean campaign, the battle’s granular details reveal exactly why Suffren is remembered as a tactical genius and why his relationship with his officers was so famously toxic.
Here is a closer look at the ship-to-ship mechanics and the internal chaos of September 3, 1782:
The Fleets and the Tactical Plan
Going into the battle, Suffren held a slight numerical advantage, commanding 14 ships of the line against Sir Edward Hughes’s 12.
- The Maneuver: Suffren’s plan was to use his superior numbers to overwhelm the British. He signaled for his vanguard (the front of the fleet) to engage the British center, while his own center and rear would double up on the British rear, trapping them in a crossfire at “pistol-shot” (point-blank) range.
The Complete Breakdown of Command
The engagement began in the mid-afternoon, and almost immediately, Suffren’s intricate plan unraveled due to his captains’ incompetence and insubordination.
- The Timid Vanguard: The captains of the French lead ships, adhering strictly to the old, cautious doctrines they were used to, refused to close the distance. They engaged the British vanguard at maximum range, where their cannons were largely ineffective, completely ignoring Suffren’s signals to move in.
- The Isolated Center: Infuriated, Suffren broke from the line in his 74-gun flagship, the Héros, and charged directly into the British center to force close-quarters combat. He expected his fleet to follow him. They did not.
- The Three-Ship Stand: Ultimately, only two ships—the 74-gun Illustre and the 64-gun Ajax—followed their admiral into the fray. For hours, these three ships absorbed the concentrated broadsides of the British center, including Hughes’s own flagship, the Superb.
The Sévère Mutiny
The sheer chaos of the battle was perfectly encapsulated by an infamous incident aboard one of the French ships, the Sévère.
After taking heavy fire and losing its rigging, the Sévère’s captain, de Cillart, panicked. Believing the ship was lost, he ordered his men to strike the colors (lower the flag to surrender) to the British. However, his junior officers were so utterly enraged by this perceived cowardice that they essentially mutinied against him on the spot. They physically prevented the surrender, re-hoisted the French colors, and fired a devastating broadside into the British ship that was moving in to claim them as a prize.
The Aftermath: Suffren’s Purge
As evening fell and the winds shifted, the rest of the cautious French fleet finally drifted down to cover Suffren’s shattered flagship. Both fleets were heavily damaged, and Hughes withdrew into the night.
While the battle secured Trincomalee for the French (a massive strategic victory), Suffren was apoplectic. The Héros had been entirely dismasted, the captain of the Ajax had been killed, and a decisive annihilation of the British fleet had slipped through his fingers because of his own men.
In the days following the battle, Suffren initiated a ruthless purge of his officer corps. He arrested at least three of his most senior captains (including de Cillart), publicly stripped them of their commands, and sent them back to France in disgrace to face court-martial for cowardice and insubordination.
Would you like to explore the specific court-martial outcomes and how the French naval establishment reacted to these disgraced captains, or would you prefer to pivot to the broader geopolitical impacts of this campaign on the war in India?
The Battle of Cuddalore (June 20, 1783)
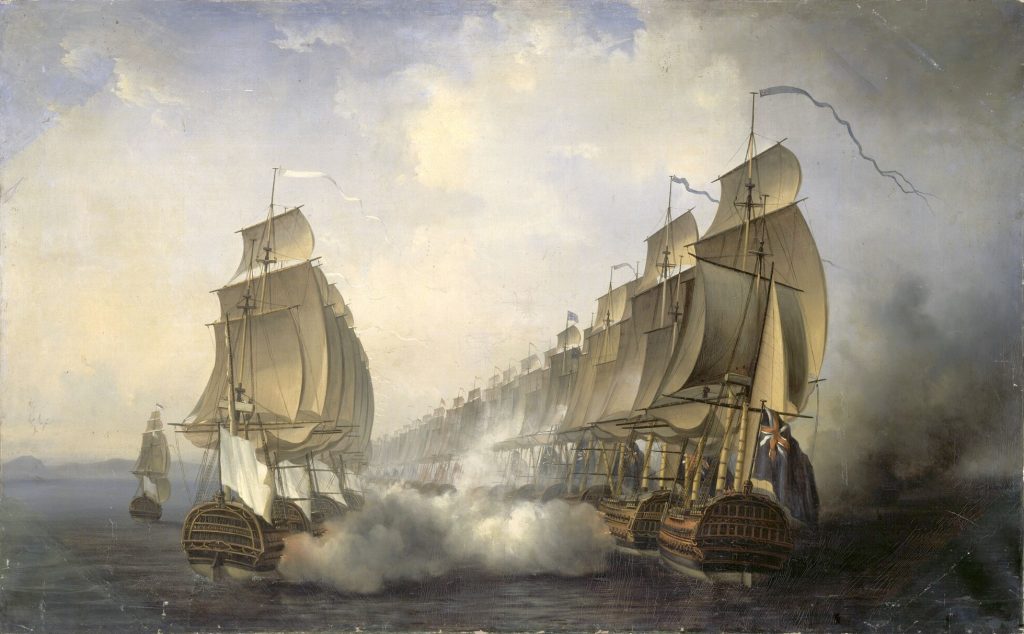
Painting of the Battle of Cuddalore (June 20th, 1783) between the French navy commanded by the Bailli de Suffren and the British one under the orders of Rear-Admiral Edward Hughes
(Wiki Image By Auguste Jugelet – Chateau de Versailles, Public Domain, https://commons.wikimedia.org/w/index.php?curid=44744648)
The Battle of Cuddalore was the fifth and final clash between Admiral Pierre André de Suffren and British Vice-Admiral Sir Edward Hughes. It served as the climax of their grueling Indian Ocean campaign and resulted in a definitive strategic victory for the French, securing their local dominance just as the war came to a close.
Here is a breakdown of this decisive final engagement:
The Strategic Context:
The Siege of Cuddalore. By the summer of 1783, the strategic situation had shifted to land. A British army under Major General James Stuart had laid siege to the French-held port of Cuddalore, commanded by the Marquis de Bussy.
- The British Advantage: Vice-Admiral Hughes had anchored his fleet off the coast, blockading the port and protecting the British supply ships. The French garrison was heavily outnumbered and running out of time.
- The French Response: Suffren, operating out of his newly secured base at Trincomalee, sailed to relieve the besieged garrison. His fleet was battered, and his crews were severely depleted by combat and disease, but he knew the fall of Cuddalore would mean the end of French influence in the region.
The Maneuvering:
A Tactical Masterclass When Suffren arrived off Cuddalore in mid-June, Hughes moved his fleet out to sea to intercept. Rather than attacking immediately, Suffren used the shifting winds to perform a brilliant piece of seamanship.
He managed to slip his entire fleet between Hughes and the shoreline, effectively stealing the British anchorage. This maneuver accomplished two vital goals:
- It broke the naval blockade, securing direct communication with the besieged French garrison.
- It allowed Suffren to embark 1,200 French soldiers from the fort to act as temporary marines, replacing his dead and sick sailors so his ships could actually fight.
The Engagement:
A Traditional Clash With his crews bolstered, Suffren sailed out to meet Hughes on June 20. Unlike his previous wild, line-breaking melees, this battle was fought in a much more traditional line of battle.
- The Exchange: Both fleets formed parallel lines and battered each other with broadsides for about three hours.
- The Attrition: Hughes’s fleet was suffering from severe water shortages and a widespread outbreak of scurvy. The reinforced French gunners, firing with discipline, inflicted heavy damage on the British rigging and hulls.
- The Retreat: Unable to sustain the fight and facing mounting casualties, Hughes broke off the engagement.
The Outcome:
A Victory Overtaken by Peace. Tactically, the French got the better of the exchange, but strategically, it was a massive triumph for Suffren.
Hughes was forced to withdraw his crippled fleet all the way back to Madras for repairs. With the British fleet gone, Suffren had total command of the sea around Cuddalore. He immediately moved to destroy the British supply ships, leaving the besieging British army stranded, starving, and vulnerable to a French counter-attack.
However, the ultimate irony of the Battle of Cuddalore is that the war was already over. Just nine days after the battle, a ship arrived bearing news that the preliminary Treaty of Paris had been signed months earlier, ending the American Revolutionary War and ordering an immediate cessation of hostilities.
Since this marks the end of Suffren’s legendary campaign, would you like me to summarize the overall historical legacy of his rivalry with Hughes, or would you prefer to explore how Suffren’s tactics influenced later naval commanders?
Admiral Pierre André de Suffren Legacy
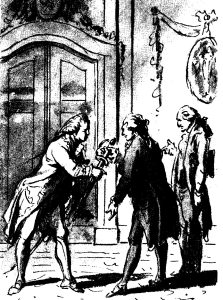
The envoys Mattheus Lestevenon and Gerard Brantsen presented Vice-Admiral Pierre André Bailly de Suffren de Saint Tropez with a golden sword in 1784
(Wiki Image By Jacobus Buys – Geheugen van Nederland, Public Domain, https://commons.wikimedia.org/w/index.php?curid=3144253)
Admiral Pierre André de Suffren’s legacy is that of a visionary commander who was fundamentally ahead of his time. Though his ultimate strategic successes were blunted by the end of the American Revolutionary War and the failures of his subordinates, his approach to naval warfare permanently altered how naval battles were fought and studied.
Here is a breakdown of his historical legacy and lasting impact:
The Forefather of Decisive Naval Warfare
Prior to Suffren, 18th-century naval warfare was often treated like a lethal chess match. Admirals adhered rigidly to the “line of battle,” seeking to outmaneuver the enemy, inflict moderate damage, and preserve their own fleets.
Suffren despised this approach. He introduced a philosophy of annihilation and concentration of force. He believed the goal of a naval battle was not to maneuver or to capture a few prizes, but to utterly destroy the enemy’s fighting capacity. By breaking the line, isolating sections of the enemy fleet, and forcing chaotic, close-quarters combat, he anticipated the tactical doctrines that would come to dominate the Napoleonic Wars decades later.
Influence on Horatio Nelson
Suffren’s most significant, albeit indirect, legacy is his profound influence on Lord Horatio Nelson, Britain’s greatest naval hero.
- Naval historians consistently draw parallels between the two commanders. Nelson’s legendary, line-breaking tactics at the Battle of Trafalgar (1805) and his aggressive concentration of force at the Battle of the Nile (1798) were essentially perfect executions of the exact maneuvers Suffren had attempted in the Indian Ocean twenty years prior.
- While Suffren’s captains failed to support him, Nelson spent years cultivating his “Band of Brothers”—captains who implicitly understood his aggressive intentions and could execute them without strict flag signals.
Recognition by Naval Strategists
In the late 19th century, Suffren was heavily studied and popularized by Alfred Thayer Mahan, the highly influential American naval historian and strategist. In his seminal work, The Influence of Sea Power Upon History, Mahan dedicated extensive analysis to Suffren’s Indian Ocean campaign.
Mahan praised Suffren’s logistical genius in maintaining a fleet without a friendly port and explicitly ranked him as the greatest naval commander France had ever produced, bringing his accomplishments to a global audience of military thinkers.
The Respect of His Adversaries
Interestingly, Suffren was arguably more respected by the British during his lifetime than by the French naval establishment, which viewed him as an abrasive maverick.
Following the peace treaty in 1783, Suffren’s fleet stopped at the British port of Cape Town on the journey back to France. The British naval officers present—some of whom he had just spent two years fighting—insisted on coming aboard his flagship to personally meet him and pay their respects to his tactical brilliance and relentless fighting spirit.
Commemoration in France
Despite the initial friction with the traditionalists of his era, France eventually recognized his genius. He became a lasting national icon.
- Naval Vessels: The French Navy has continuously honored its legacy. Since 1794, eight different French warships have been named Suffren. Currently, the lead ship of the French Navy’s newest class of nuclear-powered attack submarines is named Suffren.
- Monuments: A prominent statue of him stands in his hometown of Saint-Tropez, facing the sea. He is also honored with streets and avenues across France, including the Avenue de Suffren in Paris, located right next to the Eiffel Tower.
Would you like to dive deeper into the specific comparisons between Suffren and Nelson, or explore Alfred Thayer Mahan’s specific analysis of Suffren’s logistical strategies?
Admiral Pierre André de Suffren YouTube Views Links, and Books Table
Here are several historical YouTube videos discussing Admiral Pierre André de Suffren and his 18th-century naval campaigns, along with their current view counts and links, followed by a table of historical books about his life.
YouTube Videos: Admiral de Suffren History
- Suffren, le plus grand des amiraux français (SANS IA)
- Views: 216,620
- Link: http://www.youtube.com/watch?v=q4yRt3Qy3gs
- Admiral Satan: The French Hero Who Terrorized The British Navy
- Views: 255
- Link: http://www.youtube.com/watch?v=CKQP5r8WvMg
- 2 2 Le vice amiral de Suffren 1743 1788 Empire Colonial Français
- Views: 253
- Link: http://www.youtube.com/watch?v=bzxXNOGihgI
- The Battle That Almost Broke Britain’s Grip on India
- Views: 26
- Link: http://www.youtube.com/watch?v=4pue7PaHiAc
Historical Books Table
Here is a table of notable historical books and primary accounts detailing his life, tactics, and campaigns:
| Book Title | Author | Original Publication | Description |
| Histoire de la campagne de l’Inde, par l’escadre française, sous les ordres de M. Le bailli de Suffren | Jacques Jerome Antoine Trublet | 1801 | A first-hand account written by a former captain in Suffren’s fleet detailing the brutal Indian Ocean campaign. |
| Essai historique sur la vie et les campagnes du bailli de Suffren | J.-F.-G. Hennequin | 1824 | A classic 19th-century French historical essay exploring his life, military tactics, and overall legacy. |
| Histoire Du Bailli De Suffren | Charles Cunat | 1852 | A comprehensive 19th-century French biography covering the entirety of his naval career from his early days to his ultimate command. |
| Le Bailli de Suffren dans l’Inde | J. S. Roux | 1862 | A dedicated analysis specifically focused on his legendary maneuvering and logistical feats in the Indian Ocean. |
| Le Bailli de Suffren | Fr. Joubert | 1870 | A focused French historical text exploring the life, personality, and exploits of the famed admiral. |
| The Navy in India 1763-1783 | Admiral Sir H. W. Richmond | 1931 | A major 20th-century historical work studying the policy and naval forces in India, with extensive coverage of Suffren’s battles against British Vice-Admiral Hughes. |
🇬🇧 Admiral Lord Horatio Nelson (1758–1805)
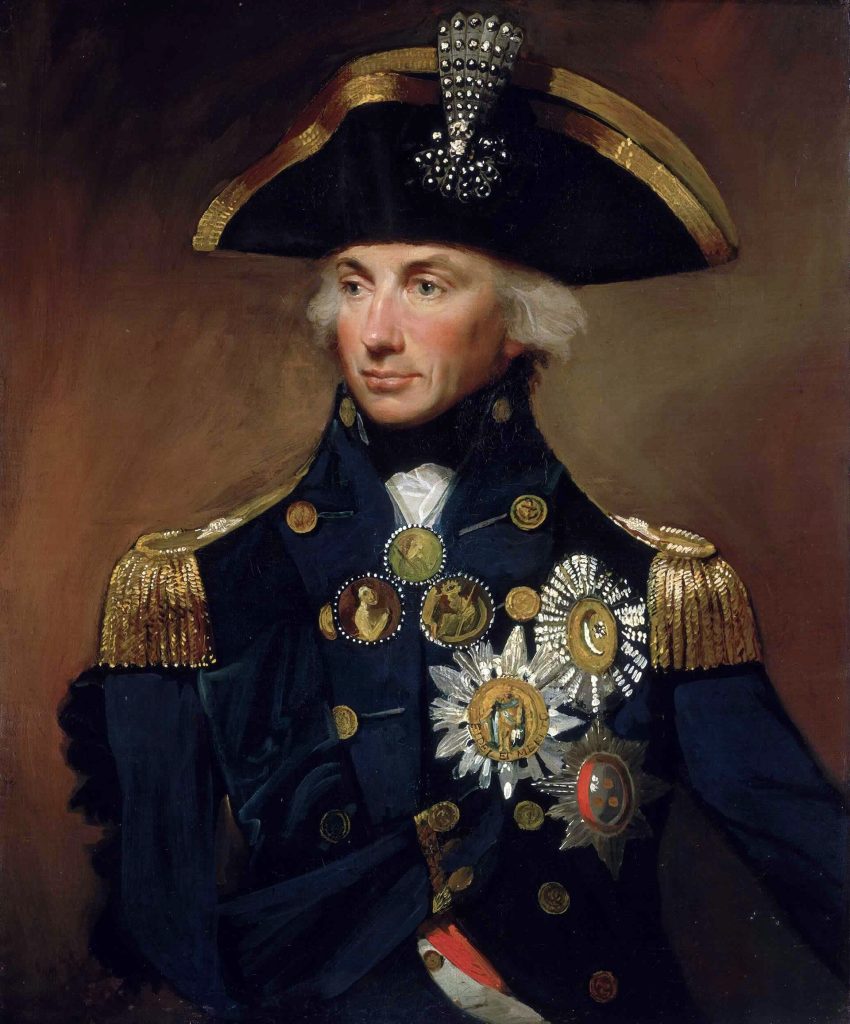
Portrait of Nelson by L. F. Abbott (1799)
(Wiki Image By Lemuel Francis Abbott – National Maritime Museum website:Embedding web page: http://www.nmm.ac.uk/collections/nelson/viewRepro.cfm?reproID=BHC2889 (archived version)Image: https://collections.rmg.co.uk/mediaLib/484/606/bhc2889.jpgFull catalogue record: https://collections.rmg.co.uk/collections/objects/14362.htmlThe painting was published as early as 1898 in: Sladen, Douglas (1898). “The Nelson Centenary”. The Magazine of Art 22: p. 530. London, Paris, New York & Melbourne: Cassell and Company. Retrieved on 2010-01-15., Public Domain, https://commons.wikimedia.org/w/index.php?curid=2833419)
Admiral Lord Horatio Nelson Quotes Table
Here is a table of some of the most famous and defining quotes from Admiral Lord Horatio Nelson, Britain’s greatest naval hero. His words often perfectly captured his aggressive tactical philosophy, his flair for the dramatic, and his deep sense of duty.
Admiral Lord Horatio Nelson Quotes
| Quote | Date / Context | Historical Significance & Meaning |
| “England expects that every man will do his duty.” | October 21, 1805
(Battle of Trafalgar) |
The most famous naval signal in British history. Nelson ordered it hoisted via flag semaphore to the fleet just before engaging the combined French and Spanish fleets. It became a lasting cultural motto in Britain. |
| “I have only one eye, I have a right to be blind sometimes… I really do not see the signal!” | April 2, 1801
(Battle of Copenhagen) |
Spoken to his flag captain after Nelson’s cautious commanding officer signaled the fleet to retreat. Nelson dramatically put his telescope to his blind eye, ignored the order, pressed the attack, and won a decisive victory. |
| “Thank God I have done my duty.” | October 21, 1805
(Battle of Trafalgar) |
Nelson’s widely reported dying words. After being shot by a French sniper, he lived just long enough to hear that his fleet had achieved a massive, decisive victory. |
| “Time is everything; five minutes make the difference between victory and defeat.” | Circa 1800 | A perfect summary of his tactical philosophy. Nelson believed that speed, initiative, and the exploitation of momentary enemy weaknesses were far more important than rigid, traditional formations. |
| “Desperate affairs require desperate measures.” | February 1797
(Battle of Cape St. Vincent) |
Spoken in the context of taking massive tactical risks against superior numbers. In this battle, Nelson broke from the line without orders to intercept the Spanish fleet, a wildly risky move that secured the victory. |
| “First gain the victory and then make the best use of it you can.” | General tactical philosophy | Reflects his focus on the annihilation of the enemy fleet rather than just forcing them to retreat. He believed a victory wasn’t complete until the enemy was unable to fight again. |
| “Aft the most honor, forward the better man.” | A traditional naval proverb often used by Nelson | Refers to the layout of a warship (officers in the rear/aft, common sailors in the front/forward). Nelson used this to express his deep respect for the courage and hard work of the common sailors serving under him. |
Would you like me to break down the specific flag semaphore system Nelson used to send his famous “England expects…” signal at Trafalgar?
Admiral Lord Horatio Nelson Battles Table
Here is a chronological table detailing the most significant battles and engagements of Admiral Lord Horatio Nelson, highlighting his tactical brilliance and the severe physical toll his career took.
Major Battles of Admiral Lord Horatio Nelson
| Date | Battle | Conflict | Nelson’s Flagship | Outcome & Significance |
| July–Aug 1794 | Siege of Calvi | War of the First Coalition | HMS Agamemnon | British Victory. While commanding a naval detachment onshore in Corsica, Nelson was struck in the face by debris from a cannon blast, resulting in the permanent loss of sight in his right eye. |
| Feb 14, 1797 | Battle of Cape St Vincent | War of the First Coalition | HMS Captain | British Victory. Nelson boldly disobeyed orders, breaking from the line of battle to engage the Spanish fleet. He personally led the boarding and capture of two enemy ships. He was knighted and promoted to Rear-Admiral shortly after. |
| July 22–25, 1797 | Battle of Santa Cruz de Tenerife | War of the First Coalition | HMS Theseus | Spanish Victory. A disastrous nighttime amphibious assault on the Canary Islands. Nelson was shot in the right arm as he landed, forcing a rapid amputation and a temporary return to England to recover. |
| Aug 1–3, 1798 | Battle of the Nile
(Aboukir Bay) |
War of the Second Coalition | HMS Vanguard | Decisive British Victory. Nelson launched a daring, unexpected night attack that nearly annihilated the anchored French fleet. This effectively stranded Napoleon’s army in Egypt and cemented Nelson’s status as a national hero. |
| April 2, 1801 | Battle of Copenhagen | War of the Second Coalition | HMS Elephant | British Victory. During a fierce firefight against the Dano-Norwegian fleet, Nelson famously put his telescope to his blind eye to deliberately ignore a signal flag ordering him to retreat, pressing the attack to victory. |
| Oct 21, 1805 | Battle of Trafalgar | War of the Third Coalition | HMS Victory | Decisive British Victory. The defining naval clash of the era. Nelson aggressively drove his columns directly through the Franco-Spanish line, devastating the enemy fleet and securing British naval supremacy for a century. Nelson was fatally shot by a French sniper at the height of the battle. |
Would you like to explore the specific naval tactics—such as the famous “Nelson Touch”—that he used to dismantle the enemy lines at Trafalgar?
Admiral Lord Horatio Nelson History
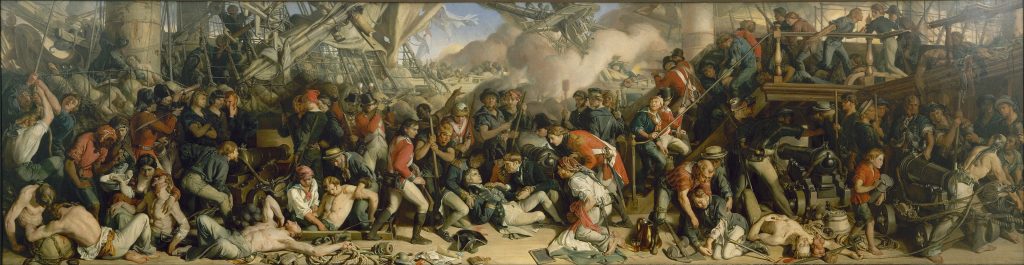
The Death of Nelson by Daniel Maclise
(Wiki Image By Daniel Maclise – TQGzQR0Xk952rA at Google Cultural Institute maximum zoom level, Public Domain, https://commons.wikimedia.org/w/index.php?curid=21878967)
Vice-Admiral Lord Horatio Nelson is arguably the most famous and celebrated naval commander in British history. His career was defined by extraordinary tactical brilliance, a willingness to defy conventional military doctrine, and a dramatic personal life, all set against the existential struggle of the French Revolutionary and Napoleonic Wars.
Here is the narrative arc of his life, his innovative approach to warfare, and his enduring legacy.
Early Life and Rapid Ascent
Born in September 1758 in Burnham Thorpe, Norfolk, Nelson was the son of a reverend. He entered the Royal Navy at the tender age of 12, reporting to his uncle, Captain Maurice Suckling, aboard HMS Raisonnable.
Nelson’s early career was characterized by rapid promotion, driven by a mix of patronage, immense personal drive, and undeniable competence. By the age of 20, during the American War of Independence, he was already a post-captain. However, the peacetime that followed the American Revolution saw Nelson placed on half-pay, a frustrating period where he languished ashore for five years.
The Crucible of the Napoleonic Era
Nelson’s true ascent began with the outbreak of the French Revolutionary Wars in 1793. The geopolitical stakes were immense, with Britain relying entirely on its navy to prevent a French invasion and protect its global trade routes.
Nelson distinguished himself not just by bravery, but by an aggressive, almost reckless pursuit of total victory rather than mere tactical advantage. He understood that in the context of the Napoleonic Wars, disabling an enemy fleet was not enough; it had to be annihilated.
- Tactical Audacity: Traditional 18th-century naval warfare dictated that fleets form parallel lines and exchange broadsides until one side withdrew. Nelson repeatedly shattered this convention. At the Battle of Cape St. Vincent (1797), he independently broke from the British line to block the Spanish escape, turning a moderate success into a crushing victory.
- The Battle of the Nile (1798): This was his first great independent command. Finding the French fleet anchored in a seemingly secure defensive line in Aboukir Bay, Egypt, Nelson immediately ordered a highly risky night attack.
His captains realized there was enough space to slip between the French ships and the shoreline, trapping the enemy in a devastating crossfire. The French fleet was obliterated, stranding Napoleon’s army in the Middle East.
The “Nelson Touch” and Leadership
Nelson’s greatest asset was perhaps his leadership style, which fostered fierce loyalty and initiative among his subordinates.
- The “Band of Brothers”: Unlike the rigid, tyrannical command structures typical of the era, Nelson discussed his overarching strategies and philosophies extensively with his captains prior to battle. Because they understood his ultimate intent, they could act independently in the chaos of combat without waiting for flag signals.
- Physical Sacrifice: Nelson led from the front, a reality reflected in his severe battlefield injuries. He lost sight in his right eye at Calvi (1794) and his right arm at Santa Cruz de Tenerife (1797). Rather than retiring, these injuries only elevated his mythic status among the British public and his men.
The Climax: Trafalgar and Legacy
The defining moment of Nelson’s life, and of naval warfare in the Age of Sail, occurred off the coast of Spain at the Battle of Trafalgar on October 21, 1805.
A combined French and Spanish fleet threatened British supremacy. Nelson’s strategy—famously dubbed the “Nelson Touch”—was designed to force a chaotic, close-quarters melee where superior British gunnery and ship handling would prevail.
Instead of forming a parallel line, Nelson divided his fleet into two columns and sailed perpendicularly directly into the enemy line, cutting it into thirds and isolating the center and rear from the vanguard.
The tactic was a masterpiece of military engineering, but it required the lead British ships to endure heavy, unanswered fire as they approached. Aboard his flagship, HMS Victory, Nelson was struck by a French musket ball that pierced his lung and lodged in his spine. He lived just long enough to be informed of the decisive British victory—which permanently ended Napoleon’s hopes of invading Britain—before dying with the famous words, “Thank God I have done my duty.”
Would you like to explore the specific naval technology and ship designs of the ships-of-the-line used during this era, or would you prefer to look closer at Nelson’s complex and highly public personal life, particularly his affair with Lady Emma Hamilton?
Admiral Lord Horatio Nelson Technology French vs British Cannon History
Admiral Lord Horatio Nelson’s spectacular naval victories at the Nile and Trafalgar were not simply the result of superior bravery. They were the culmination of a distinct technological and tactical divide between the British Royal Navy and the French Imperial Navy. While their wooden ships looked similar from afar, the engineering and philosophy governing their gun decks were radically different.
Here is a breakdown of the technological and doctrinal differences that defined Age of Sail artillery.
The British relied heavily on the 32-pounder cannon as their primary heavy artillery. These massive iron guns formed the absolute backbone of ships of the line like Nelson’s HMS Victory.
Tactical Philosophy: Hulls vs. Rigging
The technology of both navies evolved to serve completely opposite strategic goals.
-
The British Doctrine (The Smasher): The Royal Navy trained to fire on the down-roll of the ship, aiming horizontally directly into the heavy wooden hull of the enemy. Their goal was brute-force destruction: dismounting enemy guns, generating deadly flying wooden splinters, and forcing a surrender through sheer volume of fire and high casualties.
-
The French Doctrine (The Dismaster): The French Navy trained to fire on the up-roll, aiming high into the masts, sails, and rigging of the British ships. Their goal was immobilization. If they could destroy a British ship’s ability to sail, the French could outmaneuver them, rake them from vulnerable angles, or simply escape an unfavorable battle.
Technological Edges in the Gun Deck
While the French actually cast beautifully designed, mathematically precise ships and artillery, the British developed several gritty, practical innovations that drastically increased their lethality in a close-quarters brawl.
1. The Firing Mechanism
The most critical British advantage was the widespread adoption of the flintlock mechanism (similar to a musket trigger) attached to the cannon.
-
A British gun captain stood back holding a lanyard. The exact second his ship rolled to the perfect angle, he yanked the lanyard, the flint sparked, and the gun fired instantly.
-
The French relied far longer on the linstock and slow match (a smoldering piece of rope). When touched to the gunpowder, there was a brief, unpredictable fizzle before the gun fired. In the seconds it took to ignite, the ship could roll on a wave, sending the cannonball harmlessly into the water or over the enemy ship.
2. Barrel Casting and Windage
The British utilized the Wilkinson method of casting cannons as solid blocks of iron, and then using a steam-powered drill to bore out the barrel.
-
This created a perfectly straight, smooth barrel, which allowed the British to reduce the windage (the gap between the iron cannonball and the inside of the barrel).
-
Tighter windage meant less explosive gas escaped around the ball, resulting in a higher muzzle velocity, greater accuracy, and a harder impact.
3. The Carronade
The British possessed a devastating secret weapon called the carronade (affectionately nicknamed “The Smasher”). Developed by the Carron Company in Scotland, this was a short, fat, lighter cannon mounted on the upper decks. It had a very short range, but it fired massive 68-pound balls with terrifying force. As Nelson closed the distance at Trafalgar, these carronades swept the French upper decks clear of men.
The Artillery Comparison
| Feature | British Royal Navy | French Imperial Navy |
| Primary Target | The enemy’s hull and crew | The enemy’s masts and rigging |
| Tactical Goal | Sink or capture via brute force | Immobilize the ship to escape or maneuver |
| Firing Mechanism | Flintlocks (instant firing) | Linstock / Slow match (delayed firing) |
| Main Deck Guns | 32-pounders | 36-pounders (firing slightly heavier shot) |
| Rate of Fire | ~1 round every 90 seconds | ~1 round every 3 to 5 minutes |
Nelson understood these technological truths perfectly. At the Battle of Trafalgar (1805), he knew that if he could survive the initial long-range French barrage aimed at his rigging, his flintlock-equipped, highly drilled gun crews would absolutely decimate the enemy in a close-range brawl.
The Battle of Cape St. Vincent (February 1797)
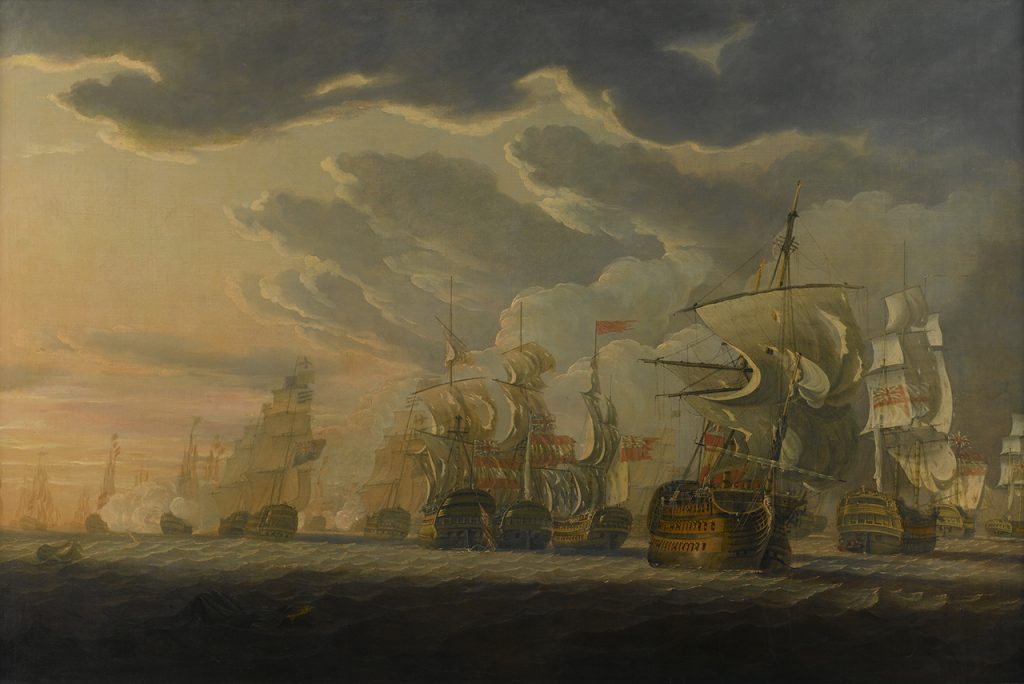
The Battle of Cape St. Vincent, 14 February 1797 by Robert Cleveley, 1798
(Wiki Image By Robert Cleveley – http://collections.rmg.co.uk/collections/objects/11978, Public Domain, https://commons.wikimedia.org/w/index.php?curid=225733)
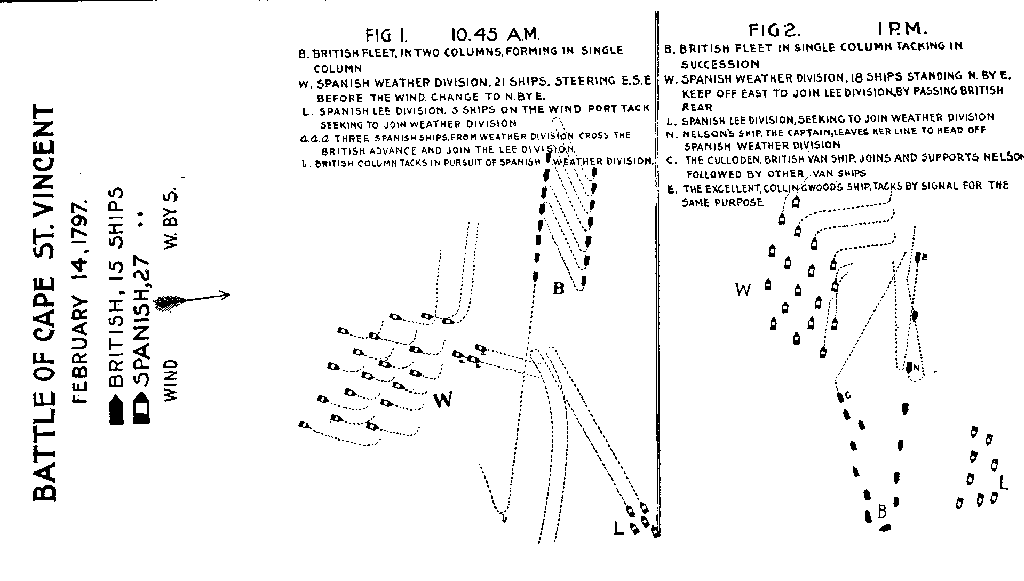
Plan of the fleet deployment during the Battle of Cape St. Vincent, 14 February 1797 by Alfred Thayer Mahan
(Wiki Image By A T Mahan – Plan of the battle of Cape St. Vincent published by AT Mahan 1897, Public Domain, https://commons.wikimedia.org/w/index.php?curid=10963087)
The Battle of Cape St. Vincent, fought on February 14, 1797, was a pivotal naval clash during the War of the First Coalition. It is best remembered as the battle where a young Commodore Horatio Nelson cemented his reputation for tactical brilliance and sheer audacity by deliberately breaking from the line of battle.
Here is a breakdown of how the engagement unfolded and why it was so significant.
The Strategic Setup
In early 1797, the British Royal Navy was stretched thin. Spain had recently allied with Revolutionary France, creating a massive combined naval threat.
The British Mediterranean Fleet, commanded by Admiral Sir John Jervis, was patrolling off the coast of Portugal near Cape St. Vincent. Jervis had only 15 ships of the line. Emerging from a heavy morning fog, he discovered he had intercepted a Spanish fleet of 27 ships of the line commanded by Admiral Don José de Córdoba.
Despite being heavily outnumbered, Jervis realized the Spanish fleet was sailing in a loose, disorganized formation, split into two distinct groups. He immediately ordered his ships into a single, rigid line of battle, intending to sail directly between the two Spanish divisions to divide and conquer them.
Nelson’s Bold Maneuver
Jervis’s plan was working initially, keeping the Spanish forces separated. However, as the British line passed through, the larger Spanish group turned to cross behind the British ships to reunite with their smaller division and escape.
Jervis signaled his ships to turn (tack in succession) to chase them, but this maneuver was slow. Positioned near the rear of the British line aboard HMS Captain, Commodore Horatio Nelson realized that if he followed standard orders, the Spanish fleet would slip away.
Taking immense personal and professional risk, Nelson ignored conventional naval doctrine. He ordered HMS Captain to break out of the British line, turning his ship directly into the path of the escaping Spanish vanguard. He single-handedly engaged several massive Spanish ships, including the Santísima Trinidad—a heavily armed four-decker that was the largest warship in the world at the time.
“Nelson’s Patent Bridge”
Nelson’s maneuver successfully stalled the Spanish escape, allowing the rest of the British fleet to catch up and join the fray. However, HMS Captain was severely battered in the close-quarters crossfire and lost its steering.
Unable to sail, Nelson made the decision to board the adjacent Spanish ship, the 80-gun San Nicolas. Leading the boarding party himself, Nelson captured the vessel in bloody hand-to-hand combat. Almost immediately, another Spanish ship, the 112-gun San Josef, collided with the captured San Nicolas.
Without hesitating, Nelson used the deck of the San Nicolas as a stepping stone, ordering his men to board and capture the San Josef as well. This unprecedented feat of capturing two enemy ships in succession by using one to board the other was gleefully dubbed by the British public as “Nelson’s Patent Bridge for Boarding First Rates.”
The Aftermath and Legacy
The battle ended as a resounding British victory. Four Spanish ships were captured, and the crippled Spanish fleet was forced to retreat to Cadiz, ending the immediate threat of a Franco-Spanish invasion of Britain.
- For Jervis: He was celebrated as a national hero and elevated to the peerage as Earl St. Vincent.
- For Nelson: Jervis could have court-martialed Nelson for disobeying orders, but instead, he fully embraced the commodore’s initiative. Nelson was knighted (becoming a Knight of the Bath) and promoted to Rear-Admiral. Cape St. Vincent proved that Nelson’s aggressive, unconventional instincts could shatter larger enemy forces.
Would you like me to elaborate on the design and immense firepower of the Santísima Trinidad, or explore the specific weapons and tactics used by boarding parties during this era?
The Battle of Santa Cruz de Tenerife (July 1797)
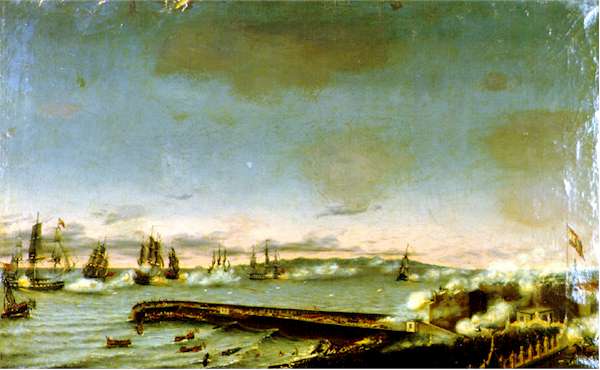
The British Attack on Santa Cruz de Tenerife. Oil on canvas, 1848
(Wiki Image By Francisco de Aguilar – Centro Virtual Cervantes. The original uploader was Albrecht at English Wikipedia., 26 September 2006 (original upload date)., Public Domain, https://commons.wikimedia.org/w/index.php?curid=6867142)
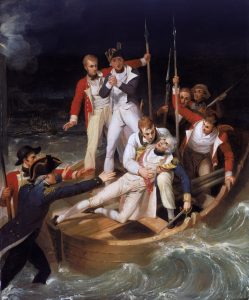
Sir Horatio Nelson, when wounded at Teneriffe, by Richard Westall. Oil on canvas.
(Wiki Image By Richard Westall – National Maritime Museum website, Public Domain, https://commons.wikimedia.org/w/index.php?curid=1096472)
Following his spectacular, rule-breaking success at Cape St. Vincent, newly promoted Rear-Admiral Sir Horatio Nelson seemed invincible. However, just five months later, the Battle of Santa Cruz de Tenerife would deliver his most stinging military defeat and exact a permanent, devastating physical toll.
Here is how the disastrous amphibious assault on the Canary Islands unfolded.
The Objective and the Target
In July 1797, Nelson was dispatched with a squadron to the Spanish-held island of Tenerife. The primary goal was to capture the heavily fortified port city of Santa Cruz. The British had received intelligence that a Spanish treasure ship, the Príncipe de Asturias, was sheltering there with a massive cargo of silver from the Americas. Securing the port would deal a severe financial blow to the Spanish war effort.
The Spanish Defenses
Nelson severely underestimated his opposition. The defense of Santa Cruz was commanded by General Antonio Gutiérrez, a shrewd and highly experienced 68-year-old veteran.
Gutiérrez had meticulously prepared for an attack. He possessed a network of formidable coastal batteries, cross-firing cannons (including a famous bronze cannon named “El Tigre”), and a well-drilled force of regular soldiers and local militia. When Nelson’s ships arrived, the Spanish were not surprised; they were waiting.
The Disastrous Assault
The British attack was plagued by terrible luck and fierce resistance from the start.
- The First Attempt (July 22): The initial plan was to land troops secretly at night to take the heights above the town. However, strong gales and adverse ocean currents pushed the British landing boats off course, ruining the element of surprise and forcing them to abort.
- The Night Assault (July 24–25): Frustrated but determined, Nelson decided to lead a direct, frontal amphibious assault on the city’s main mole (pier) under the cover of darkness.
As the British boats approached the shore, the Spanish defenders opened up with a devastating barrage of cannon and musket fire. Many British boats were smashed to pieces in the surf before they even reached the beach. Those who did land found themselves trapped on the waterfront, pinned down by intense urban warfare.
The Loss of Nelson’s Arm
As Nelson prepared to step off his boat onto the beach, drawing his sword, he was struck heavily in the right arm by grapeshot or a musket ball. The impact shattered his bone and severed a major artery.
His stepson, Lieutenant Josiah Nisbet, saved his life by applying a makeshift tourniquet and rushing him back through the gunfire to his flagship, HMS Theseus. In the dark, cramped surgeon’s bay, Nelson’s shattered right arm was amputated high above the elbow, with no anesthetic other than a shot of rum.
A Chivalrous Surrender
With Nelson incapacitated and the British forces ashore completely surrounded and out of ammunition, Captain Thomas Troubridge was forced to negotiate a surrender.
What followed was a remarkable display of 18th-century military chivalry. General Gutiérrez allowed the surviving British forces to return to their ships with their weapons and colors, on the condition that they promise not to attack the Canary Islands again. Gutiérrez even treated the wounded British soldiers, provided them with rations, and allowed them to buy provisions.
In a famous exchange of mutual respect, Nelson sent Gutiérrez a cask of English beer and a wheel of cheese, along with a formal letter of thanks (written for the first time with his left hand). Gutiérrez responded with a gift of fine local wine.
The Immediate Aftermath
The battle was a complete disaster for the British, resulting in over 250 casualties. Nelson returned to England in deep despair, writing a letter stating, “A left-handed Admiral will never again be considered as useful… I am become a burthen to my friends, and useless to my Country.” However, his fears were unfounded. The British public, remembering his heroics at Cape St. Vincent, embraced him not as a defeated commander but as a tragic hero who had sacrificed his body for the nation.
Would you like to learn more about the harsh realities of naval surgery and amputations in the late 18th century, or explore the specific role of the Spanish cannon “El Tigre” in this battle?
The Battle of the Nile (August 1798)
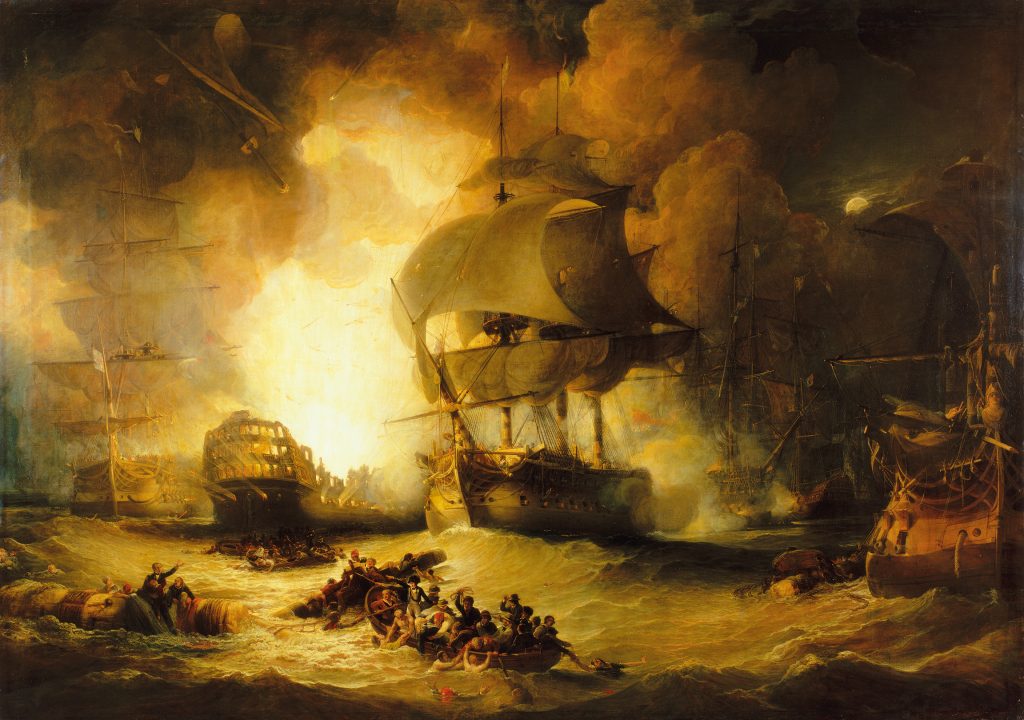
The Destruction of L’Orient at the Battle of the Nile by George Arnald, 1827
(Wiki Image By George Arnald – 1. National Maritime Museum2. Royal Museums Greenwich, Public Domain, https://commons.wikimedia.org/w/index.php?curid=2696347)
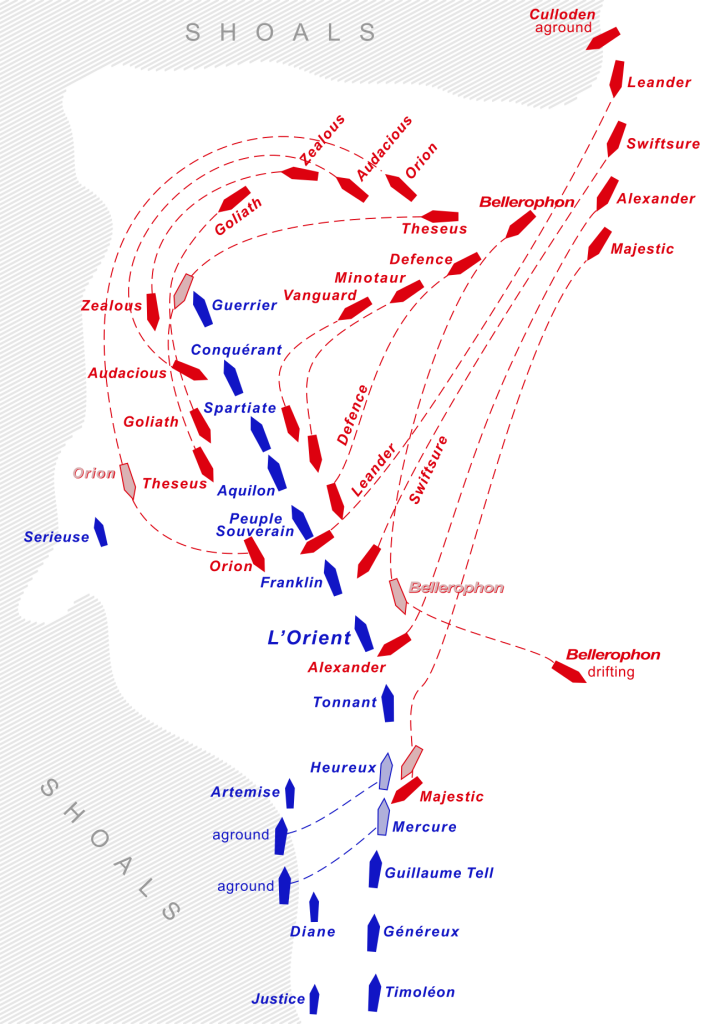
Map of ship positions and movements during the Battle of Aboukir Bay, 1–2 August 1798. British ships are in red; French ships are in blue. Intermediate ship positions are shown in pale red/blue. The map has been simplified and differs from the text in several minor particulars.
(Wiki Image By Gsl – Vectorized from File:Battle of Aboukir Bay.png, based on a map from Intelligence in War, John Keegan, 2003, ISBN 0091802296, p. 43, Public Domain, https://commons.wikimedia.org/w/index.php?curid=32190185)
The Battle of the Nile, fought on August 1–3, 1798, in Aboukir Bay off the coast of Egypt, is widely considered one of the greatest and most decisive naval victories in history. It was the battle that elevated Horatio Nelson from a brilliant commander to an international naval superstar and profoundly altered the course of the French Revolutionary Wars.
Here is how Nelson systematically dismantled the French fleet and trapped Napoleon Bonaparte.
The Strategic Setup: The Hunt for Napoleon
In the spring of 1798, Napoleon Bonaparte launched a massive, secret expedition to invade Egypt. His goal was to establish a French presence in the Middle East, threaten British control of India, and cut off lucrative British trade routes.
Nelson, commanding a British squadron, spent months frantically hunting the Mediterranean for the French armada. He finally tracked them down on the afternoon of August 1. While Napoleon had successfully landed his army and marched on Alexandria, his protective fleet, commanded by Vice-Admiral François-Paul Brueys d’Aigalliers, was anchored in Aboukir Bay.
The French Defensive Position
Admiral Brueys believed his position was impregnable. His 13 ships of the line were anchored in a long line across the bay.
- The Shoreline: The French port side (left side) faced shallow, treacherous shoals, which Brueys assumed would prevent any British ships from passing behind him.
- The Guns: Because he only expected an attack from the seaward side, Brueys had ordered his crews to clear the decks and prepare the cannons exclusively on the starboard (right) side of his ships.
Because the British arrived late in the afternoon, Brueys assumed Nelson would not risk navigating the unmapped, shallow bay in the dark and would wait until morning to attack. He was wrong.
The Attack: A Masterstroke of Seamanship
Nelson saw the French formation and immediately recognized a fatal flaw in Brueys’s logic: if there was enough water for the French ships to swing at anchor, there was enough water for a British ship to sail behind them.
Without waiting to form a traditional battle line, Nelson signaled his ships to attack the French vanguard (the front of the line) immediately.
The lead British ship, HMS Goliath (commanded by Captain Thomas Foley), completely surprised the French. Instead of engaging from the open sea, Foley daringly steered his ship inside the French line, scraping past the shallow shoals. Several other British ships followed him, while Nelson and the rest of the fleet engaged from the outside.
This maneuver subjected the French vanguard to a devastating crossfire from both sides. Crucially, the French port-side guns were unprepared, manned by skeleton crews, and cluttered with supplies. The British rapidly destroyed the front of the French line and systematically moved down to engage the center.
The Climax: The Destruction of L’Orient
The turning point of the battle occurred when the British converged on the massive French flagship, the 120-gun L’Orient.
During the fierce exchange of fire, L’Orient caught fire. The blaze quickly spread out of control. Knowing the ship’s massive powder magazines would inevitably ignite, nearby British and French ships desperately stopped firing and scrambled to distance themselves.
At around 10:00 PM, L’Orient detonated in one of the largest non-nuclear explosions in history. The blast was so colossal that the shockwave tore the sails of surrounding ships, and the concussion could be felt all the way in Alexandria. The sheer trauma of the explosion caused a complete ceasefire across the bay for ten minutes as burning debris rained down from the night sky.
The Aftermath and Legacy
The battle was an annihilation. Of the 13 French ships of the line, 11 were captured or destroyed. The British did not lose a single ship.
- The Trap: Napoleon’s army was entirely cut off from France. While he would win land battles in Egypt, his grand strategic vision for the Middle East was doomed. He eventually abandoned his army and slipped back to France.
- Nelson’s Glory: Nelson, who suffered a severe head wound during the battle (a piece of shrapnel tore a flap of skin over his good eye, temporarily blinding him entirely), became a living legend. He was elevated to the peerage as Baron Nelson of the Nile.
The victory secured British control of the Mediterranean, encouraged other European nations to form the Second Coalition against France, and proved that Nelson’s aggressive, annihilating style of warfare was the new standard for the Royal Navy.
Would you like to dive into the specific details of the French flagship L’Orient and the archaeological efforts to recover its wreckage, or would you prefer to move forward to Nelson’s next major engagement at the Battle of Copenhagen?
The Battle of Copenhagen (April 1801)
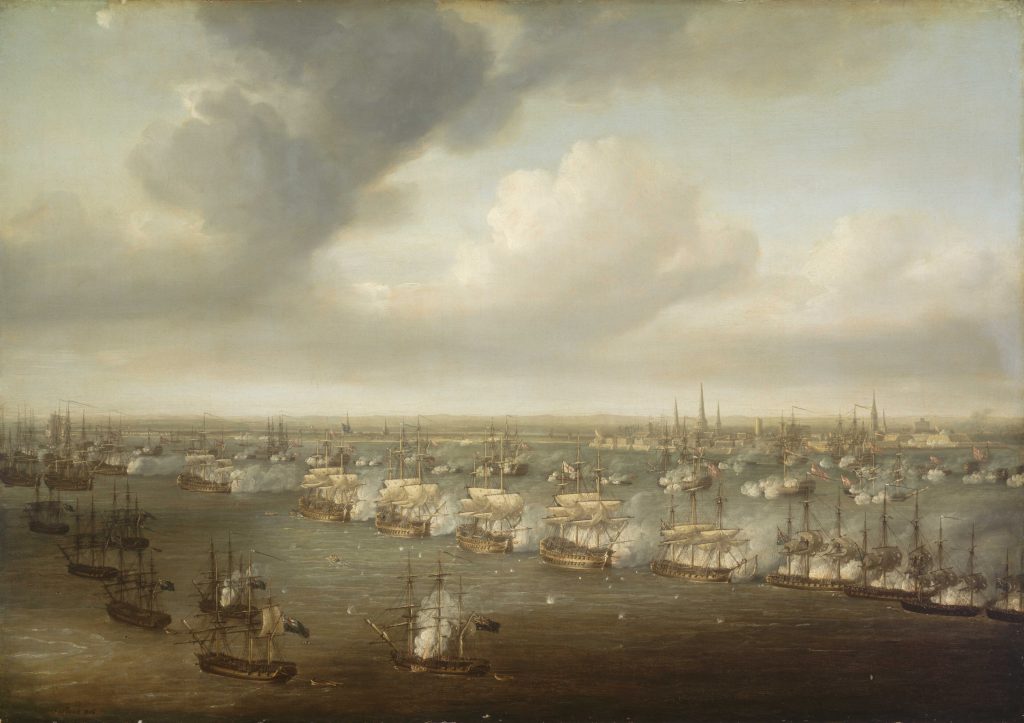
The Battle of Copenhagen, 2 April 1801 The Battle of Copenhagen, 2 April 1801, fought to force Denmark out of the hostile ‘Armed Neutrality’ of the Northern Powers – Russia, Sweden, Denmark, and Prussia –was the second of Nelson’s great battles and, like the Battle of the Nile, also against an enemy at anchor. Nelson’s intention was to concentrate on parts of the Danish defence and defeat it in detail, but despite careful preparations, the issue remained in doubt. Nelson ignored his superior’s signal of recall: ‘Leave off action! … Now damn me if I do. You know, Foley, I have only one eye – I have a right to be blind sometimes….I really do not see the signal.’
(Wiki Image By Nicholas Pocock – http://collections.rmg.co.uk/collections/objects/12021, Public Domain, https://commons.wikimedia.org/w/index.php?curid=62741045)
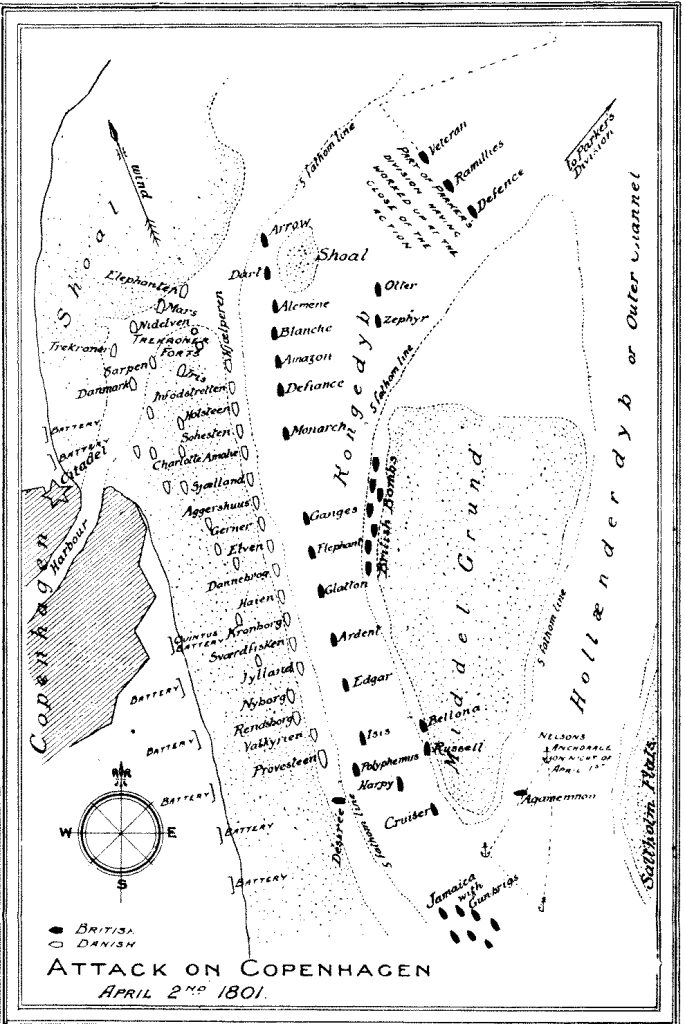
Sketch of the battle
(Wiki Image By Sir William Laird Clowes (1856-1905). Depicted in “The Royal Navy, A History from the Earliest Times to the Present”, Vol. IV, Sampson Low, Marston and Company, London, 1899. – http://www.historyofwar.org/Maps/maps_copenhagen3.html. Converted to .jpg and reduced to two colours., Public Domain, https://commons.wikimedia.org/w/index.php?curid=830377)
The Battle of Copenhagen, fought on April 2, 1801, was one of Nelson’s most difficult and fiercely contested engagements. It is also the origin of one of the most famous legends in British naval history: turning a “blind eye.”
Here is how Nelson navigated treacherous waters, a formidable defense, and his own cautious commander’s orders to secure a crucial strategic victory.
The Strategic Setup: The League of Armed Neutrality
By 1801, Britain was fighting for its survival against Napoleonic France. To maintain its massive navy, Britain desperately needed naval stores (timber, tar, hemp, canvas) from the Baltic states. However, Russia, Prussia, Sweden, and Denmark-Norway had formed the League of Armed Neutrality to protect their shipping from British blockades and searches.
Viewing this alliance as a direct threat, Britain dispatched a fleet to the Baltic to break it up—by diplomacy if possible, or by force if necessary. The fleet was commanded by the cautious Admiral Sir Hyde Parker, with Vice-Admiral Horatio Nelson serving as his second-in-command.
The Danish Defenses
When negotiations with Denmark failed, the British fleet anchored off Copenhagen. The Danish defenses were incredibly formidable.
The Danish fleet wasn’t just anchored; it was integrated into the city’s coastal defense system. Their heavily armed blockships (hulks stripped of masts and packed with cannons) and floating batteries were moored in a long line along the edge of a deep shoal. At the northern end of this line sat the massive Trekroner Fort (Three Crowns Fort), bristling with artillery.
To attack, the British would have to navigate the treacherous, unmapped “King’s Channel” right in front of the Danish guns. Admiral Parker was hesitant, but Nelson aggressively lobbied for the attack, eventually securing permission to lead a detachment of twelve lighter, shallower-draft ships of the line to do the job.
The Assault: A Brutal Artillery Duel
On the morning of April 2, Nelson’s squadron moved into the King’s Channel.
Things went wrong almost immediately. Three of Nelson’s heavy ships ran aground on the shoals, severely reducing his firepower. Despite this, Nelson anchored his remaining ships opposite the Danish line, and a brutal, point-blank artillery duel commenced.
The fighting was exceptionally bloody. Unlike the deep-water battles where the British could rely on superior ship handling, Copenhagen was a static slugfest. The Danish defenders, supplemented by civilian volunteers from the city, fought with immense courage and stubbornness. For hours, neither side gave an inch, and casualties mounted rapidly.
The “Blind Eye” Incident
Watching the carnage from a safe distance with the reserve fleet, Admiral Parker grew deeply alarmed by the lack of visible progress and the grounded British ships. Fearing a disaster, Parker hoisted Signal 39: “Discontinue the action.”
Aboard his flagship, HMS Elephant, Nelson was informed of the signal. If he obeyed, his fleet would have to retreat through the narrow channel under heavy fire, which would likely result in annihilation. If he disobeyed, he risked a court-martial and disgrace.
Nelson famously turned to his flag captain, Thomas Foley, and said, “You know, Foley, I only have one eye—I have a right to be blind sometimes.” He then raised his telescope to his blind right eye (lost at Calvi) and declared:
“I really do not see the signal!”
He ordered his own signal—Signal 16, “Engage the enemy more closely”—to be kept flying. His captains, recognizing Nelson’s intent, also ignored Parker’s signal and continued the punishing bombardment.
The Resolution and Diplomacy
Nelson’s calculated defiance paid off. By the early afternoon, the sustained British firepower began to overwhelm the Danish blockships, many of which surrendered or caught fire. However, the Trekroner Fort remained intact, and the Danish shore batteries continued to fire on British boats trying to take possession of the surrendered ships.
Realizing the battle was at a dangerous stalemate, Nelson demonstrated brilliant diplomatic cunning. He wrote a letter addressed “To the Brothers of Englishmen, the Danes,” threatening to burn the captured floating batteries with their crews still inside if the firing did not cease.
This mix of humanity and ruthless pragmatism worked. The Crown Prince of Denmark agreed to a 24-hour truce, which Nelson leveraged into a 14-week armistice.
The Aftermath
The Battle of Copenhagen was a tactical and strategic success. Combined with the timely (and entirely coincidental) assassination of the anti-British Tsar Paul I of Russia, the League of Armed Neutrality collapsed, securing Britain’s access to vital Baltic naval stores. Parker was recalled to Britain in disgrace for his hesitancy, and Nelson was promoted to Commander-in-Chief of the Baltic Fleet and made a Viscount.
Would you like to explore the assassination of Tsar Paul I and how it unraveled the Baltic alliance, or shall we move on to the grand finale of Nelson’s career at the Battle of Trafalgar?
The Battle of Trafalgar (October 1805)

The Battle of Trafalgar by William Clarkson Stanfield
(Wiki Image By Clarkson Frederick Stanfield – [1], Public Domain, https://commons.wikimedia.org/w/index.php?curid=1624092)
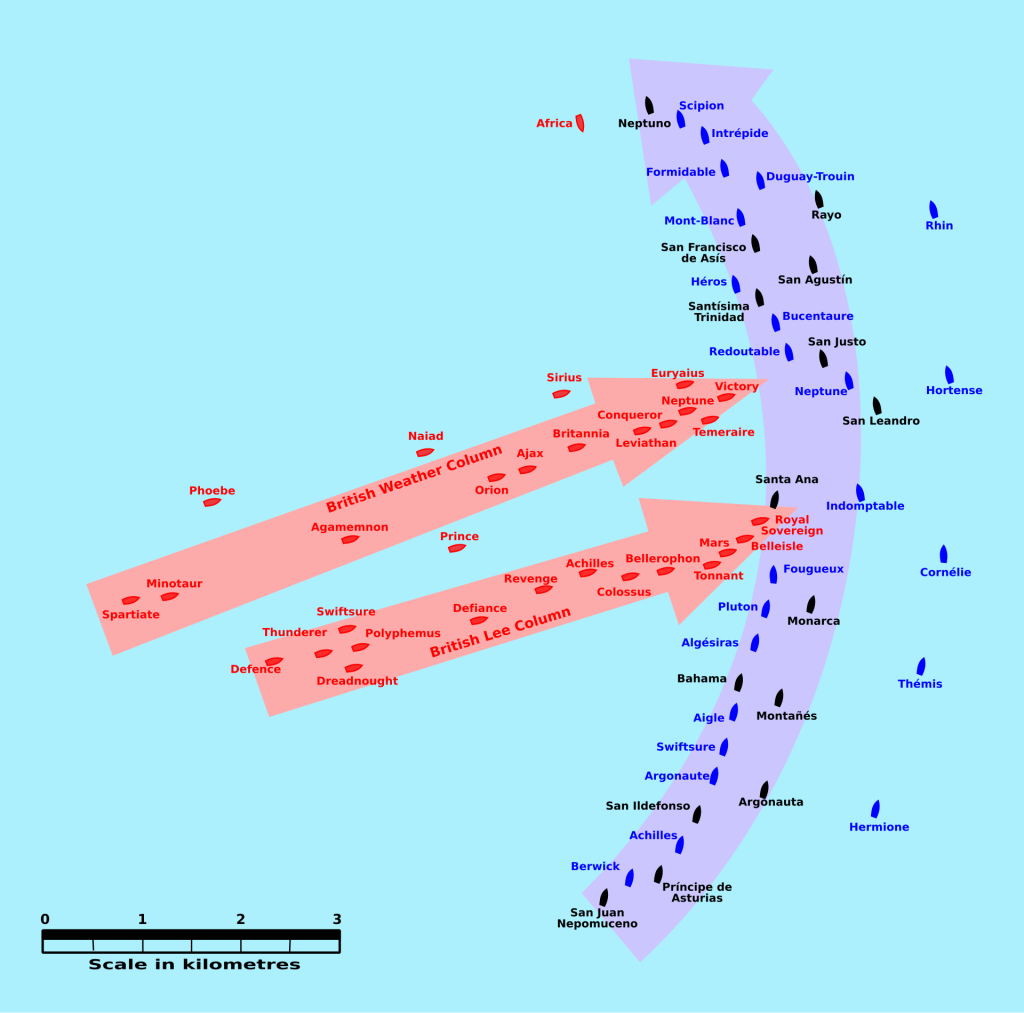
Artist’s conception of the situation at noon as Royal Sovereign was breaking into the Franco-Spanish line
(Wiki Image By Pinpin – own work made with Inkscape from Image:Trafalgar 1200hr.gif : This drawing is based on an illustration in issue number 84 of the Strategy & Tactics magazine The map was made by RJHall using the Campaign Cartographer drawing program, and the image was reduced in size 50% in Paint Shop Pro. Ship icons are not to scale., CC BY-SA 3.0, https://commons.wikimedia.org/w/index.php?curid=2852751)
The Battle of Trafalgar, fought on October 21, 1805, is the undisputed climax of Horatio Nelson’s career and arguably the most famous naval engagement of the Age of Sail. It permanently ended Napoleon Bonaparte’s threat to invade Britain and established a British global naval supremacy that would remain largely unchallenged for exactly a century.
Here is how Nelson orchestrated his masterpiece and made the ultimate sacrifice to secure it.
The Strategic Setup: The Threat of Invasion
By the fall of 1805, Napoleon had amassed his “Armée d’Angleterre” (Army of England) on the French coast, waiting only for his navy to secure control of the English Channel so his barges could cross.
To achieve this, the French and Spanish fleets combined under the command of French Admiral Pierre-Charles Villeneuve. After a complex series of maneuvers across the Atlantic and back, the combined fleet found itself blockaded in the Spanish port of Cadiz by a British fleet commanded by Lord Nelson. When Villeneuve was ordered by Napoleon to sail for Italy to support operations there, Nelson intercepted him off the coast of Cape Trafalgar.
The “Nelson Touch”
Nelson had 27 ships of the line against Villeneuve’s 33. Knowing he was outnumbered, and knowing that a traditional, parallel-line artillery duel would likely end in an inconclusive draw, Nelson briefed his captains on a radical, annihilating strategy he called the “Nelson Touch.”
Instead of forming a single line parallel to the enemy, Nelson divided his fleet into two columns. The plan was to sail perpendicularly directly into the Franco-Spanish line, cutting it into three isolated pieces.
- The lee column, led by Vice-Admiral Cuthbert Collingwood in HMS Royal Sovereign, would cut the rear of the enemy line.
- The weather column, led by Nelson in HMS Victory, would cut through the center, specifically targeting the enemy flagship.
- The enemy vanguard (the front of the line) would sail forward, unable to quickly turn back to help against the wind, leaving the center and rear to be destroyed in a chaotic, close-quarters melee where superior British gunnery and seamanship would dominate.
The Approach and the Famous Signal
The morning of October 21 brought very light winds. This meant the British columns approached the enemy line at an agonizingly slow walking pace. For nearly an hour, the leading British ships had to absorb concentrated, heavy broadsides from the Franco-Spanish fleet without being able to fire back.
As the fleets closed, Nelson ordered his signal lieutenant to hoist what would become the most famous flag signal in British naval history:
“England expects that every man will do his duty.”
The Melee and the Death of Nelson
Collingwood’s Royal Sovereign reached the enemy line first, unleashing devastating, double-shotted broadsides into the Spanish flagship Santa Ana.
Shortly after, Nelson’s Victory smashed through the line just behind Villeneuve’s flagship, the Bucentaure, pouring a devastating raking fire through its stern that effectively took it out of the battle. Victory then collided and locked rigging with the heavily armed French 74-gun ship Redoutable.
The battle devolved into the exact brutal, close-quarters slugfest Nelson had engineered. While British gunners cleared the lower decks of the enemy, French sharpshooters stationed high up in the rigging of the Redoutable swept the exposed upper deck of Victory.
At around 1:15 PM, at the height of the battle, Nelson—conspicuously pacing the quarterdeck in his full admiral’s uniform with all his decorations—was shot by a French musketeer. The lead ball entered his left shoulder, punctured his lung, and lodged in his spine.
Nelson collapsed, immediately realizing the wound was mortal. He was carried down to the dark, bloody surgeon’s cockpit so the crew would not be demoralized by seeing him fall.
“Thank God I Have Done My Duty”
While Nelson lay dying below decks, the battle raged above him. Over the next three hours, Captain Thomas Hardy frequently visited the dying admiral to report on the battle’s progress.
The “Nelson Touch” had worked flawlessly. The Franco-Spanish vanguard sailed away from the fight, while the center and rear were systematically dismantled by the better-drilled British crews. When Hardy finally reported that a decisive victory was certain and at least 15 enemy ships had surrendered, Nelson replied with his famous last words: “Thank God I have done my duty.” He died shortly after at 4:30 PM.
The Aftermath and Legacy
The victory was absolute. The British captured or destroyed 22 enemy ships without losing a single vessel of their own. Admiral Villeneuve was captured. Napoleon’s invasion plans were permanently scrapped, and he turned his army east toward Austerlitz.
Nelson’s body was preserved in a cask of brandy for the voyage home. He was given a state funeral of unprecedented scale and buried in St. Paul’s Cathedral. Trafalgar immortalized Nelson not just as a brilliant tactician, but as Britain’s ultimate martyr.
Considering you have been developing a historical “what if” project, would you like to explore the alternate history scenarios of what might have happened to Britain, Europe, and the global balance of power if Nelson’s high-risk maneuver had failed and the British fleet had been destroyed at Trafalgar?
Admiral Lord Horatio Nelson Legacy

Nelson’s Column in Trafalgar Square, London
(Wiki Image By Diliff – Own work, CC BY-SA 2.5, https://commons.wikimedia.org/w/index.php?curid=1362957)
Admiral Lord Horatio Nelson’s death at the very moment of his greatest triumph at Trafalgar instantly elevated him from a celebrated military commander to a mythic national savior. His legacy is profound, shaping global geopolitics, fundamentally altering naval warfare, and cementing him as the archetype of British heroism.
However, modern history also views him as a deeply complex, flawed individual. Here is a breakdown of his lasting impact.
1. Geopolitical Impact: The Dawn of Pax Britannica
Nelson’s victory at Trafalgar did more than just stop Napoleon’s invasion plans; it completely wiped out the naval power of Britain’s European rivals.
- Undisputed Supremacy: For exactly a century—from Trafalgar in 1805 until the naval arms race preceding World War I—the British Royal Navy ruled the world’s oceans essentially unchallenged.
- The Engine of Empire: This maritime dominance allowed Britain to expand and maintain its global empire, secure its vital trade routes, and enforce a period of relative global stability known as the Pax Britannica (British Peace).
2. The Revolution in Naval Doctrine
Nelson permanently changed how naval battles were fought and how officers led their men.
- Annihilation over Attrition: Before Nelson, naval battles were often inconclusive, with fleets lining up in parallel, exchanging fire, and eventually sailing away. Nelson sought the total annihilation of the enemy fleet. His tactics—breaking lines, forcing close-quarters melees, and concentrating fire—became the gold standard for naval engagements.
- Decentralized Command: Nelson cultivated his “Band of Brothers.” He spent hours discussing tactics and his overarching philosophy with his captains. Because they understood his mind, he didn’t need to micromanage them with flag signals during the chaos of combat. He trusted his subordinates to take the initiative, a philosophy that remains a core tenet of modern military leadership.
3. Cultural Martyrdom and Monuments
Nelson’s death in the service of his country gave Britain a secular saint.
- The Archetype: He became the ultimate symbol of duty, aggressive spirit, and self-sacrifice. His famous signal, “England expects that every man will do his duty,” became a cultural rallying cry that was invoked for generations, particularly during the World Wars.
- Trafalgar Square: In London, the focal point for national gatherings and protests remains Trafalgar Square, dominated by Nelson’s Column—a 169-foot monument topped with a statue of the Admiral, gazing out toward the sea, guarded by four massive bronze lions cast from captured French and Spanish cannons.
4. The Flawed Hero
While his military genius is undisputed, historians today take a candid look at his highly controversial personal life and political actions.
- Scandalous Private Life: Nelson carried on a very public, passionate, and scandalous affair with Emma, Lady Hamilton (the wife of the British ambassador to Naples), while brutally casting aside his own loyal wife, Fanny. When he died, his dying wish was that the nation would provide for Emma and their illegitimate daughter, Horatia. The British government ignored this request; Emma died in poverty in France.
- The Neapolitan Atrocities: The darkest stain on his military record occurred in 1799 in Naples. Driven by his hatred of French republicans and his devotion to the Neapolitan royal family (and Emma Hamilton), Nelson annulled a treaty of surrender and oversaw the execution of numerous Neapolitan republicans, including hanging the respected Admiral Francesco Caracciolo from the yardarm of a British ship. Many contemporaries and modern historians view these actions as illegal and ruthlessly vindictive.
Would you like me to go into more detail about his controversial actions during the Neapolitan Revolution, or explore how the Royal Navy tried to replicate his strategic success in the decades following his death?
Admiral Lord Horatio Nelson YouTube Views Links, and Books Table
Here is a collection of YouTube videos and highly regarded books detailing the life, campaigns, and enduring legacy of Vice-Admiral Lord Horatio Nelson.
YouTube Videos
Here are some excellent YouTube documentaries and educational videos that cover his history and battles. (Note: Exact view counts are dynamic and not displayed here, but these are popular historical resources).
| Video Title | Focus / Description | Link |
| The Story of Horatio Nelson | Sea Stories Ep. 21 | A great biographical overview of his life, his rise through the ranks, and his enduring legacy. | Watch Video |
| The Life & Death Of Britain’s Naval Hero – Horatio Nelson | Explores his aggressive tactics, his complex personality, and his three most famous victories. | Watch Video |
| Battle of Trafalgar: The Legendary Tale Of HMS Victory | Focuses heavily on his famous flagship, HMS Victory, and its role in shaping British naval superiority. | Watch Video |
| The Rarest Artefacts From the Battle Of Trafalgar! | A fascinating look at surviving historical items, including parts of the white ensign flown by HMS Victory and a lock of Nelson’s hair. | Watch Video |
Books on Admiral Lord Horatio Nelson
For a more thorough academic and historical dive, here are some of the most notable books focused on his life, his complex personality, and his leadership:
| Book Title | Author(s) | Focus / Description |
| Nelson: Britannia’s God of War | Andrew Lambert | A concise, highly readable biography that serves as an excellent starting point for understanding Nelson’s enduring celebrity status and naval genius. |
| The Pursuit of Victory: The Life and Achievement of Horatio Nelson | Roger Knight | A massive, definitive biography employing deep research to analyze the man, his achievements, and the specific environment of the Royal Navy he operated within. |
| Nelson: A Dream of Glory, 1758-1797 | John Sugden | A comprehensive, deeply detailed look at Nelson’s early life and career, charting his rise right up to the disastrous attack on Tenerife, where he lost his arm. |
| Nelson’s Navy: The Ships, Men and Organisation 1793-1815 | Brian Lavery | Essential reading for understanding the world Nelson lived in. It provides exhaustive details on the ships, weapons, and daily lives of the sailors in the Royal Navy during this era. |
| Nelson: The New Letters | Edited by Colin White | A fascinating compilation of over 500 previously unpublished letters, offering fresh, unfiltered insights directly from Nelson’s own correspondence. |
Would you like me to find resources specifically focused on the anatomy and construction of HMS Victory, or are you interested in exploring the commanders who fought against it?
This video provides an in-depth podcast discussion breaking down Nelson’s overarching strategy and the specific ships of the line involved in his most famous engagement.
Battle of Trafalgar, Nelson’s greatest victory
🇰🇷 Yi Sun-sin, 🇳🇱 Michiel de Ruyter, 🇬🇧 Edward Hawke, 🇫🇷 Pierre André de Suffren, and 🇬🇧 Horatio Nelson Similarities
While these five legendary admirals operated under entirely different flags, navigated different centuries, and fought with evolving technologies, their underlying philosophies of war were remarkably identical. They did not just win battles; they fundamentally changed how naval warfare was waged.
If you strip away the specific nationalities and eras, a clear blueprint for naval immortality emerges. Here are the four core similarities that bind Yi Sun-sin, Michiel de Ruyter, Edward Hawke, Pierre André de Suffren, and Horatio Nelson together:
1. Tactical Rebellion: Annihilation Over Orthodoxy
Before each of these commanders took the helm, naval combat in their respective eras was often plagued by rigid, cautious rules that frequently led to indecisive draws. These five men were tactical heretics. They completely discarded the “safe” way to fight because they were not interested in merely surviving a battle or taking a few prizes—they sought the absolute annihilation of the enemy fleet.
- Yi Sun-sin rejected the standard Japanese tactic of grappling and boarding (where the samurai excelled), instead pioneering stand-off artillery barrages and specialized ship designs (the Turtle Ship) to blast the enemy to splinters.
- Suffren, Hawke, and Nelson all famously rejected the rigid “line of battle” (where fleets sailed in parallel lines taking potshots at each other). They deliberately broke formation to crash directly into the enemy line, forcing a chaotic, point-blank melee where their aggressive captains could overwhelm isolated enemy ships.
2. The Sea as a Weapon: Environmental Mastery
Average admirals dreaded bad weather, treacherous shoals, and churning tides. These five commanders actively sought them out and weaponized them against numerically superior enemies. They possessed an unparalleled, almost instinctual understanding of their battle spaces.
- Yi Sun-sin used the terrifying, shifting whirlpools of the Myeongnyang Strait to destroy a fleet ten times his size.
- De Ruyter constantly used the shallow, treacherous sandbanks of the Dutch coast to trap and outmaneuver the heavier, deeper-draft ships of the English and French.
- Hawke and Nelson both achieved their greatest masterpieces (Quiberon Bay and the Battle of the Nile, respectively) by recklessly sailing into highly dangerous, reef-filled coastal waters in fading daylight, knowing the enemy would never expect such an incredibly dangerous maneuver.
3. “Leading from the Front”: Extreme Physical Courage
These men did not command from the safety of a rear-echelon flagship; they threw themselves directly into the absolute center of the carnage. This sheer physical courage bred a fanatic, cult-like devotion among their sailors and subordinate captains.
- De Ruyter was affectionately known by his men as Bestevaêr (“Granddad”) because he worked alongside them, sharing their rations and dangers.
- Nelson referred to his captains as a “Band of Brothers” and led boarding parties sword-in-hand, losing an arm and an eye before ultimately losing his life on the deck of the Victory.
- Yi Sun-sin was shot in the shoulder during an early battle but secretly dug the bullet out himself to keep his men from panicking. He, like Nelson and de Ruyter, was ultimately killed in action, dying at the exact moment of his final victory.
4. Strategic Resilience: Fighting the Enemy and the Bureaucracy
Perhaps their most frustrating shared trait was that all of them had to fight brilliant campaigns while being actively undermined, under-supplied, or outright betrayed by their own governments or cautious subordinates.
- Suffren fought an entire multi-year campaign in the Indian Ocean without a friendly naval base, forced to scavenge for supplies and repair his shattered ships in open water while dealing with mutinous, cowardly captains.
- Hawke sustained a brutal, six-month winter blockade of France despite terrible supply chains, rampant disease, and a lack of support from the Admiralty in London.
- Yi Sun-sin suffered the worst betrayal; he was stripped of his rank, tortured, and nearly executed by his own jealous King, only to be reinstated when the navy was destroyed and asked to save the country with a measly 13 surviving ships.
Ultimately, these five commanders share a legacy of profound audacity. They understood that achieving absolute victory on the sea required risking absolute destruction.
Would you like to explore the specific differences in how their respective governments treated them after their monumental victories, or take a closer look at the evolution of the naval artillery they used to achieve these annihilations?
🇰🇷 Yi Sun-sin, 🇳🇱 Michiel de Ruyter, 🇬🇧 Edward Hawke, 🇫🇷 Pierre André de Suffren, and 🇬🇧 Horatio Nelson Differences
While these five admirals shared an aggressive, unyielding approach to naval warfare, the circumstances under which they fought were vastly different. They operated across three centuries, used vastly different maritime technologies, and served governments that either worshipped them or actively tried to destroy them.
Here is a breakdown of the fundamental differences that separate Yi Sun-sin, Michiel de Ruyter, Edward Hawke, Pierre André de Suffren, and Horatio Nelson:
1. The Technology: Oars vs. The Deep-Ocean Sail
The most glaring difference is the technological era in which they operated. “The Age of Sail” is a broad term, and the ships commanded by Yi Sun-sin would be unrecognizable to Horatio Nelson.
- Yi Sun-sin (16th Century): Yi operated at the very dawn of the global Age of Sail. His fleet relied heavily on a combination of sails and oars for propulsion. His primary warships, the Panokseon and the famous Geobukseon (Turtle Ship), were essentially flat-bottomed, floating fortresses. They were designed to navigate the jagged coastlines and powerful tides of Korea, not to cross deep oceans.
- De Ruyter (17th Century): De Ruyter commanded deep-water sailing ships, but they were still highly specialized. Because the Dutch coast is notoriously shallow, his warships were built with flatter bottoms and shallower drafts than their English counterparts. This made them highly maneuverable in coastal shoals but less stable in heavy ocean storms.
- Hawke, Suffren, and Nelson (18th–19th Centuries): These three commanded the ultimate evolution of the era: the “Ship of the Line.” These were massive, purely wind-driven, deep-ocean leviathans stacked with three decks of heavy cannons. By Nelson’s era, ships were also fitted with copper sheathing on their hulls to prevent rot and increase speed, allowing for truly global, year-round deployments.
2. Strategic Scope: Homeland Survival vs. Global Empire
The geographic scope of their campaigns completely dictated their strategic goals. Some fought purely to prevent their homes from burning, while others fought to project imperial power across the globe.
- The Defender (Yi Sun-sin): Yi’s war was intensely localized and entirely defensive. He fought exclusively in the waters surrounding the Korean peninsula to repel a massive Japanese amphibious invasion. His sole objective was national survival; he was not trying to conquer foreign territory or secure global trade.
- The Protector of Trade (De Ruyter): De Ruyter’s primary mission was to protect the economic lifeblood of the Dutch Republic: its massive merchant fleets. While he executed brilliant strikes against the English coast, his operational theater was mostly confined to the North Sea, the English Channel, and the Mediterranean, acting as the maritime shield for a fragile republic surrounded by hostile monarchies.
- The Imperial Projectors (Hawke, Suffren, Nelson): These three were the enforcers of global empires. They fought thousands of miles from their respective homelands. Suffren waged his campaign in the Indian Ocean to strip Britain of its Asian colonies, while Hawke and Nelson locked down the Atlantic and the Mediterranean to secure British global hegemony.
3. Tactical Doctrine: The Stand-Off vs. The Melee
While all five sought the enemy’s destruction, the ways they achieved it differed greatly depending on the strengths of their respective crews.
- Yi Sun-sin’s Artillery Stand-Off: Yi’s greatest threat was Japanese infantry, who were highly trained in close-quarters combat and boarding tactics. Therefore, Yi’s entire doctrine was based on avoiding the melee. He used superior Korean cannons and ship maneuverability to bombard the Japanese from a safe distance, refusing to let them board.
- De Ruyter’s Disciplined Line: De Ruyter perfected the rigid “line of battle.” Because he often faced heavier English ships, he relied on keeping his ships in a strict, unbroken line to maximize overlapping fields of fire and protect his vulnerable merchant convoys during fighting retreats.
- The British/French Melee (Suffren, Hawke, Nelson): By the late 18th century, the line of battle had become stale. Suffren, Hawke, and Nelson realized that the best way to destroy an enemy was to deliberately break the line and force a chaotic, point-blank brawl. Nelson, in particular, knew that superior British discipline and faster cannon-reloading speeds would guarantee victory in a disorganized, close-quarters slugfest.
4. The Enemy Within: Support from the State
A commander’s success is heavily dependent on the backing of their government and subordinate officers. In this regard, their experiences could not have been more different.
- The Beloved Sons (Nelson and Hawke): Nelson was the absolute darling of the British Admiralty and the public. He was given the best ships, and his captains (his “Band of Brothers”) idolized him and flawlessly executed his aggressive orders. Hawke also enjoyed strong backing from the aggressive Prime Minister William Pitt the Elder, though he occasionally had to fight the bureaucracy for proper winter supplies.
- The Betrayed Hero (Yi Sun-sin): No commander achieved more with less support than Yi. King Seonjo was deeply paranoid of Yi’s immense popularity. The Korean court actively sabotaged him, stripped him of his rank, tortured him, and only reinstated him when the nation was on the absolute brink of annihilation.
- The Frustrated Genius (Suffren): Suffren had the backing of the French state, but he was constantly undermined by his own aristocratic, traditionally minded captains. They frequently refused to follow his aggressive, highly unorthodox orders in the heat of battle, robbing him of several decisive victories.
- The Tragic Patriot (De Ruyter): De Ruyter was deeply respected by the Dutch leadership for most of his life. However, after a political revolution, the new leadership (William III) sent an aging de Ruyter to the Mediterranean with an under-equipped, inadequate fleet. De Ruyter knew it was a suicide mission but obeyed orders anyway, ultimately dying in battle.
Would you like to explore the specific differences in how these navies handled the brutal logistics of feeding and supplying their crews, or look closer at the evolution of the cannons that dominated these distinct eras?
🇰🇷 Yi Sun-sin, 🇳🇱 Michiel de Ruyter, 🇬🇧 Edward Hawke, 🇫🇷 Pierre André de Suffren, and 🇬🇧 Horatio Nelson Compared Table
Here is a side-by-side comparison of these five legendary naval commanders. While they fought in different centuries and for different empires, looking at them together highlights how naval warfare evolved from the rigid “line of battle” to the chaotic, annihilation-focused tactics of the late Age of Sail.
⚓ Masterpieces of the Sea: A Comparative Overview
| Commander & Nation | Era / Primary Conflict | Defining Tactical Innovation | Most Famous Victory | Ultimate Fate & Legacy |
| 🇰🇷 Yi Sun-sin
(Joseon Korea) |
Late 16th C.
The Imjin War |
Artillery & Terrain: Popularized armored Geobukseon (Turtle Ships) to prevent boarding; masterfully used local tides, whirlpools, and advanced artillery formations (like the “Crane Wing”) against vastly larger fleets. | Battle of Myeongnyang (1597): Defeated an armada of 130+ Japanese ships with a fleet of only 13 vessels by using a churning tidal strait. | Killed in Action: Struck by a bullet at his final victory (Noryang). Leaves behind an impossible, undefeated record of 23-0. |
| 🇳🇱 Michiel de Ruyter
(Dutch Republic) |
Mid-17th C.
Anglo-Dutch Wars |
The Line & The Shallows: Perfected the highly disciplined “line of battle”; pioneered devastating amphibious raids; expertly utilized the shallow draft of Dutch ships to outmaneuver heavier English galleons in treacherous coastal shoals. | Raid on the Medway (1667): Sailed into the English homeland, burned the docked Royal Navy, and stole their flagship. | Killed in Action: Mortally wounded by a cannonball at the Battle of Augusta. Remembered as the absolute savior of the Dutch Republic. |
| 🇬🇧 Edward Hawke
(Great Britain) |
Mid-18th C.
Seven Years’ War |
The Relentless Blockade: Replaced cautious maneuvering with a doctrine of absolute pursuit and year-round, grueling blockades, trapping enemy fleets in their ports regardless of brutal winter weather. | Battle of Quiberon Bay (1759): Chased the French fleet into a deadly, reef-filled bay during a raging winter storm, utterly destroying them. | Peaceful Retirement: Survived the wars and died peacefully in 1781. His aggressive doctrines laid the absolute foundation for the First British Empire. |
| 🇫🇷 Pierre André de Suffren
(France) |
Late 18th C.
American Revolutionary War |
Annihilation over Preservation: Broke the rigid French doctrine of firing at enemy rigging to escape. He aggressively sought to break the enemy line, isolate sections of their fleet, and scavenge British supplies to keep his cutoff fleet alive. | The Indian Ocean Campaign (1782–1783): Fought five brutal, drawn-out battles against the British, fighting them to a standstill without a friendly port. | Sudden Death: Died suddenly in Paris in 1788 (rumored to be from a duel) just before the French Revolution. Highly respected even by his British adversaries. |
| 🇬🇧 Horatio Nelson
(Great Britain) |
Turn of the 19th C.
Napoleonic Wars |
The “Nelson Touch”: Completely discarded the parallel “line of battle.” He deliberately sailed his columns perpendicularly directly into the enemy line, forcing a chaotic, close-quarters melee where British gunnery speed and discipline reigned supreme. | Battle of Trafalgar (1805): Annihilated the combined French and Spanish fleets, permanently ending Napoleon’s threat of a cross-Channel invasion. | Killed in Action: Shot by a French sniper on the deck of the HMS Victory at the moment of his greatest triumph. Secured British naval dominance for a century. |
Would you like me to dive into a specific comparison between two of these commanders—such as how Suffren’s aggressive tactics in the Indian Ocean heavily influenced Nelson’s later masterpiece at Trafalgar?